Decorist: Caroline’s Guest Bedroom

Happy Friday, all! It’s been a busy one around here trying to get unpacked and readjusted to our normal routine after the long trip. But we have no plans this weekend, so hopefully we can fit in a bit of relaxing around all of the remaining cleaning and loads of laundry!

As promised, I wanted to share the third project I worked on for my sweet client, Caroline, in the lovely old house in New Orleans. As with the master bedroom, she wanted this room to have an eclectic modern feeling with a hint of bohemian flair, tons of cozy texture, and a sophisticated color palette that flowed with the other rooms in her home. This room was a blank slate, with no existing items to work with (besides some AMAZING floor to ceiling windows if that counts!), which is always super fun! Caroline wanted a comfortable, functional, and gorgeous guest room to host the myriad of visitors that would inevitably come through once her little bundle of joy arrived. While her original thought was just a bed and some sort of clothes storage (as there is no closet), I also thought we should explore some additional seating, suitcase storage, and workspace options to make her guests more comfortable on their stay. So after selecting a couple of the staple pieces, here are the concepts I created for her.

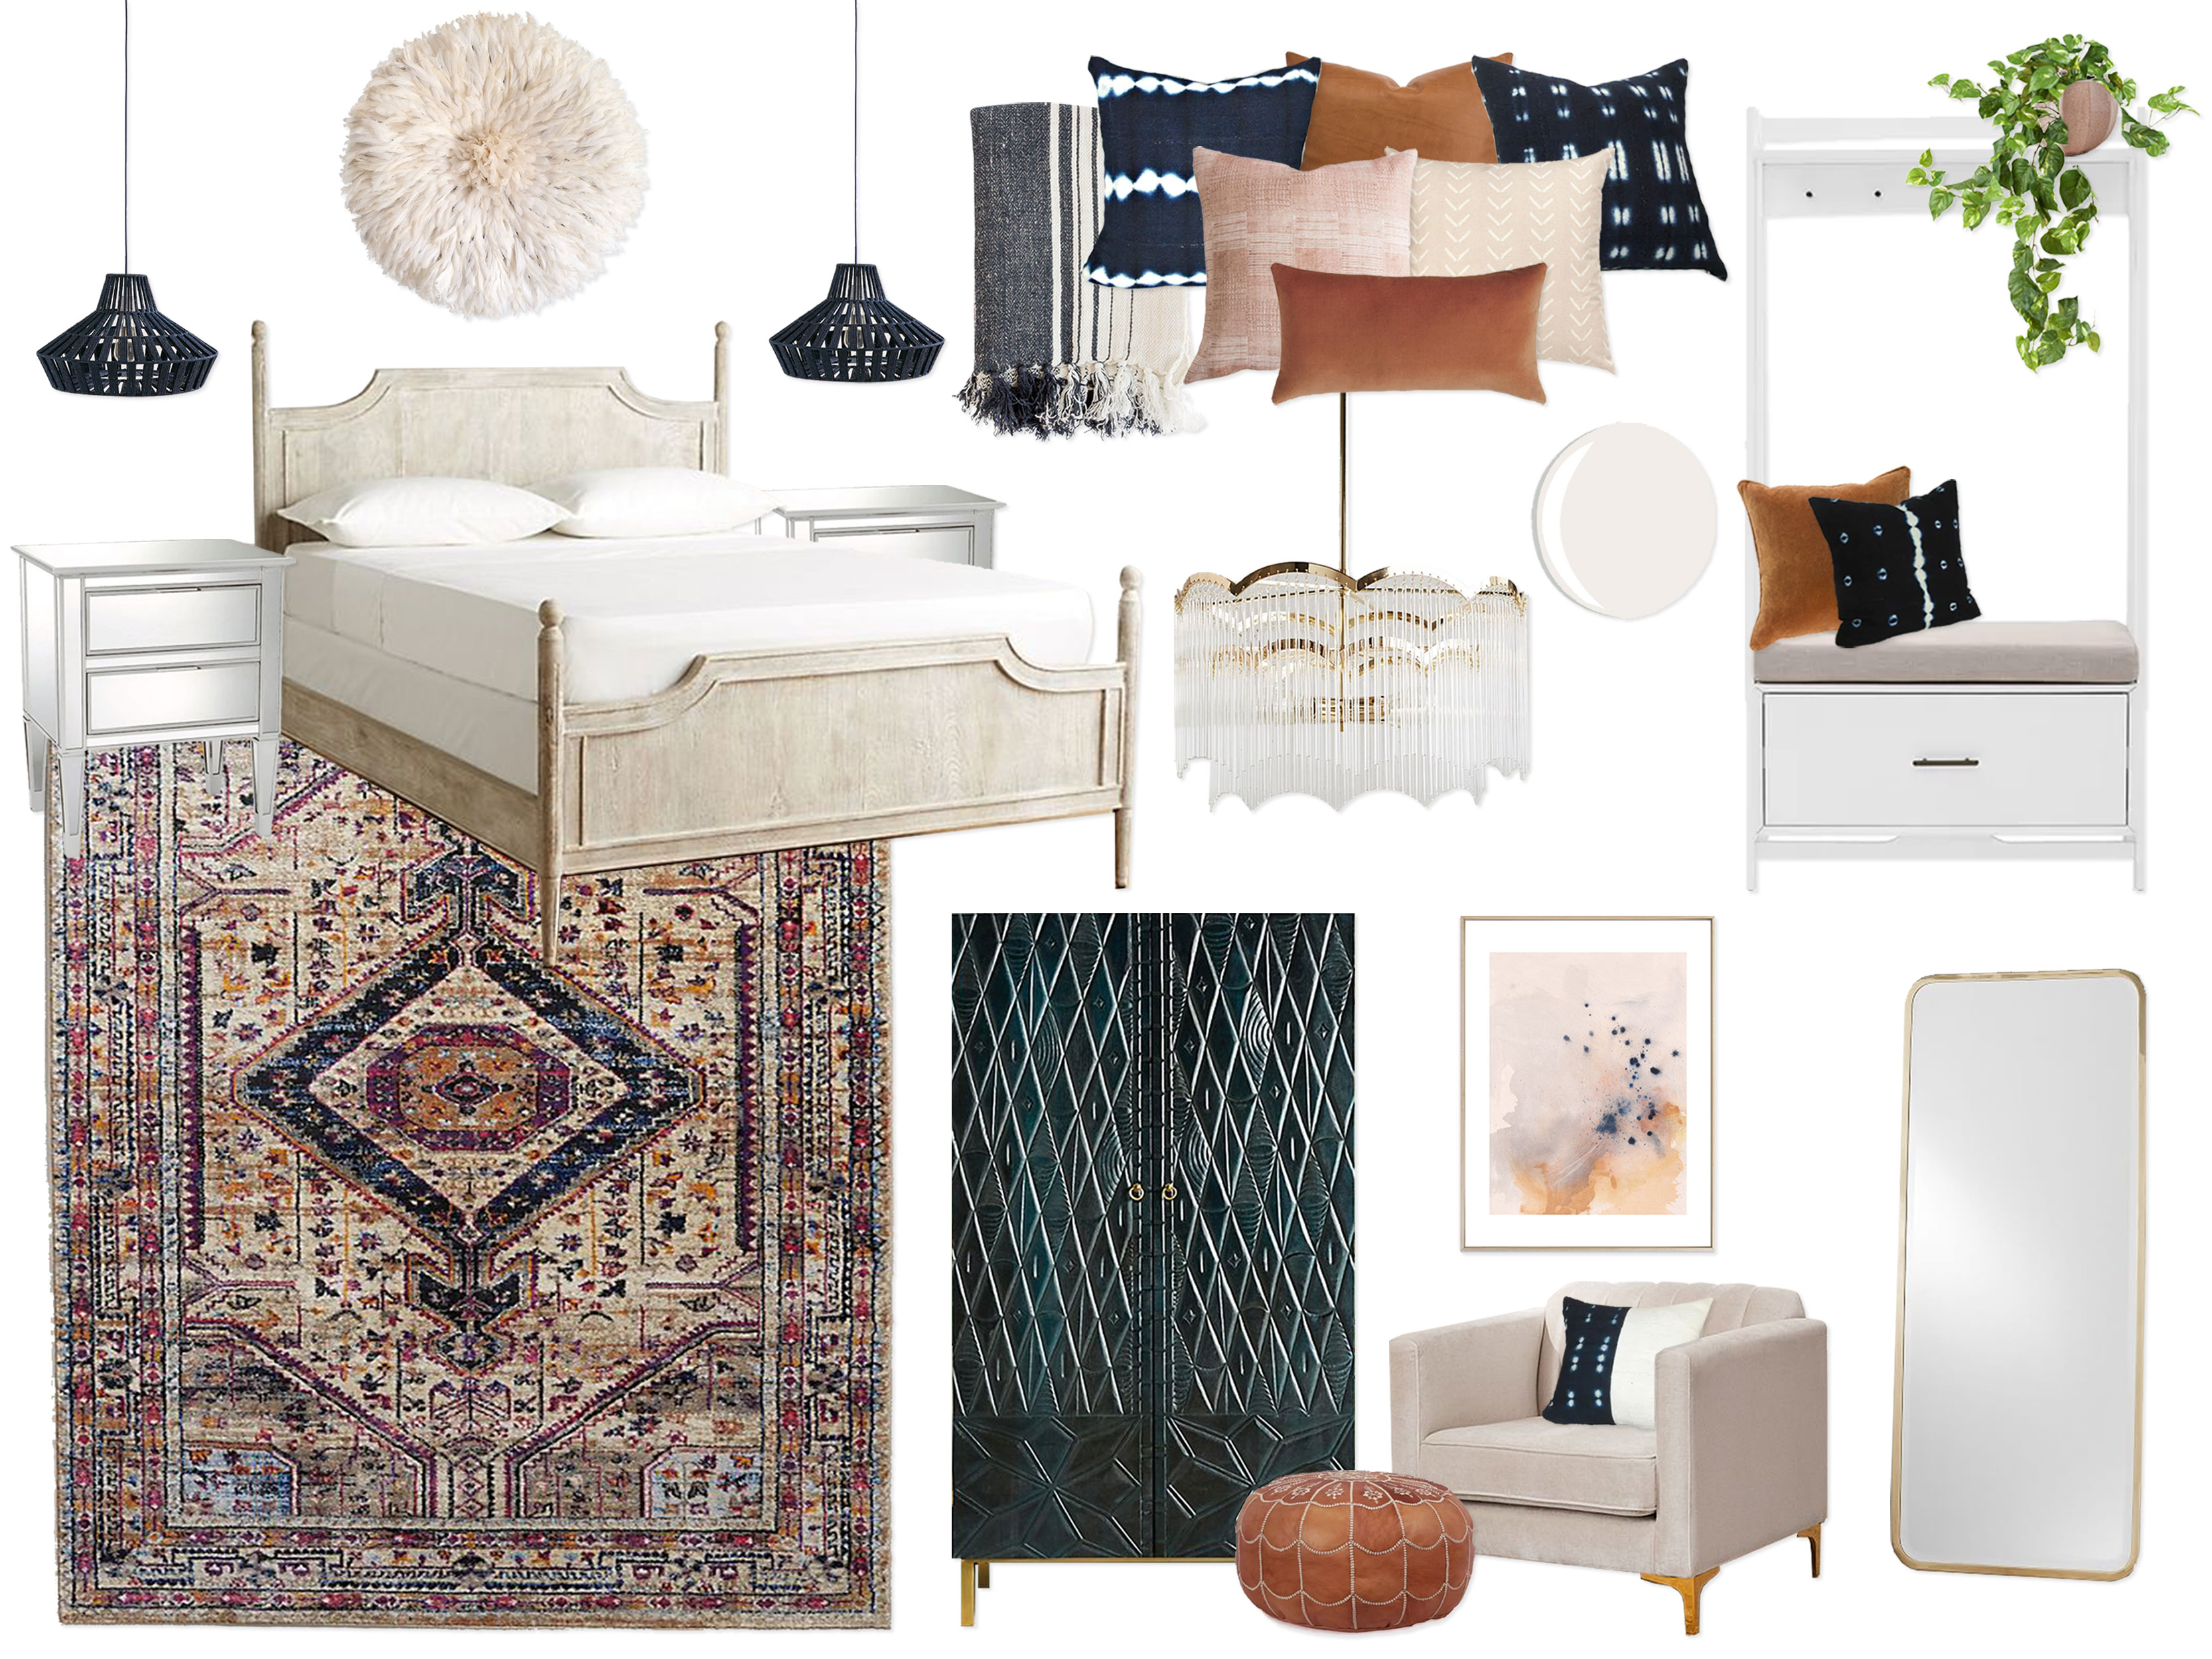
Concept 1: Deep Indigo, Blush & Cognac

(click image to enlarge)

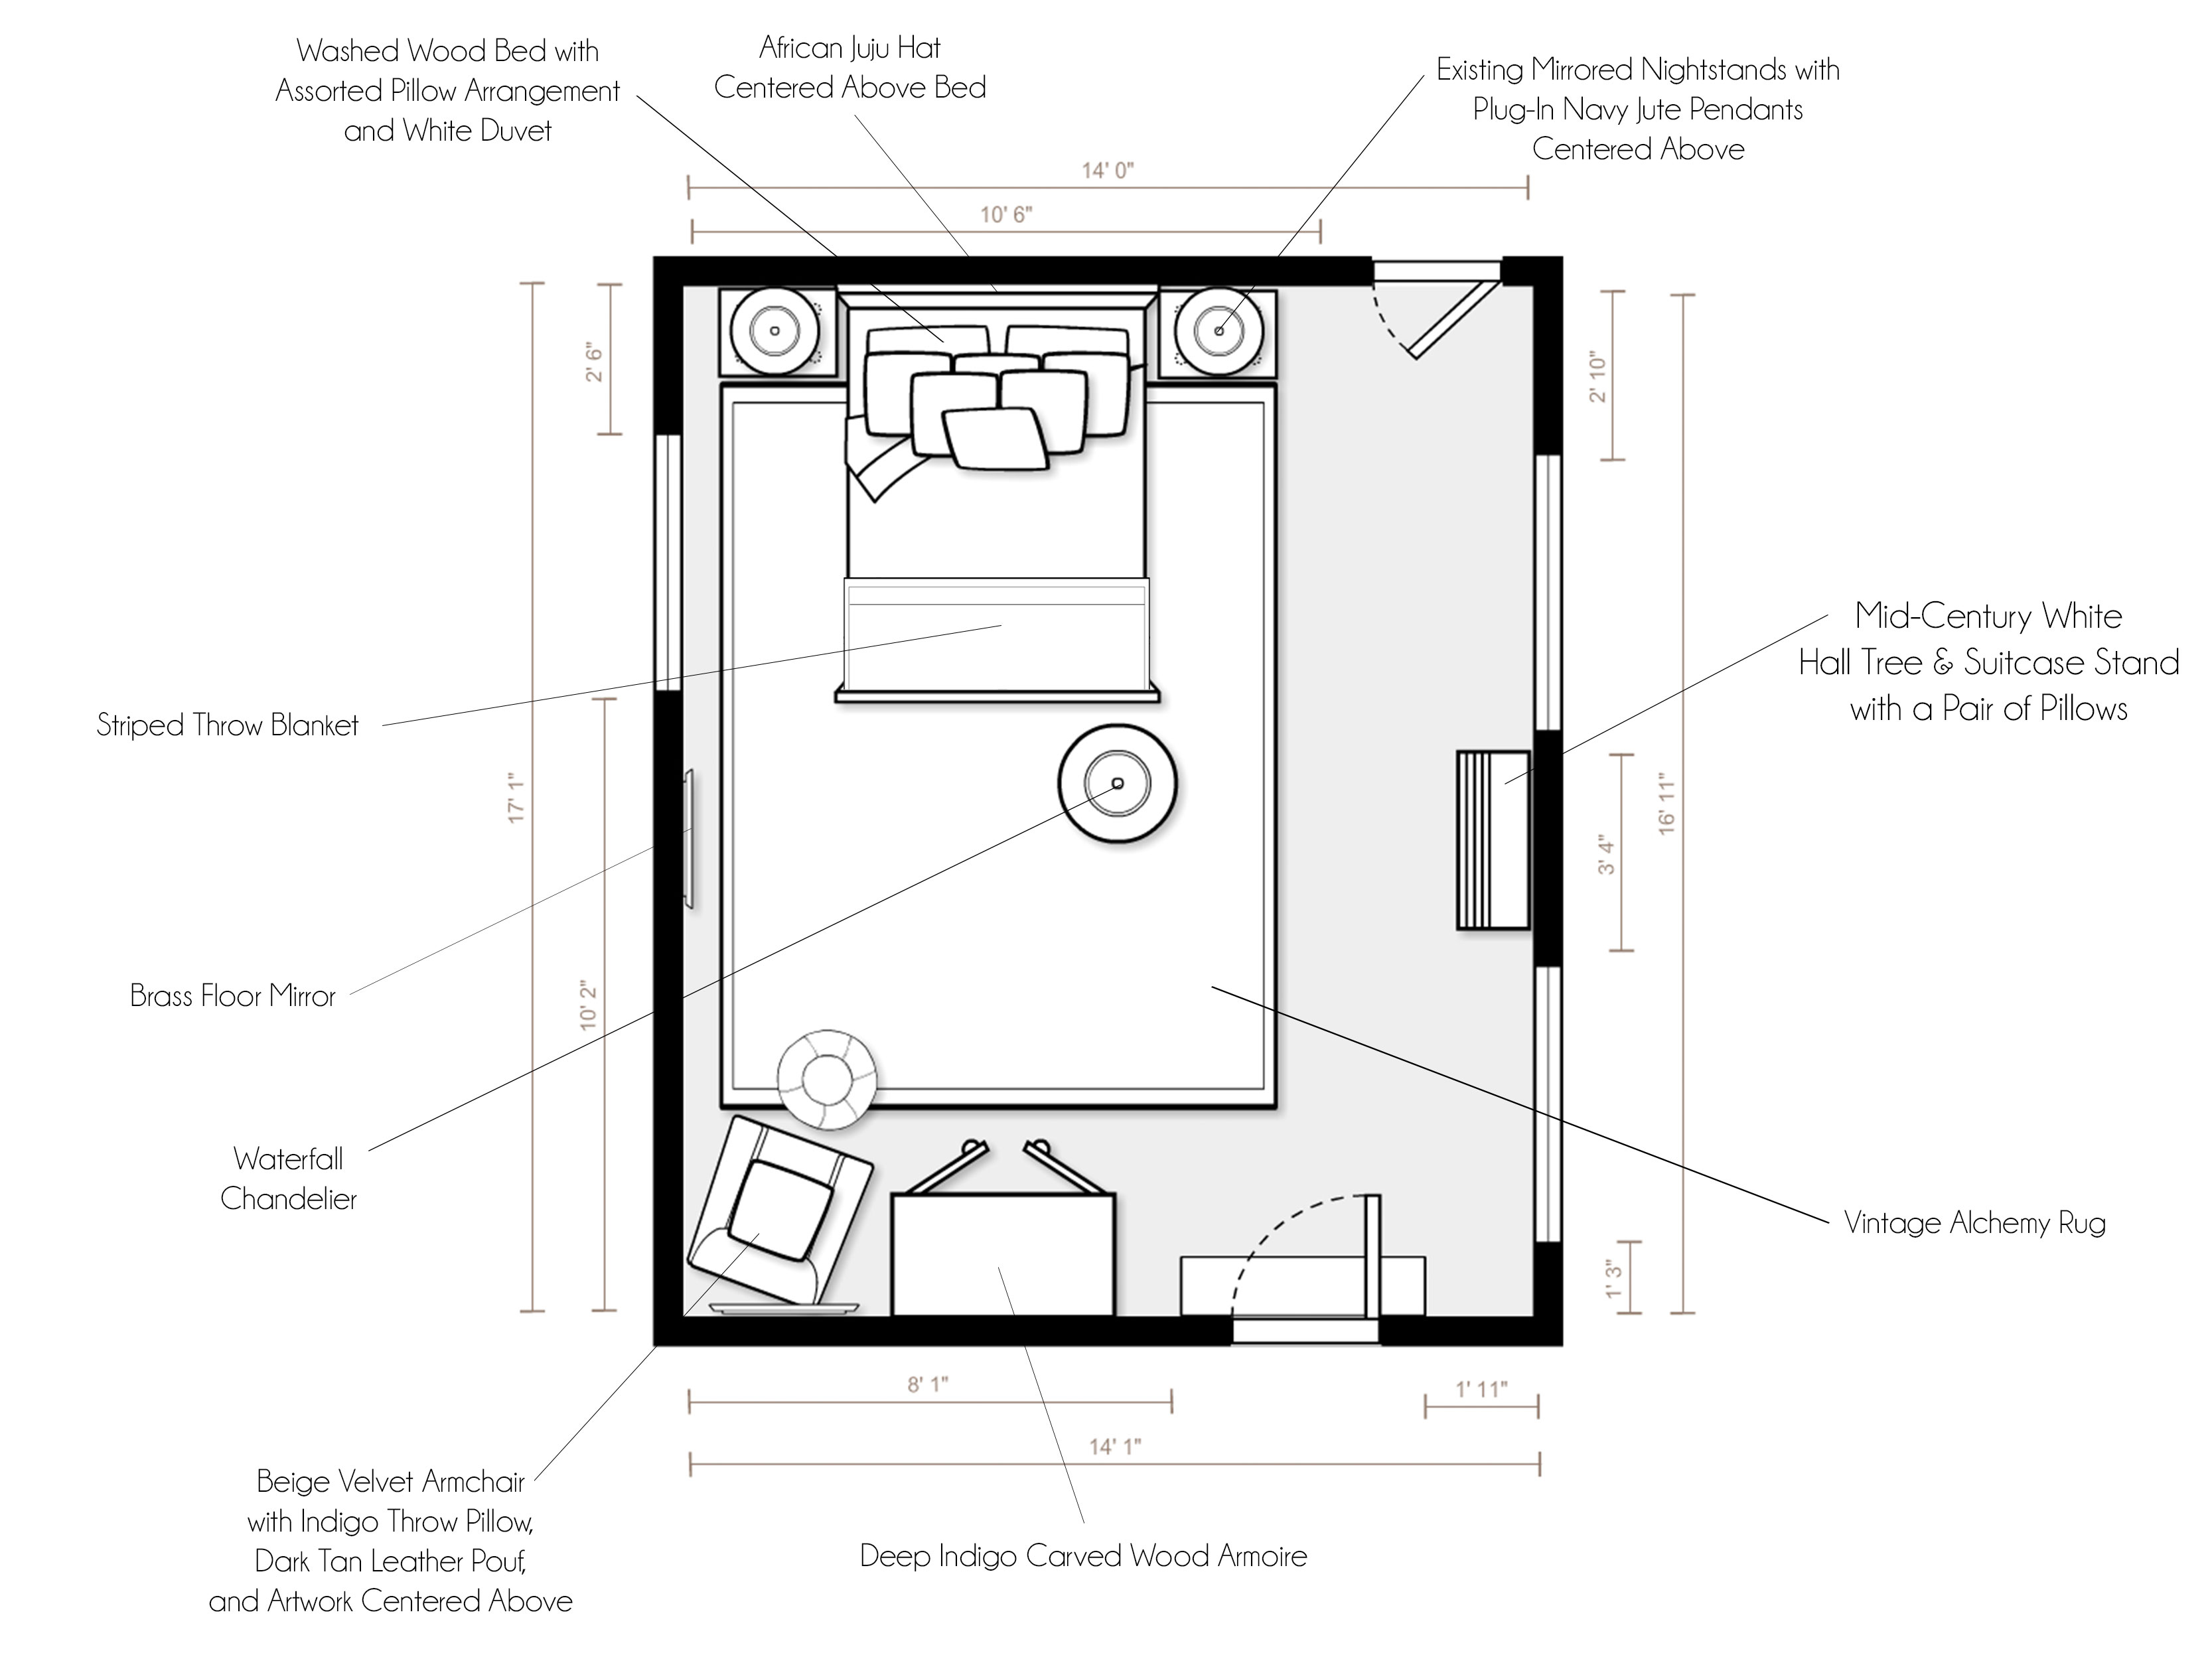
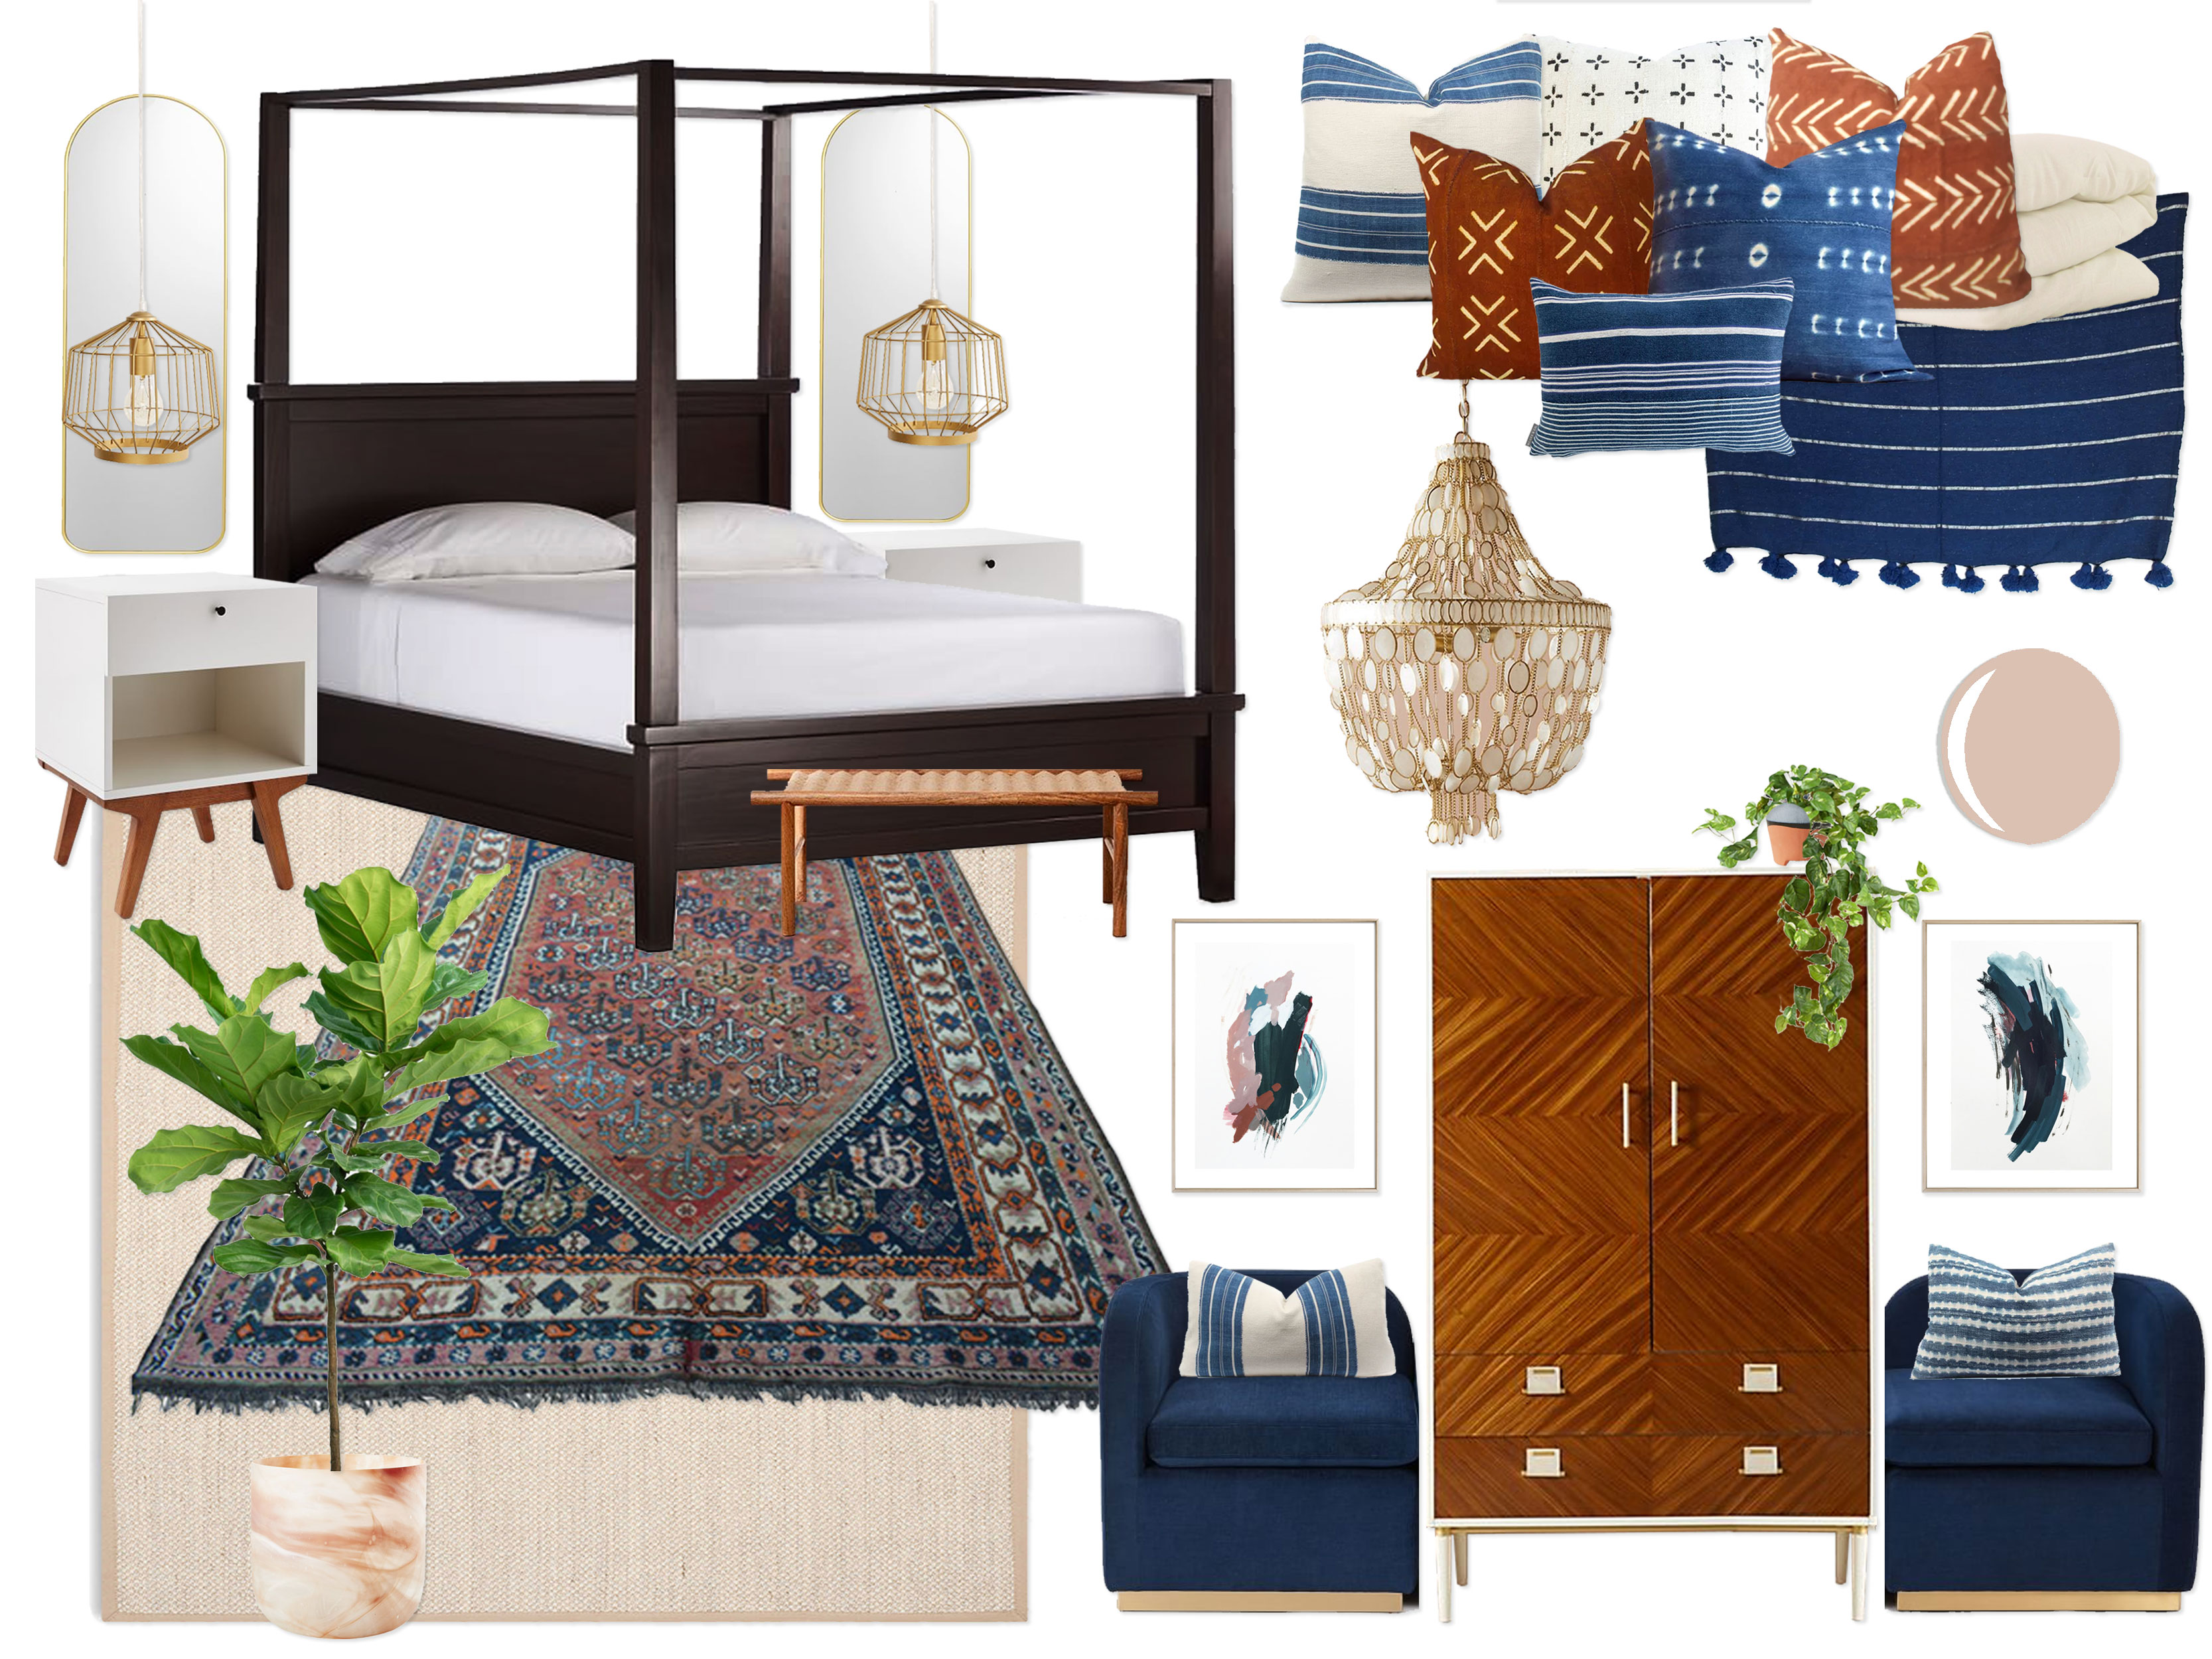
“Inspired by the neutral yet high contrast palettes in your inspiration photos, this design embraces the elegance of layered neutral tones (bright white, warm ivory, and sand) with pops of high contrast deep indigo and rich cognac, as well as metallic accents in brass. The walls are painted in the same crisp off-white (BM White Dove) as the rest of your home, creating the perfect clean, fresh foundation to let the color palette really pop. Setting the tone for the entire color palette in the space is the show-stopping medallion rug. A lovely washed wood bed is surrounded by your existing mirrored nightstands, as well as two plug-in indigo jute pendant lights. Centered above the bed is a jaw-dropping feather African Juju Hat, which gives the modern elegant space a hint of natural bohemian charm. Giving the room personality, coziness, and visual interest are the array of amazing pillows of deep indigo dye, cognac leather & velvet, sand mudcloth, and blush patchwork, as well as a striped indigo throw blanket draped across the bottom of the bed (which has a crisp bright white duvet). Not to be outdone by the incredible bed and rug, a jaw-dropping deep indigo and brass carved armoire sits on the wall opposite the bed and provides lots of clothes storage space for your guests. Floating next to the armoire is a lovely beige velvet chair for guests to sit, complete with a deep indigo pillow, cognac leather pouf ottoman, and beautiful piece of artwork centered above. Adding a few more convenient and comfortable touches for your guests, the room also boasts a gorgeous floor length brass mirror for outfit checks, as well as a white midcentury hall tree and bench (with two lovely throw pillows) for taking off shoes and hanging jackets, which also doubles as a suitcase station if needed with the cushion removed! These multi-purpose touches will ensure your guests have a comfortable and functional stay. No room would be complete without it’s eye candy, so the final touch in the space is a magnificent curved arch waterfall chandelier. Calming, fresh, modern, packed with cozy texture, and complete with a punch of bold contrast, this elegant design creates a perfect luxurious and functional guest suite for all of your friends & family already booking their visits to come meet the new bundle of joy!”

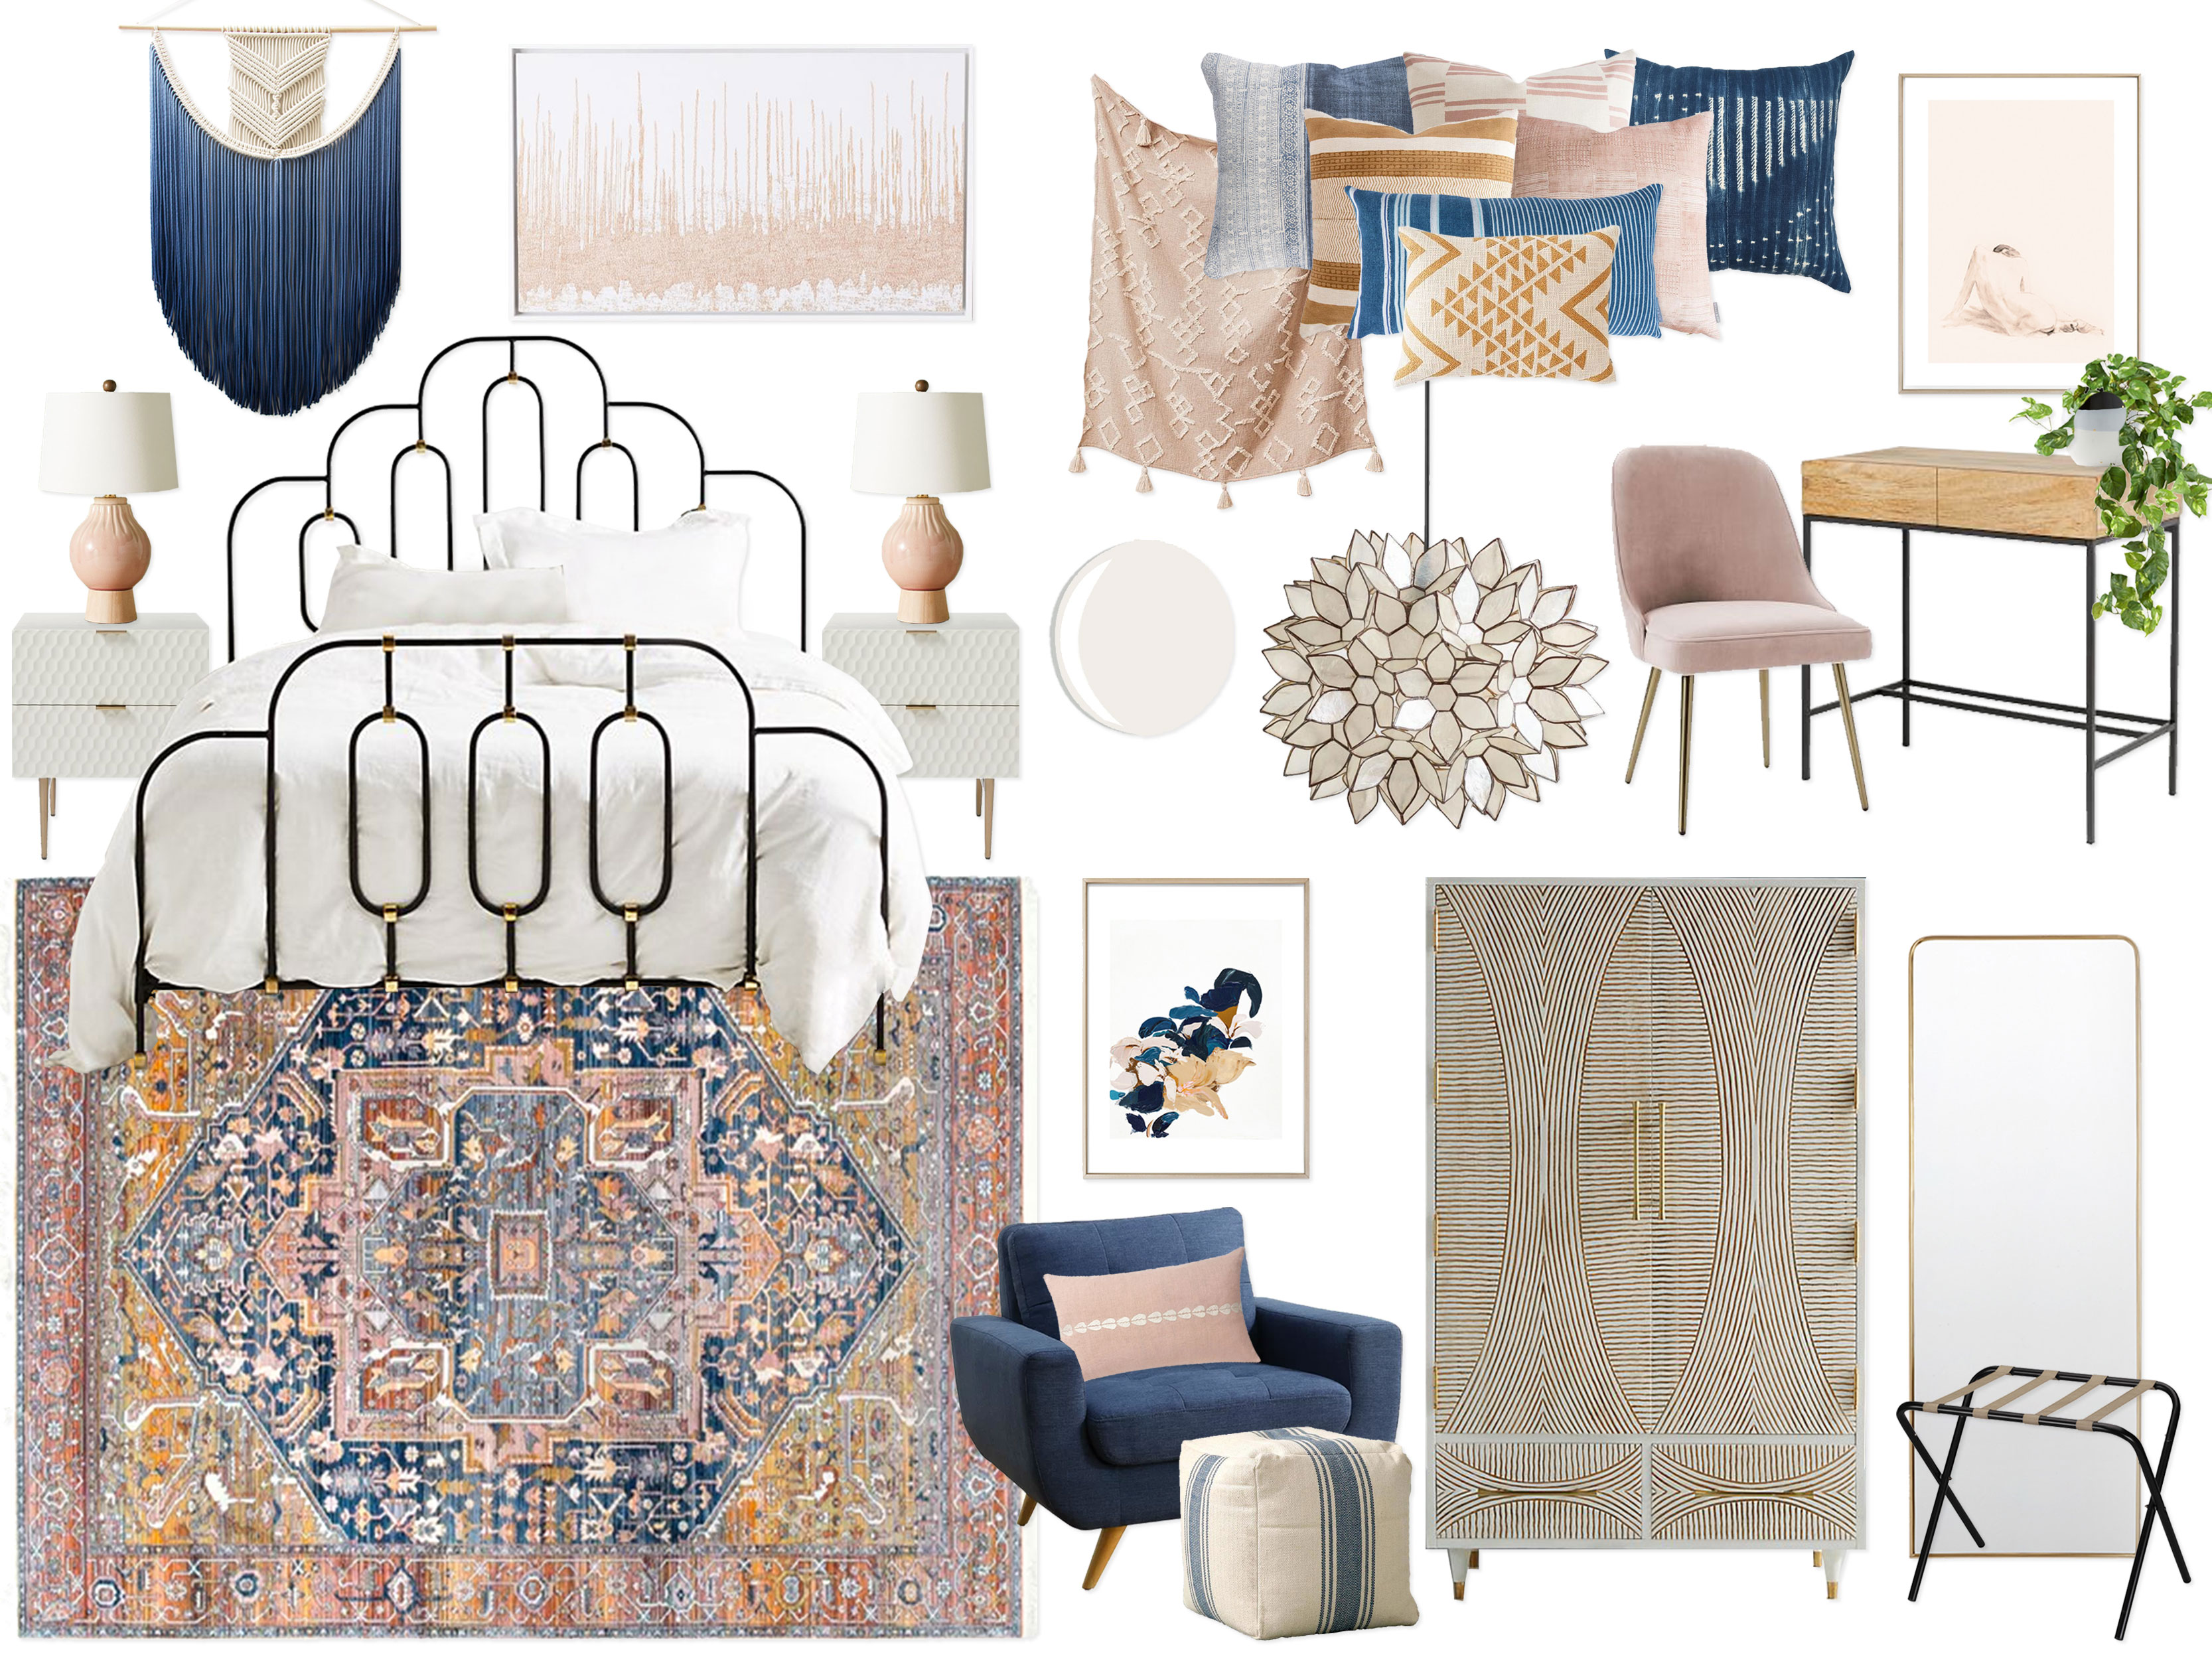
Concept 2: Denim Blue, Blush, Mustard & Natural Wood

(click image to enlarge)

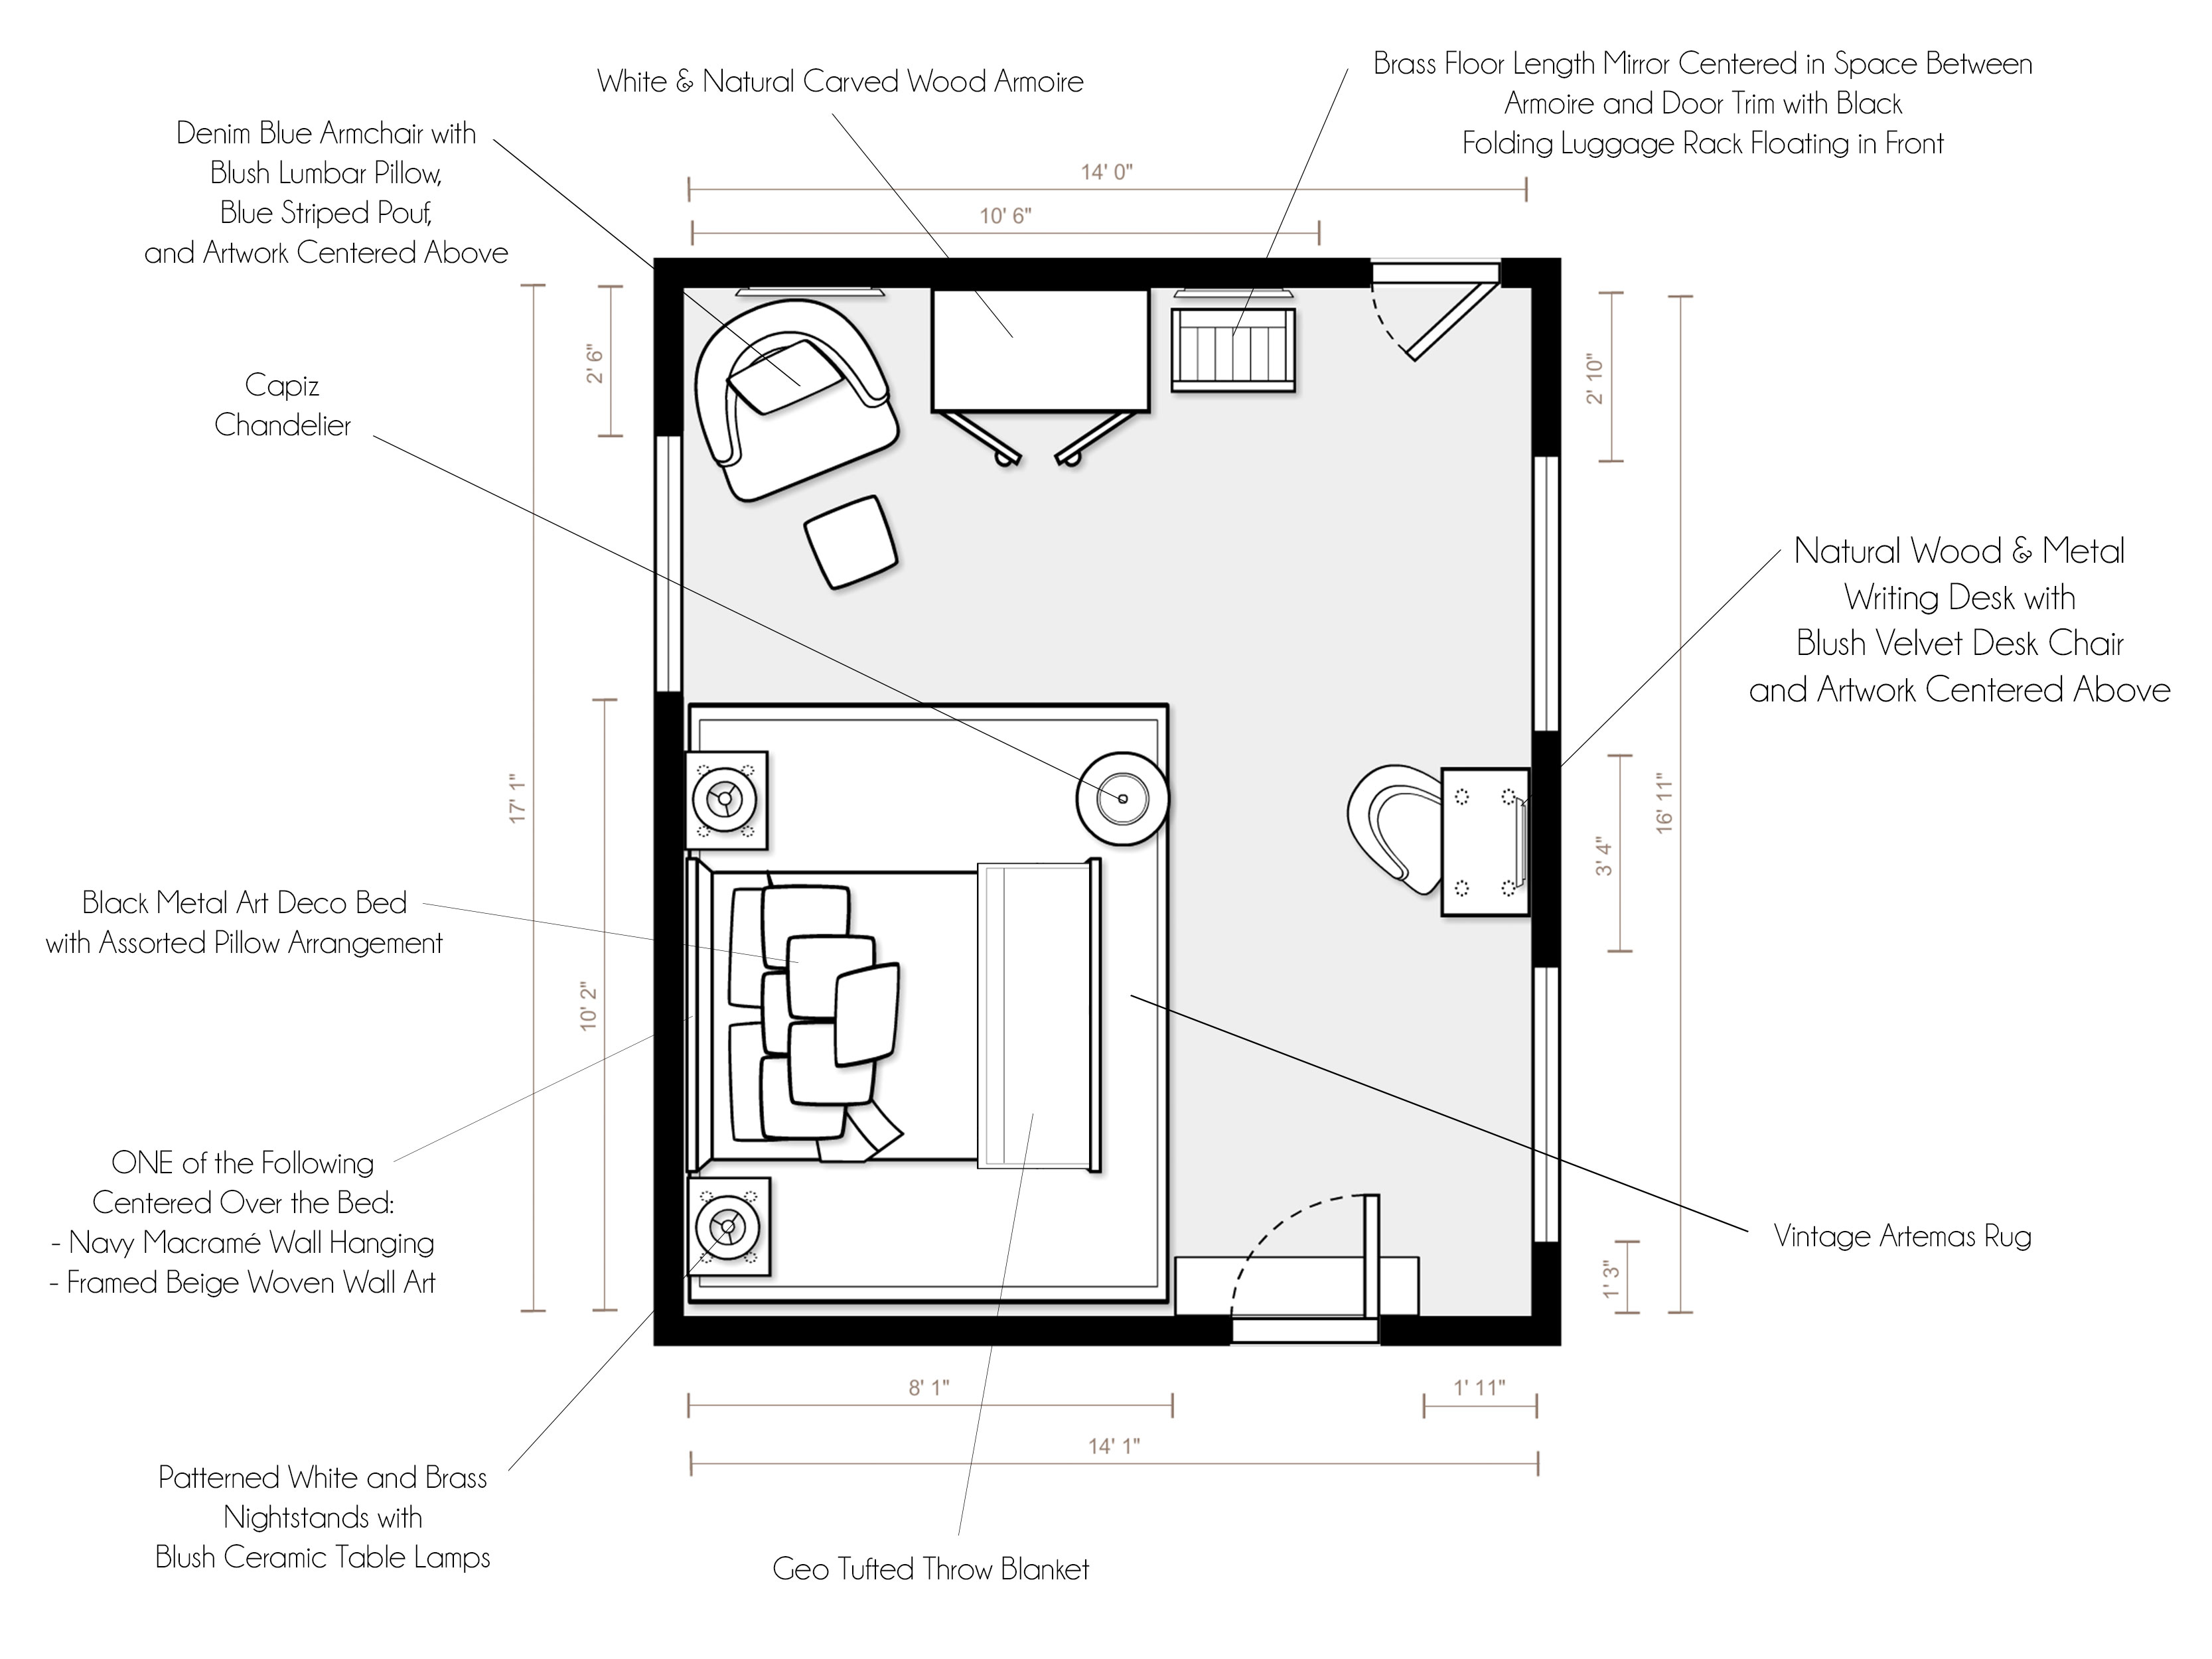
“Sparked by your many inspiration images with colorful yet sophisticated color palettes, this design embodies a modern vibe with a hint of a bohemian spirit, complete with a beautiful color palette of navy, denim blue, bright white, blush, and mustard, as well as natural wood tones and metallic brass accents. To flow consistently with the rest of your home and create a fresh backdrop for the space, the walls are painted the same crisp off-white as the other rooms in your home (BM White Dove). Creating the color palette for the entire room, the incredible Persian rug takes center stage. An outstanding black metal Art Deco bed is outfitted with the most amazing dyed indigo, denim blue striped, blush striped & textured, and mustard patterned pillows, as well as a crisp bright white duvet and a rosy beige geo tufted throw blanket at the bottom of the bed. On either side of the bed sit two lovely textured modern white and brass nightstands, both of which have beautiful blush ceramic table lamps on top. Centered above the bed, you have a choice of a more bohemian navy ombre macrame wall hanging or a more modern framed beige woven wall hanging. Both have a handmade, natural feeling while creating an incredible focal point on the bed wall. Once again, not to be rivaled by the wonderful bed, a magnificent natural wood, white, and brass carved wood armoire sits on the wall leading to the bathroom and is the first thing you see when you enter. The armoire is flanked on one side by a denim blue armchair (complete with a blush lumbar pillow, striped denim square pouf, and a lovely piece of artwork centered above) and a full length brass mirror and folding, portable black metal luggage rack on the other, creating the perfect area for guests to store clothes, get dressed, relax, and make themselves at home. Another touch to ensure guests will have a comfortable, convenient (and productive) stay is the small natural wood and black metal writing desk with blush velvet desk chair and artwork centered above… now they can get a little work done while the baby (and you!) nap. A geometric capiz shell chandelier finishes off the space with a modern, natural, bohemian flair! This design walks the fine line between modern & bohemian, colorful & refined, elegant & fun, and luxurious & humble with an elegance that makes it a perfect oasis for all of your visitors in town to meet your baby!”

After reviewing these guest room concepts, as well as her master bedroom concepts at the same time, Caroline’s feedback sent this project down a super fun path! Usually the client loves one concept or blends the two concepts to an extent. As you recall, Caroline chose concept 1 outright for her master bedroom. However, there were elements of master bedroom concept 2 that Caroline loved and couldn’t get out of her head! So what she wanted to do was blend all three of the remaining concepts to create the perfect final design for her guest space! Here is the second master bedroom concept as a reminder:

So here is what she decided she wanted from each one:

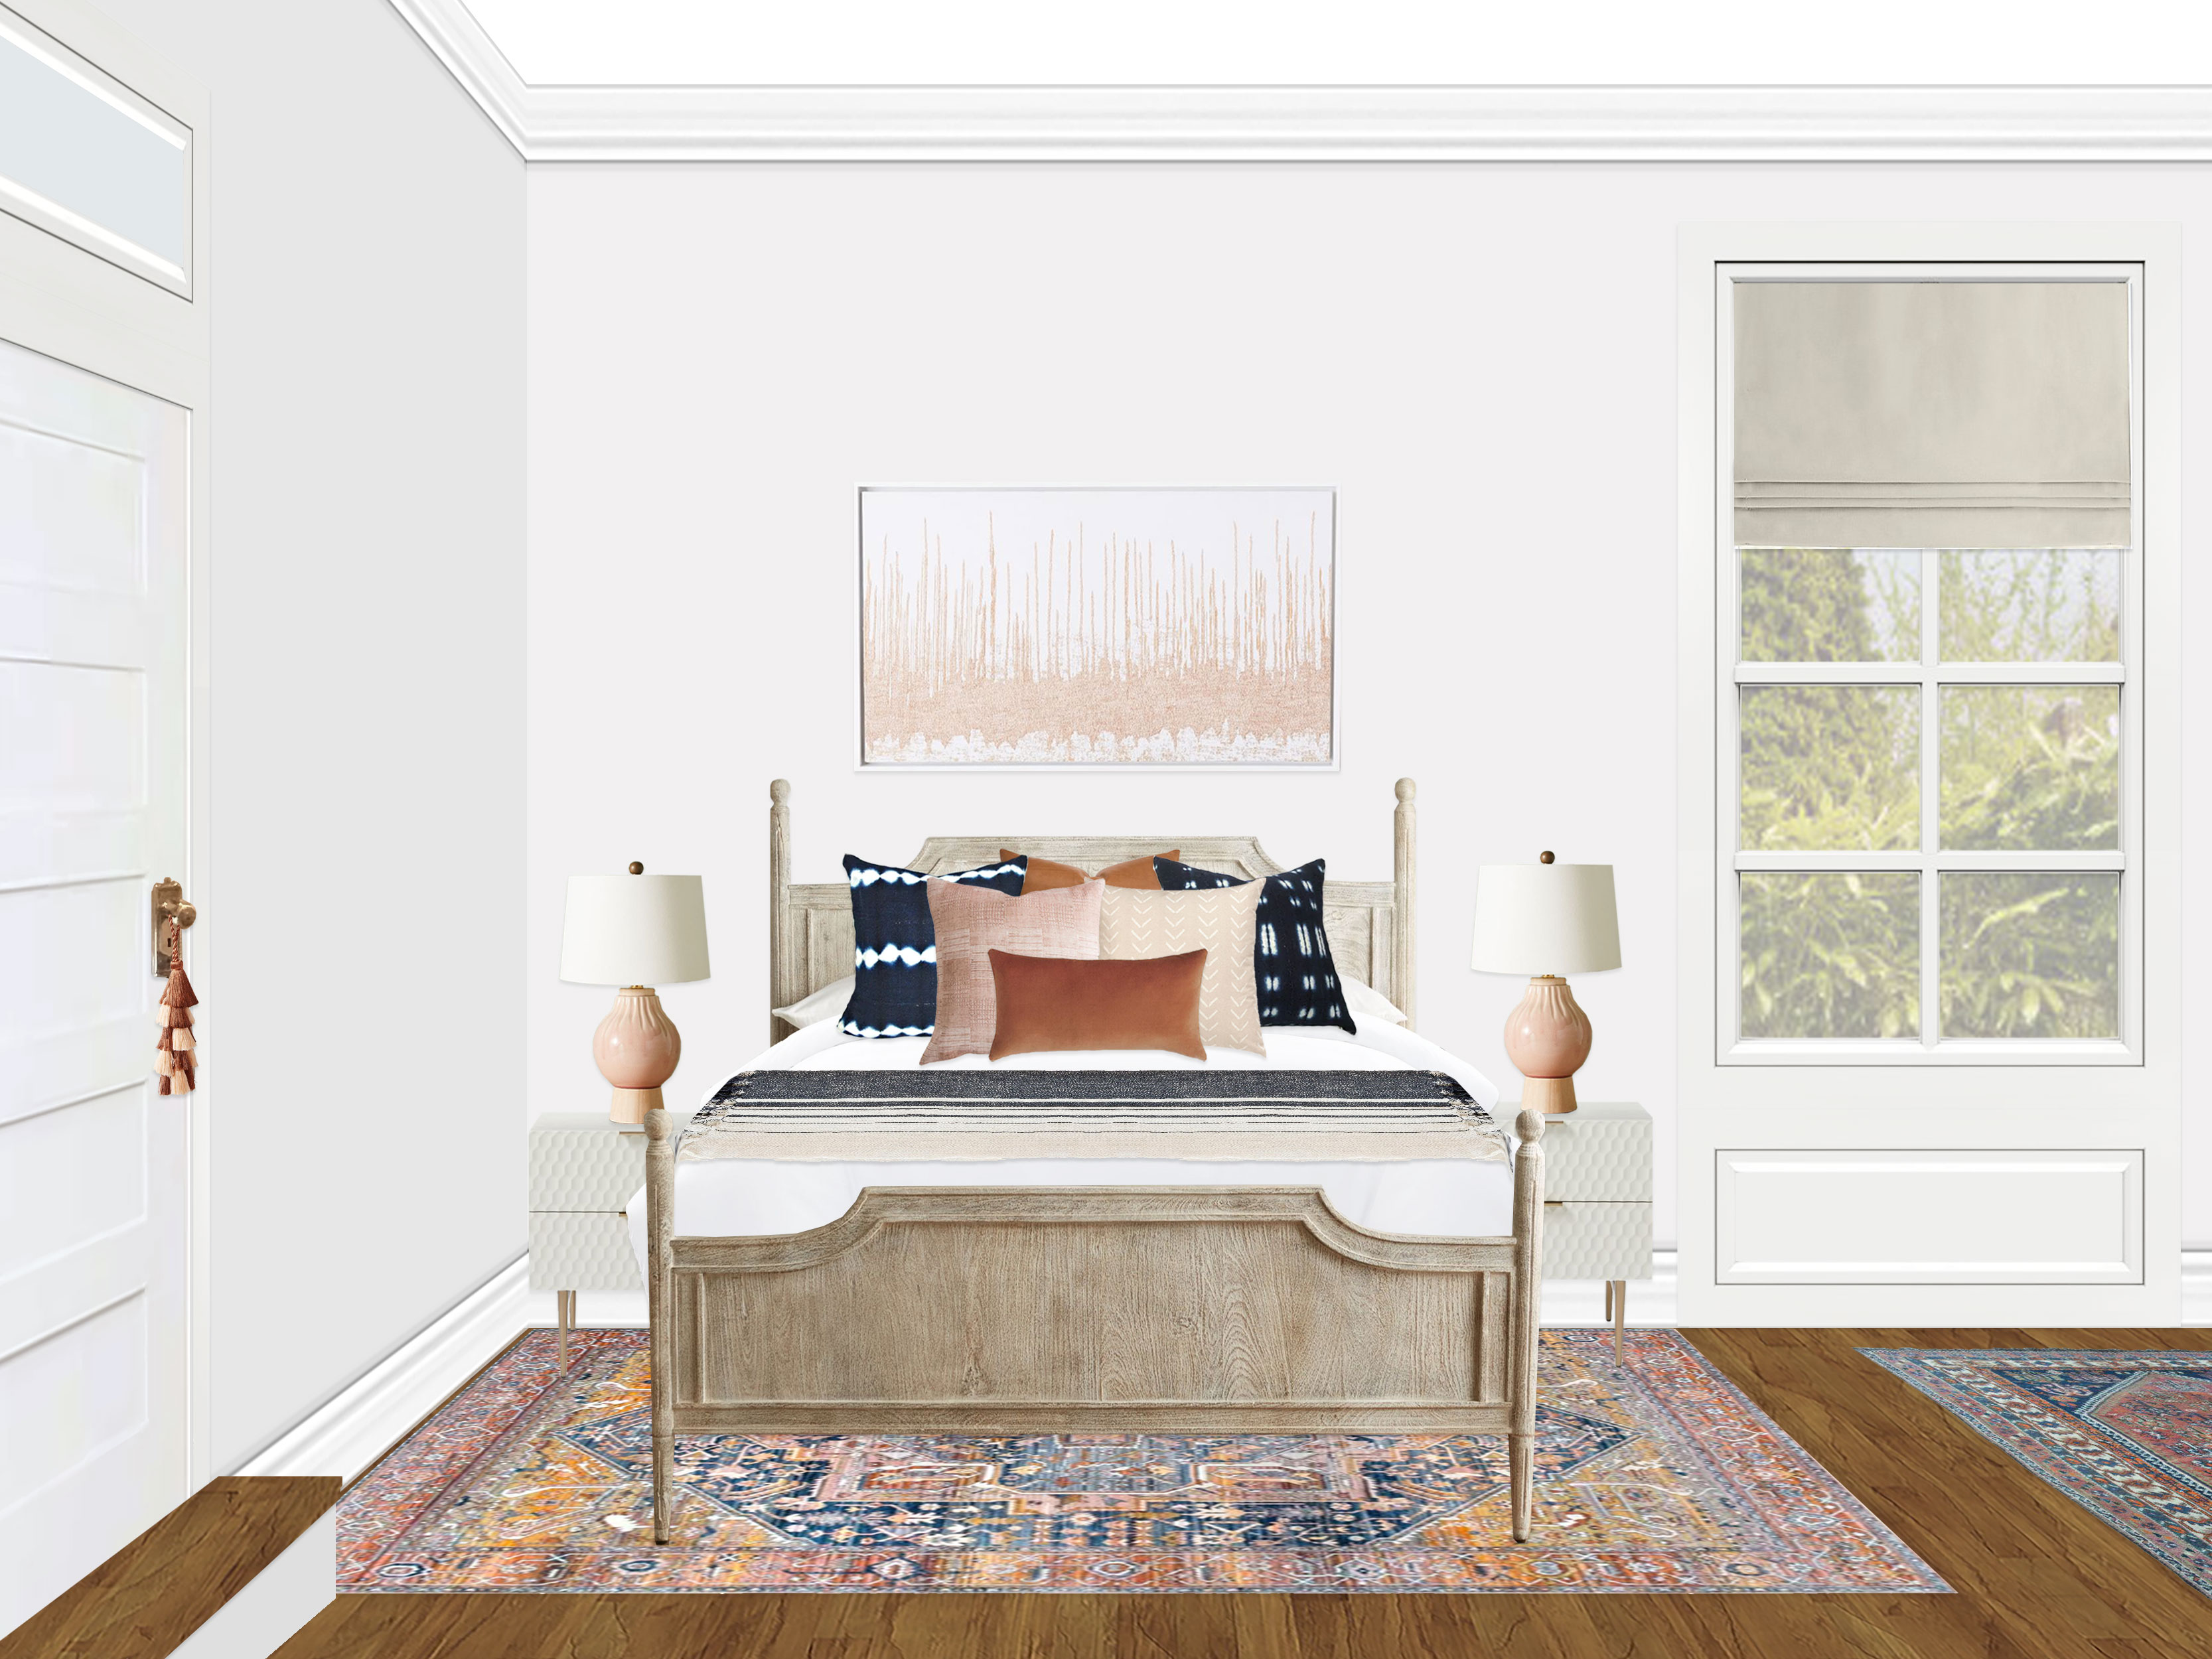
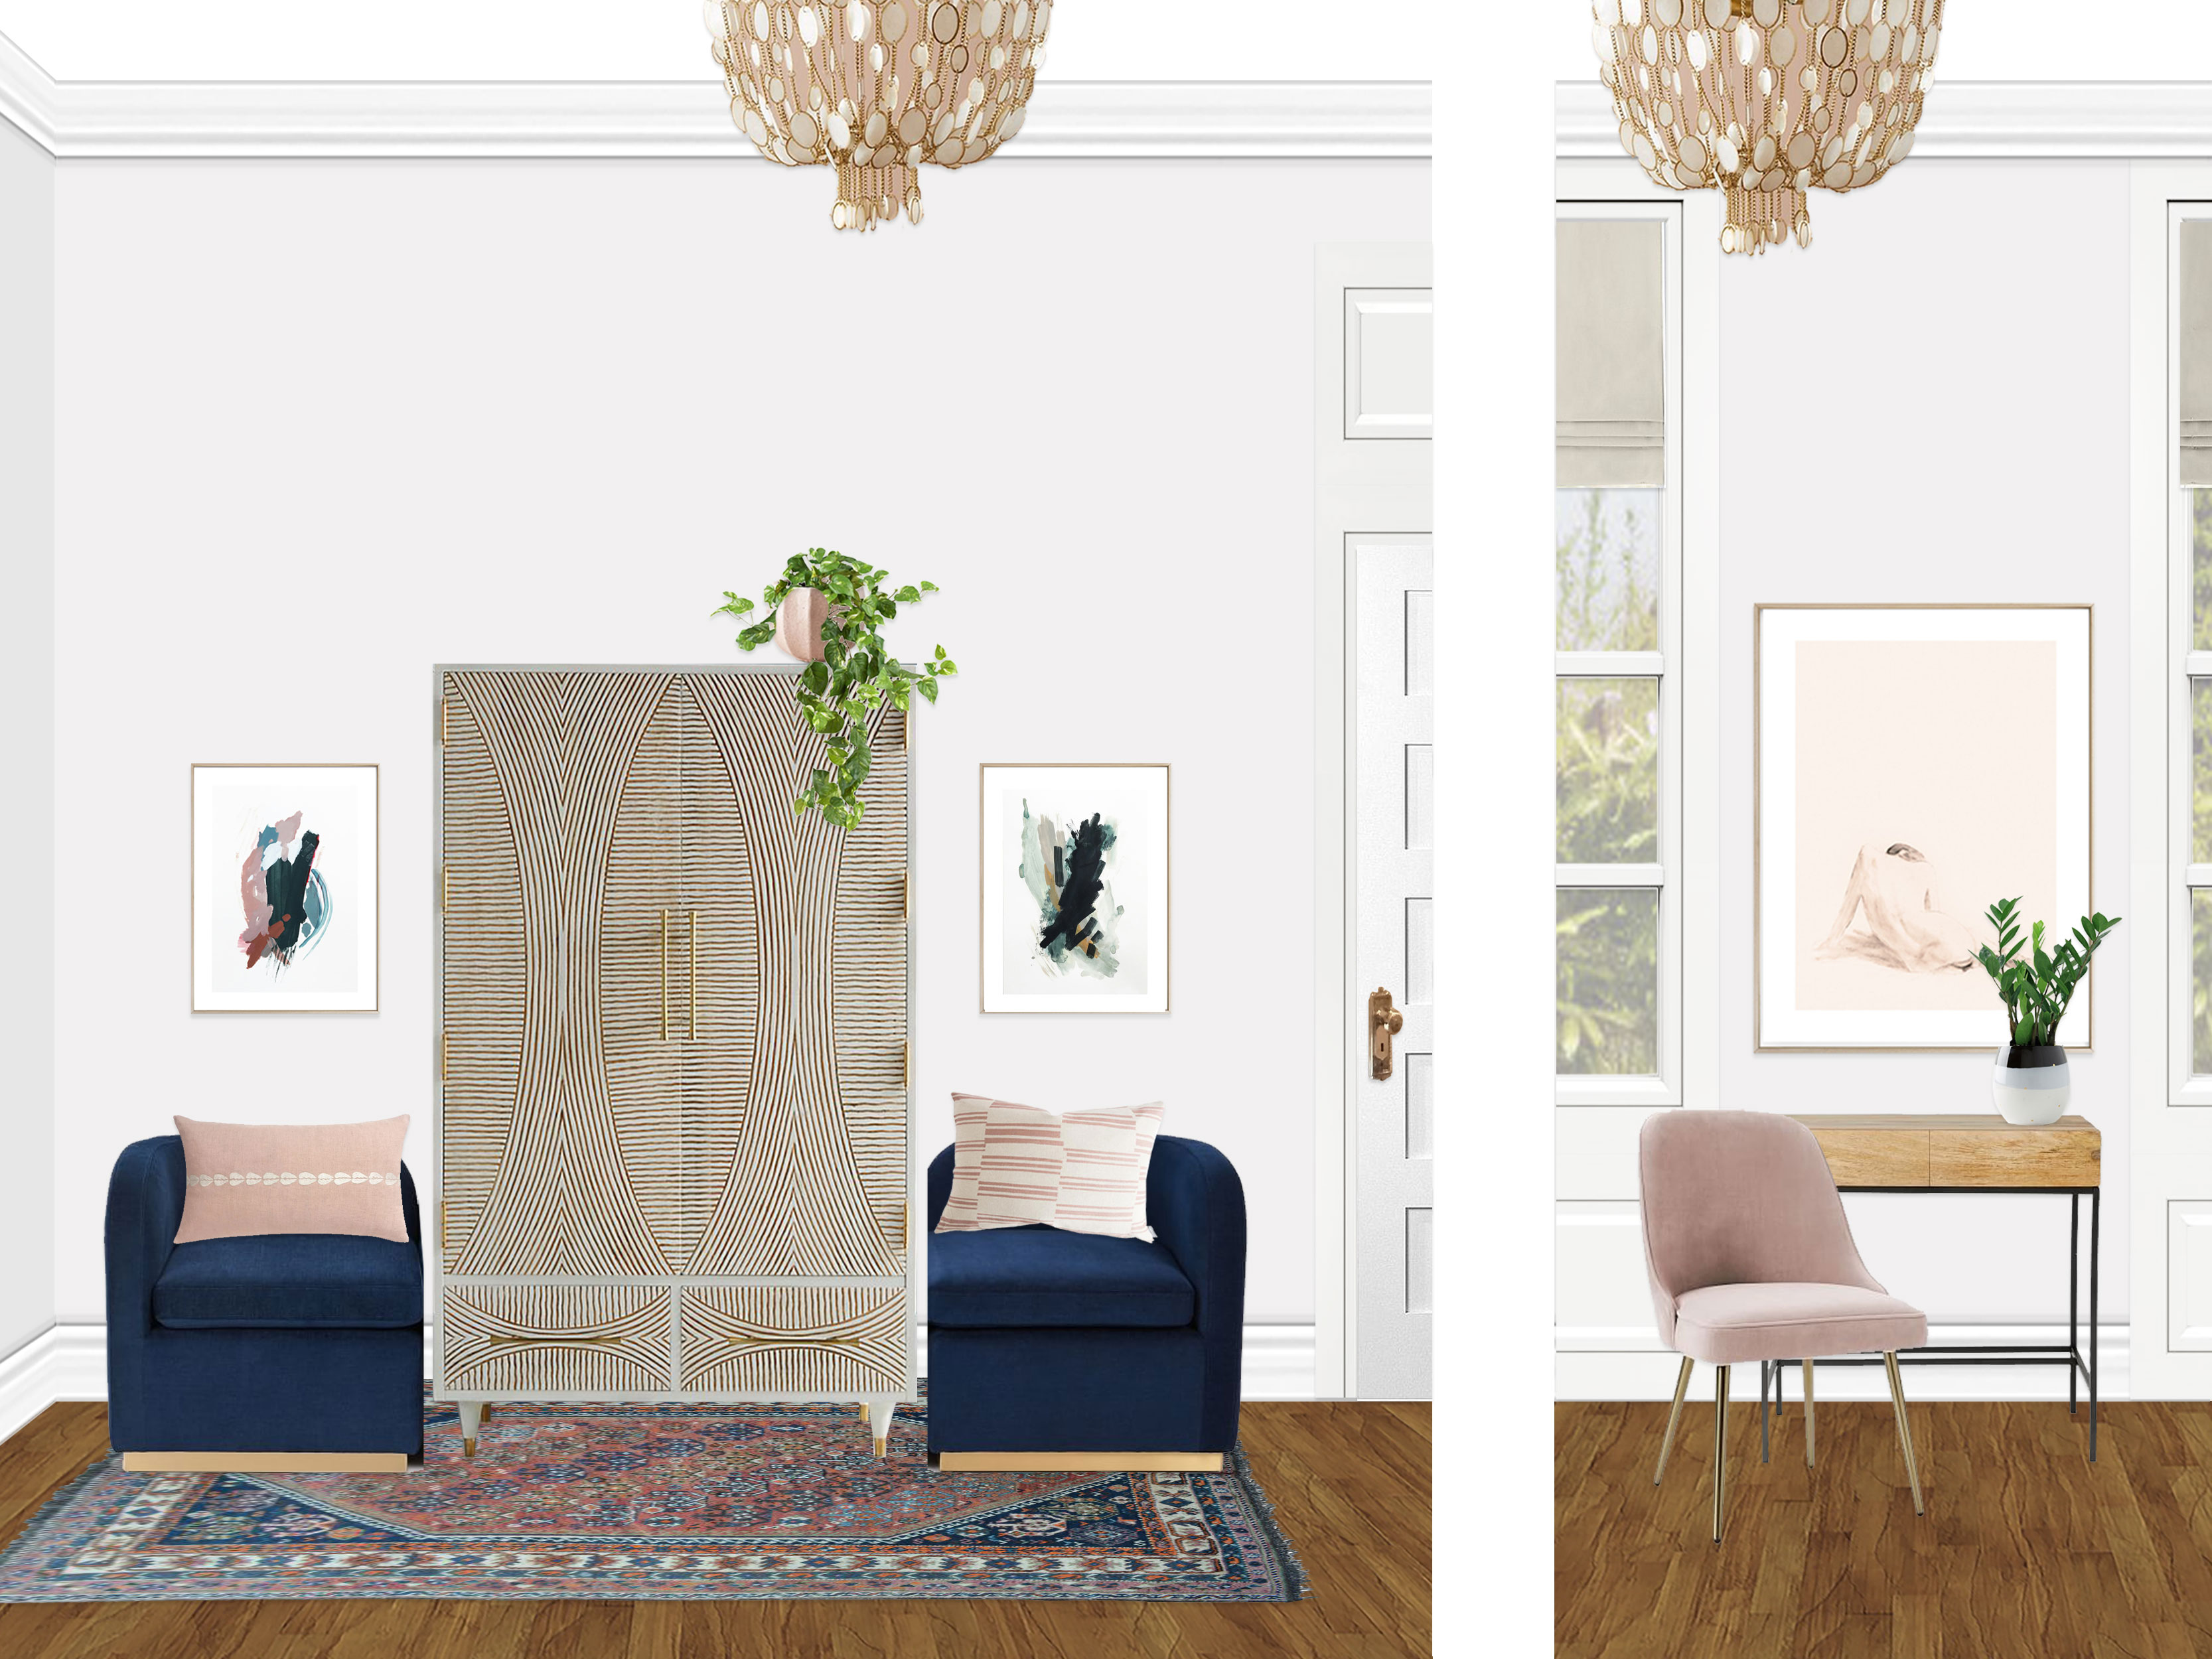
I combined all of these elements together for her, made a couple more tweaks, and here is the final design!

(click image to enlarge)

“Setup Instructions:

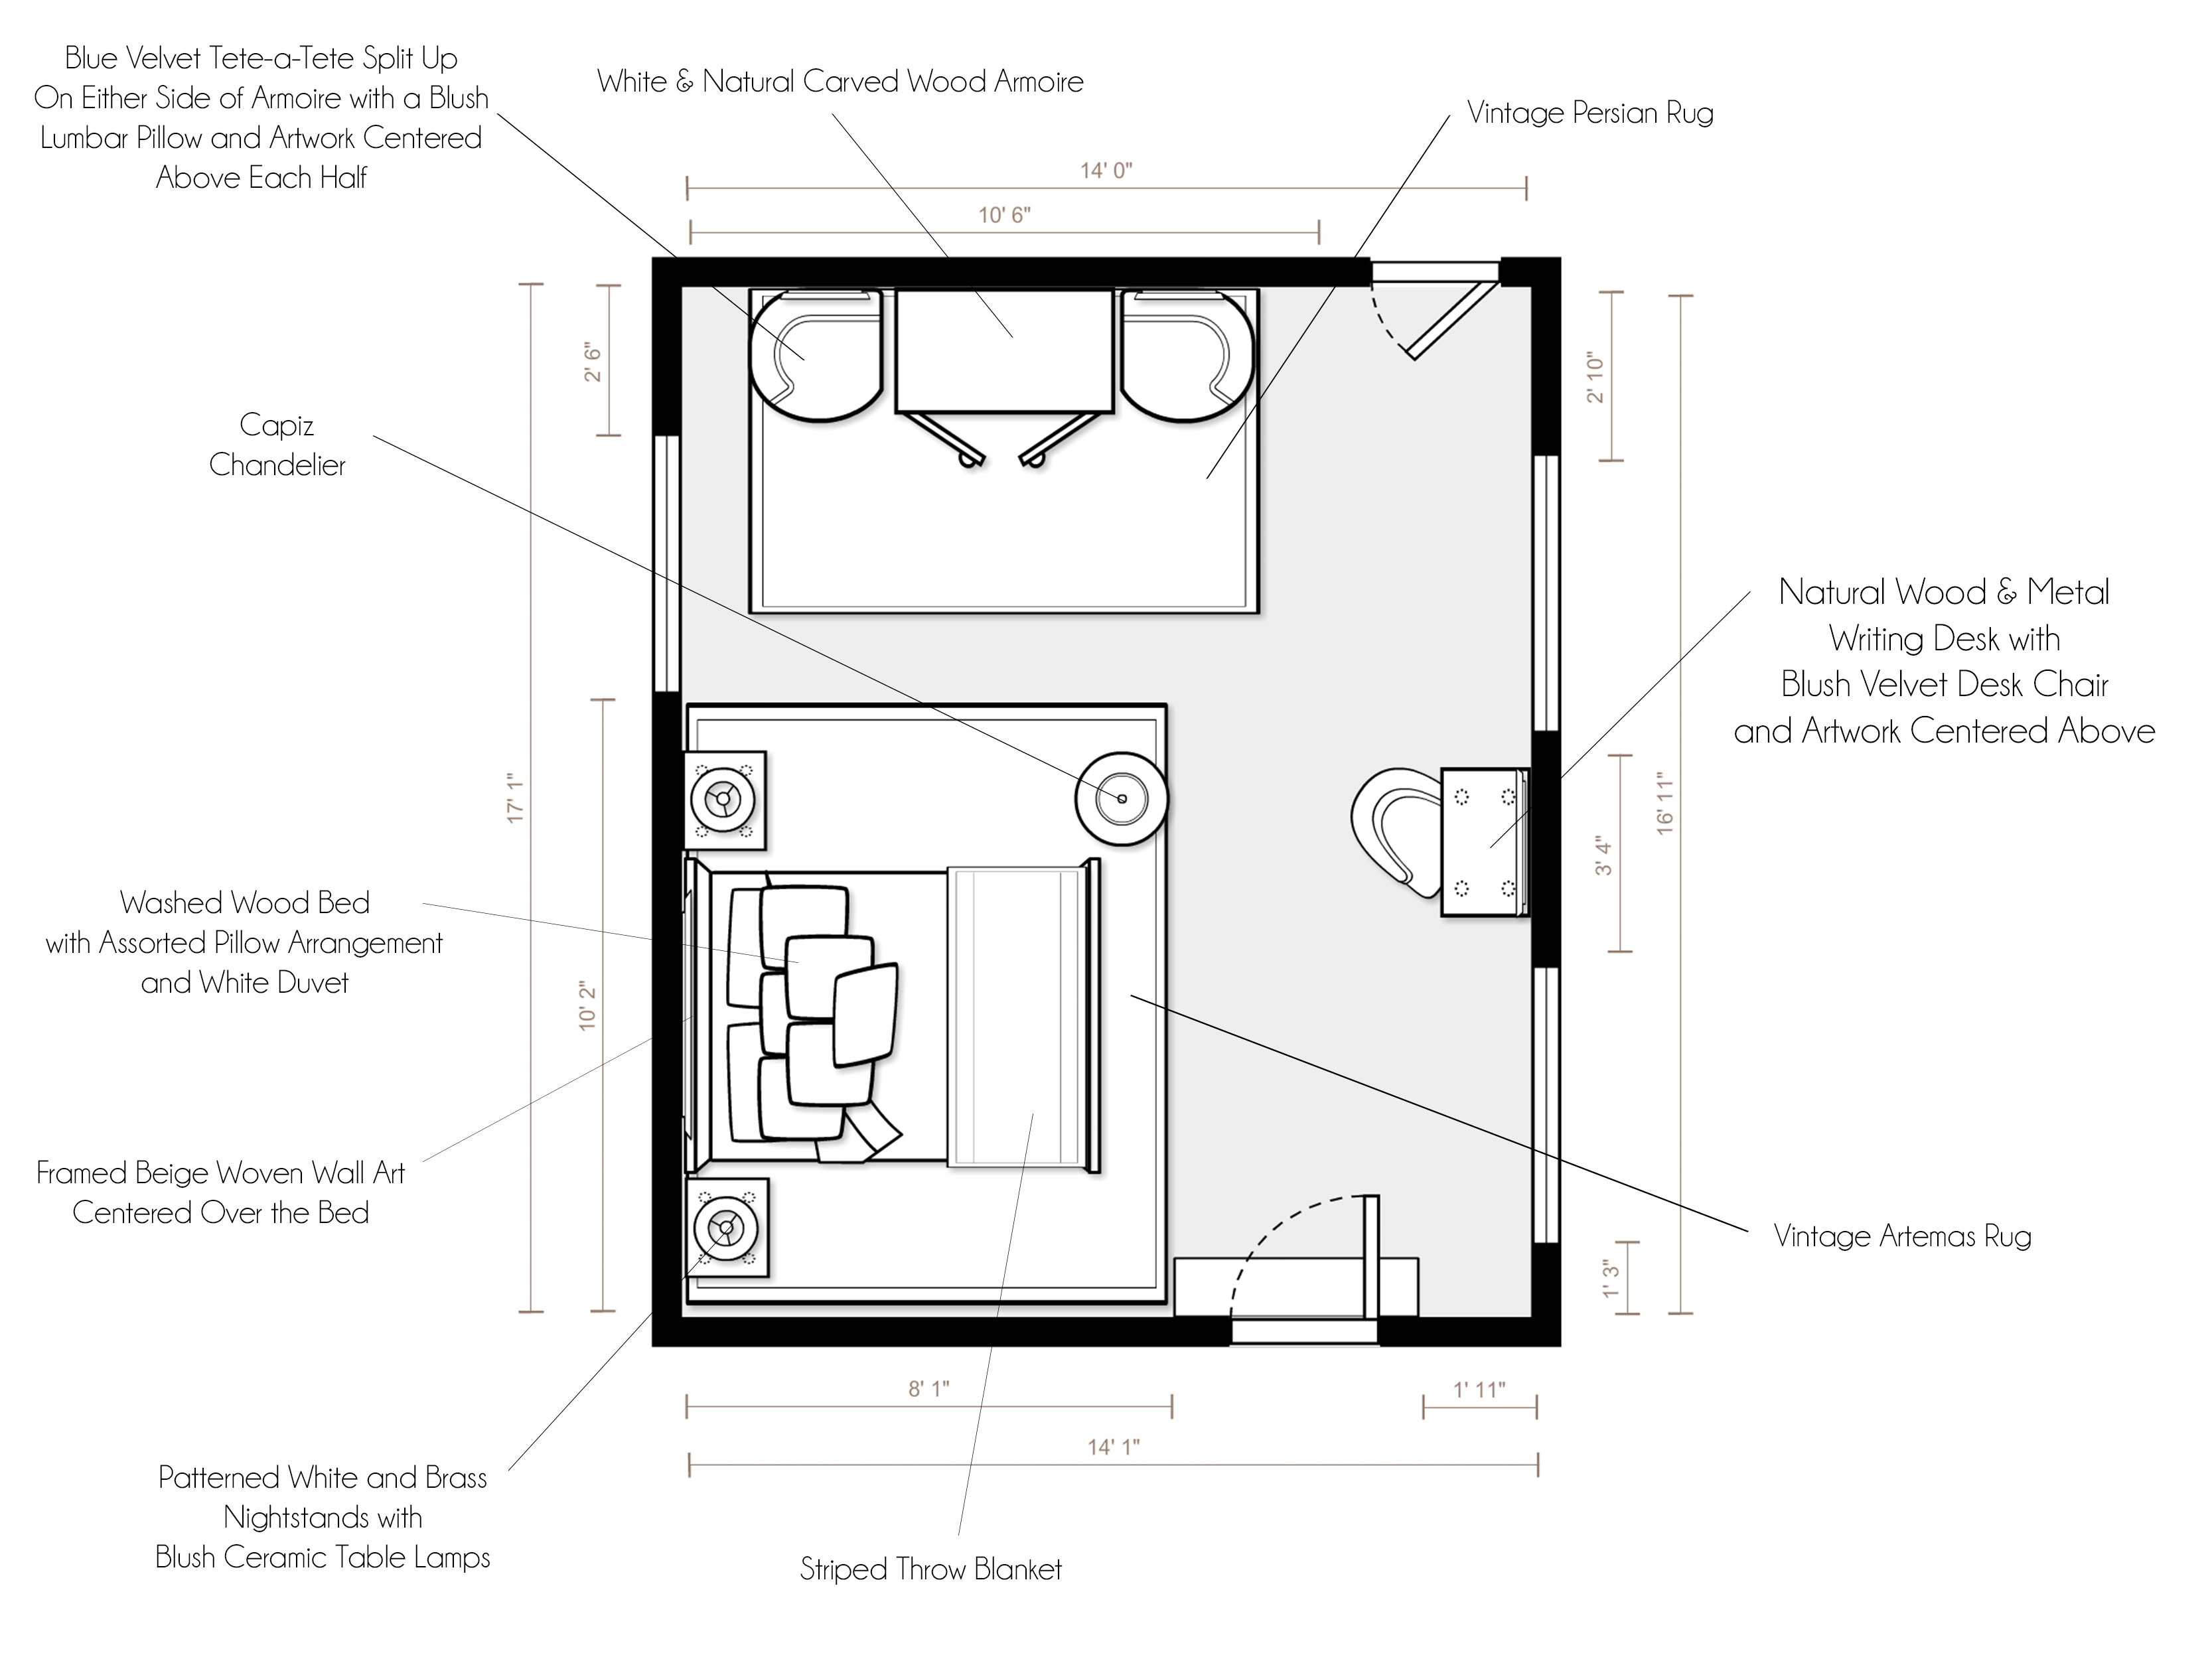
For specific product placement, please refer to your floor plan and renderings.

  • Creating two stunning, well-defined areas in the space, as well as creating a sophisticated color palette, are the pair of amazing Persian rugs. The 8’x10′ rug fits snugly in the area next to the entrance, while the the smaller vintage rug is centered on the armoire wall with the door leading to the bathroom.
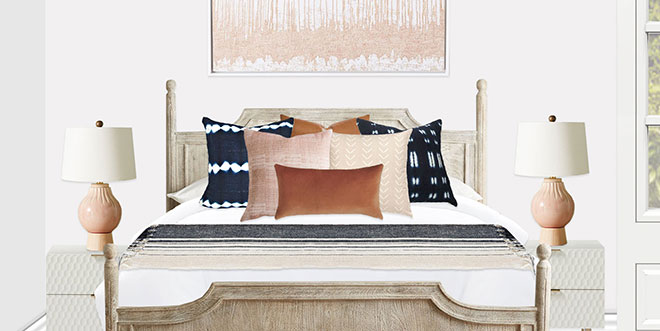
  • Centered on the larger 8’x10′ rug, a gorgeous washed wood bed is the centerpiece of this luxurious sanctuary! Floating on either side of the bed are two lovely parchment lacquered geo nightstands. A pair of blush ceramic lamps sit on the nightstands, framing the bed.
  • Giving the bed personality, texture, and coziness are an assortment of printed and textured pillows (please see the rendering for recommended placement), as well as a gorgeous indigo and ivory striped blanket. These all sit on top of a crisp white linen duvet.
  • Completing the bed wall is the spectacular framed woven wall hanging in a gorgeous rosy beige, which gives the space a modern yet handmade and natural feeling.
  • Hanging on the inside doorknob of the entrance door from the hall is a perfect little tassel decor in tones of blush and cognac.
  • Another wow moment in the space, a breathtaking carved wood armoire is centered on the wall with the door leading to the bathroom (and over the vintage rug) and is the first thing you see when you enter the room. Flanking the armoire are two halves of a marvelous indigo velvet tete-a-tete, creating a unique, elegant, and impactful his & hers seating arrangement around the armoire.
  • Centered above each piece of the tete-a-tete are two complementary pieces of art from the same series. These help tie in all of the colors of the room, as well as create a nice balance to finish off the armoire moment. A planter with a pothos is perched on top of the armoire, breaking up the symmetry just enough!
  • In one last convenient area for guests, a small natural wood and metal desk floats between the two windows on the wall opposite of the bed. A stunning large piece of blush artwork is hung over the desk and a dusty blush velvet desk chair with brass legs tucks right underneath. A gilded striped planter houses a ZZ plant on the desk to give the area a little life!
  • The cherry on top is the stunning Capiz Chandelier! Since the ceiling is 120″ high and the fixture is 32.5″ high, I recommend hanging the chandelier right up at the ceiling to allow the maximum amount of clearance underneath (as guests will be walking underneath, so a 7′ minimum is advised). This will be 7′-3″ from the floor.”

I am really happy with the way it turned out! I think her guests will be wowed by both the elegant aesthetic and comfortable functionality of the space. It was so fun to work with Caroline on all of the projects we did together! What an exciting time to have purchased a home and are in the process of getting it all ready to welcome a new baby. Hopefully I made that process smooth and enjoyable for the mama-to-be! And as always, if anyone is interested in working with me on one of their rooms, you can purchase a package on my Decorist page using my friends & family promo code Designer233073 that allows you 30% off!

Have a great weekend everyone! :)

Decorist: Caroline’s Master Bedroom

Hello all! I just got back from a wonderful two week vacation visiting our families in both New York and Nebraska. Just before we left (I mean like up until 3 minutes before hopping into the car for the airport… yikes!), however, I finished up two great projects for my amazing client, Caroline, in New Orleans. I completed her nursery last month, so we then took on her master and guest bedrooms! Since I often post bits and pieces of the Decorist e-design process, I thought it would be fun to do a post with a bit more detail about how everything works from start to finish, as I get a lot of questions about the whole thing. So I decided I would do a two-part example with Caroline’s master and guest bedrooms so that you all can see two fairly different paths these projects often take.

Today I will start with the master bedroom. The process begins with the client uploading photos of the room, providing the measurements of the space, and filling out a questionnaire about their wants and needs for the space. I won’t share these, since I respect my client’s privacy, but you get the idea! Generally, she wanted both rooms to have an eclectic modern feeling with a hint of bohemian flair, tons of cozy texture, and a sophisticated color palette that flowed with the other rooms. It was important for her to have the rooms feel unique but cohesive in an aesthetic for her new (GORGEOUS OLD) house. The existing items she wanted to work with were a gorgeous four poster king bed and some beautiful mirrored nightstands (though she was happy to use these in either the master or guest rooms). The plan was to add an amazing modern bohemian area rug, new media cabinet/sideboard, new curtains, bedside lamps, and an overhead light fixture, as well as some incredible decorative accents and fabulous artwork.

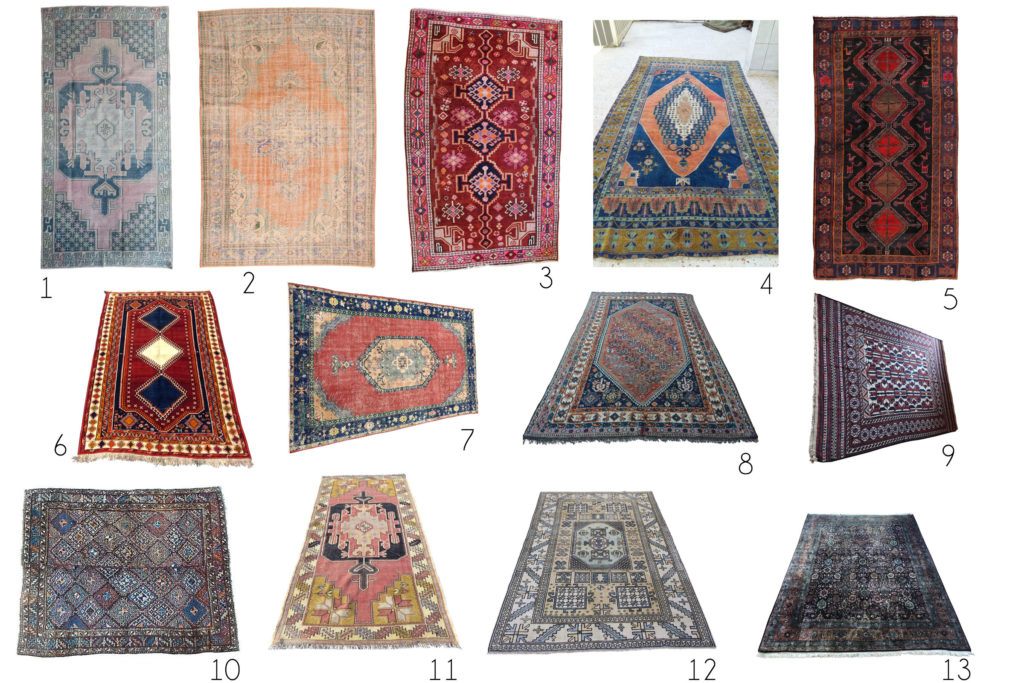
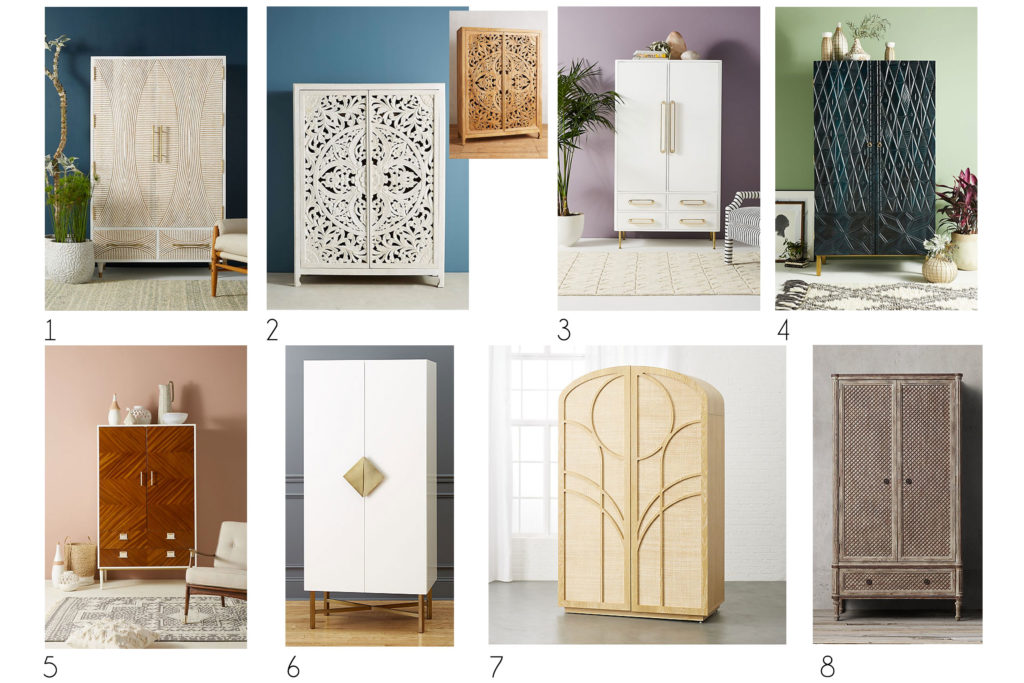
Step one for me is to review the information in detail, put the room into a to-scale floor plan, and send over all of my initial questions. This list is often very lengthy, but it is so necessary for me to better understand the client, assess their needs, and clarify room setup/dimensions. We usually go back and forth a couple times, and then I will send over a few mini boards to help select some of the main sample pieces (as well as to get a better understanding of the client’s style based on the things they are choosing so I can pick the remaining items with a more targeted eye). Here is an example of some of the types of boards I send:

Vintage Rug Options for the Master

Armoire Options for the Master & Guest Bedrooms

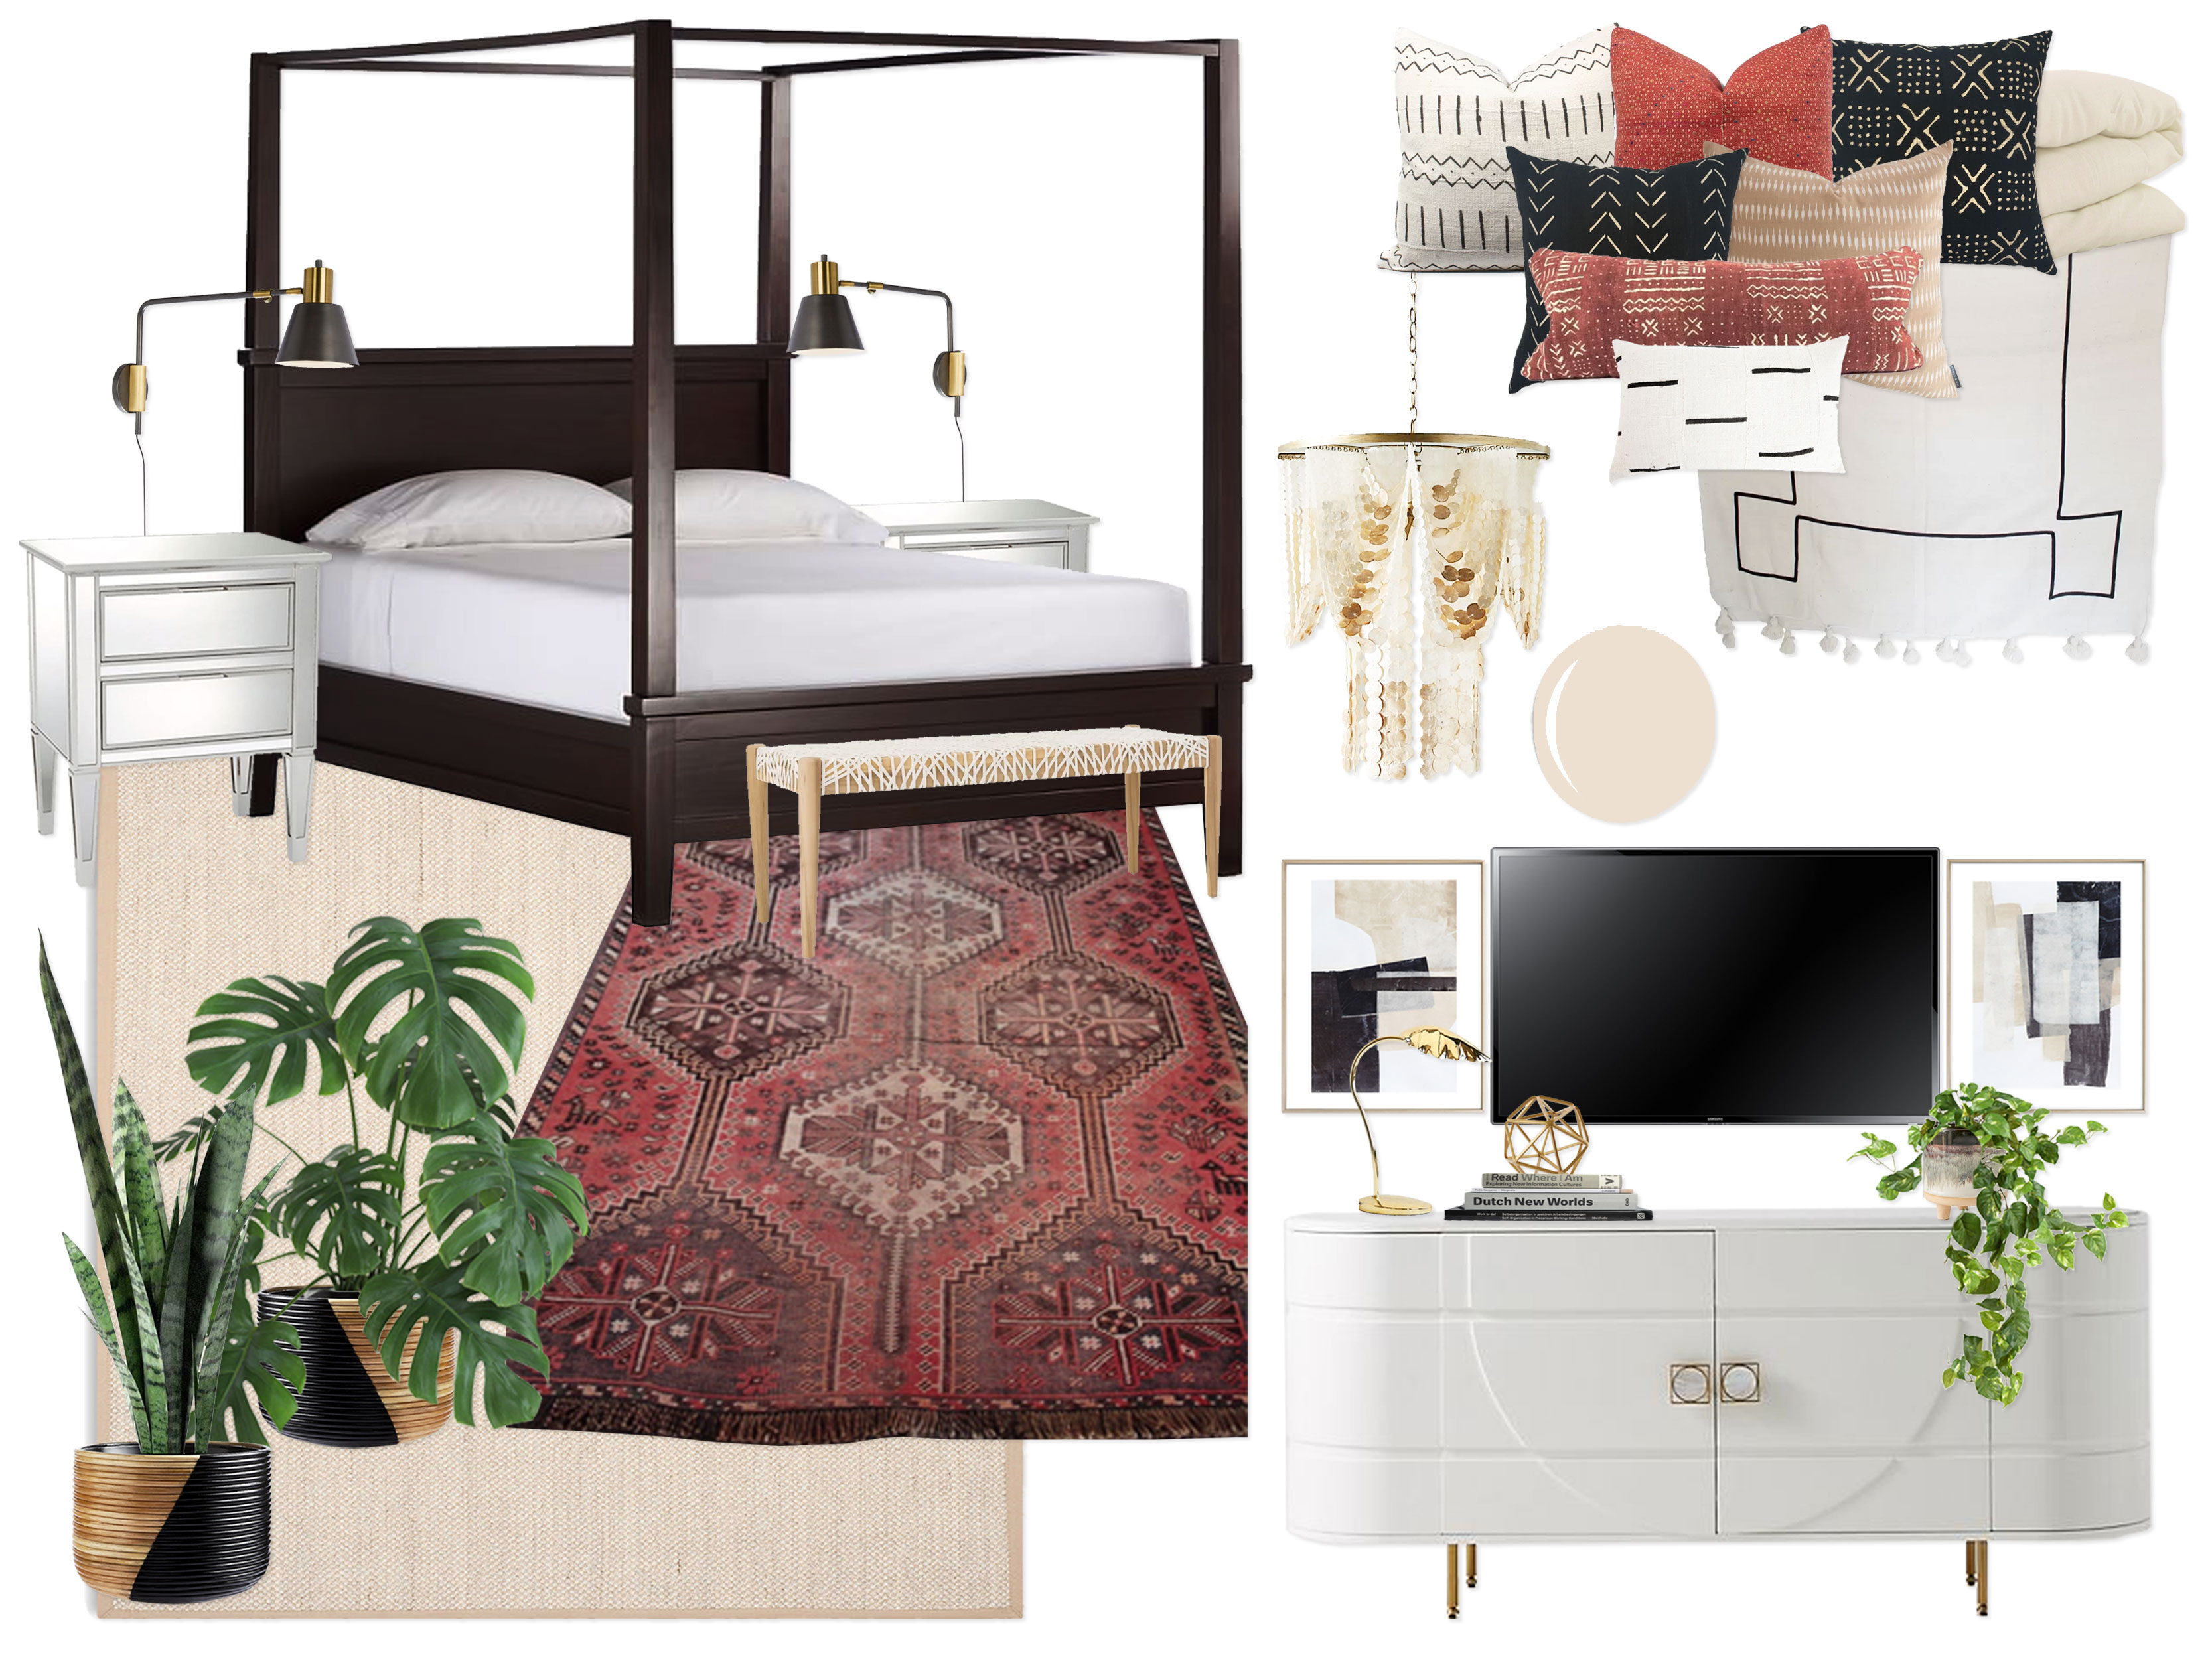
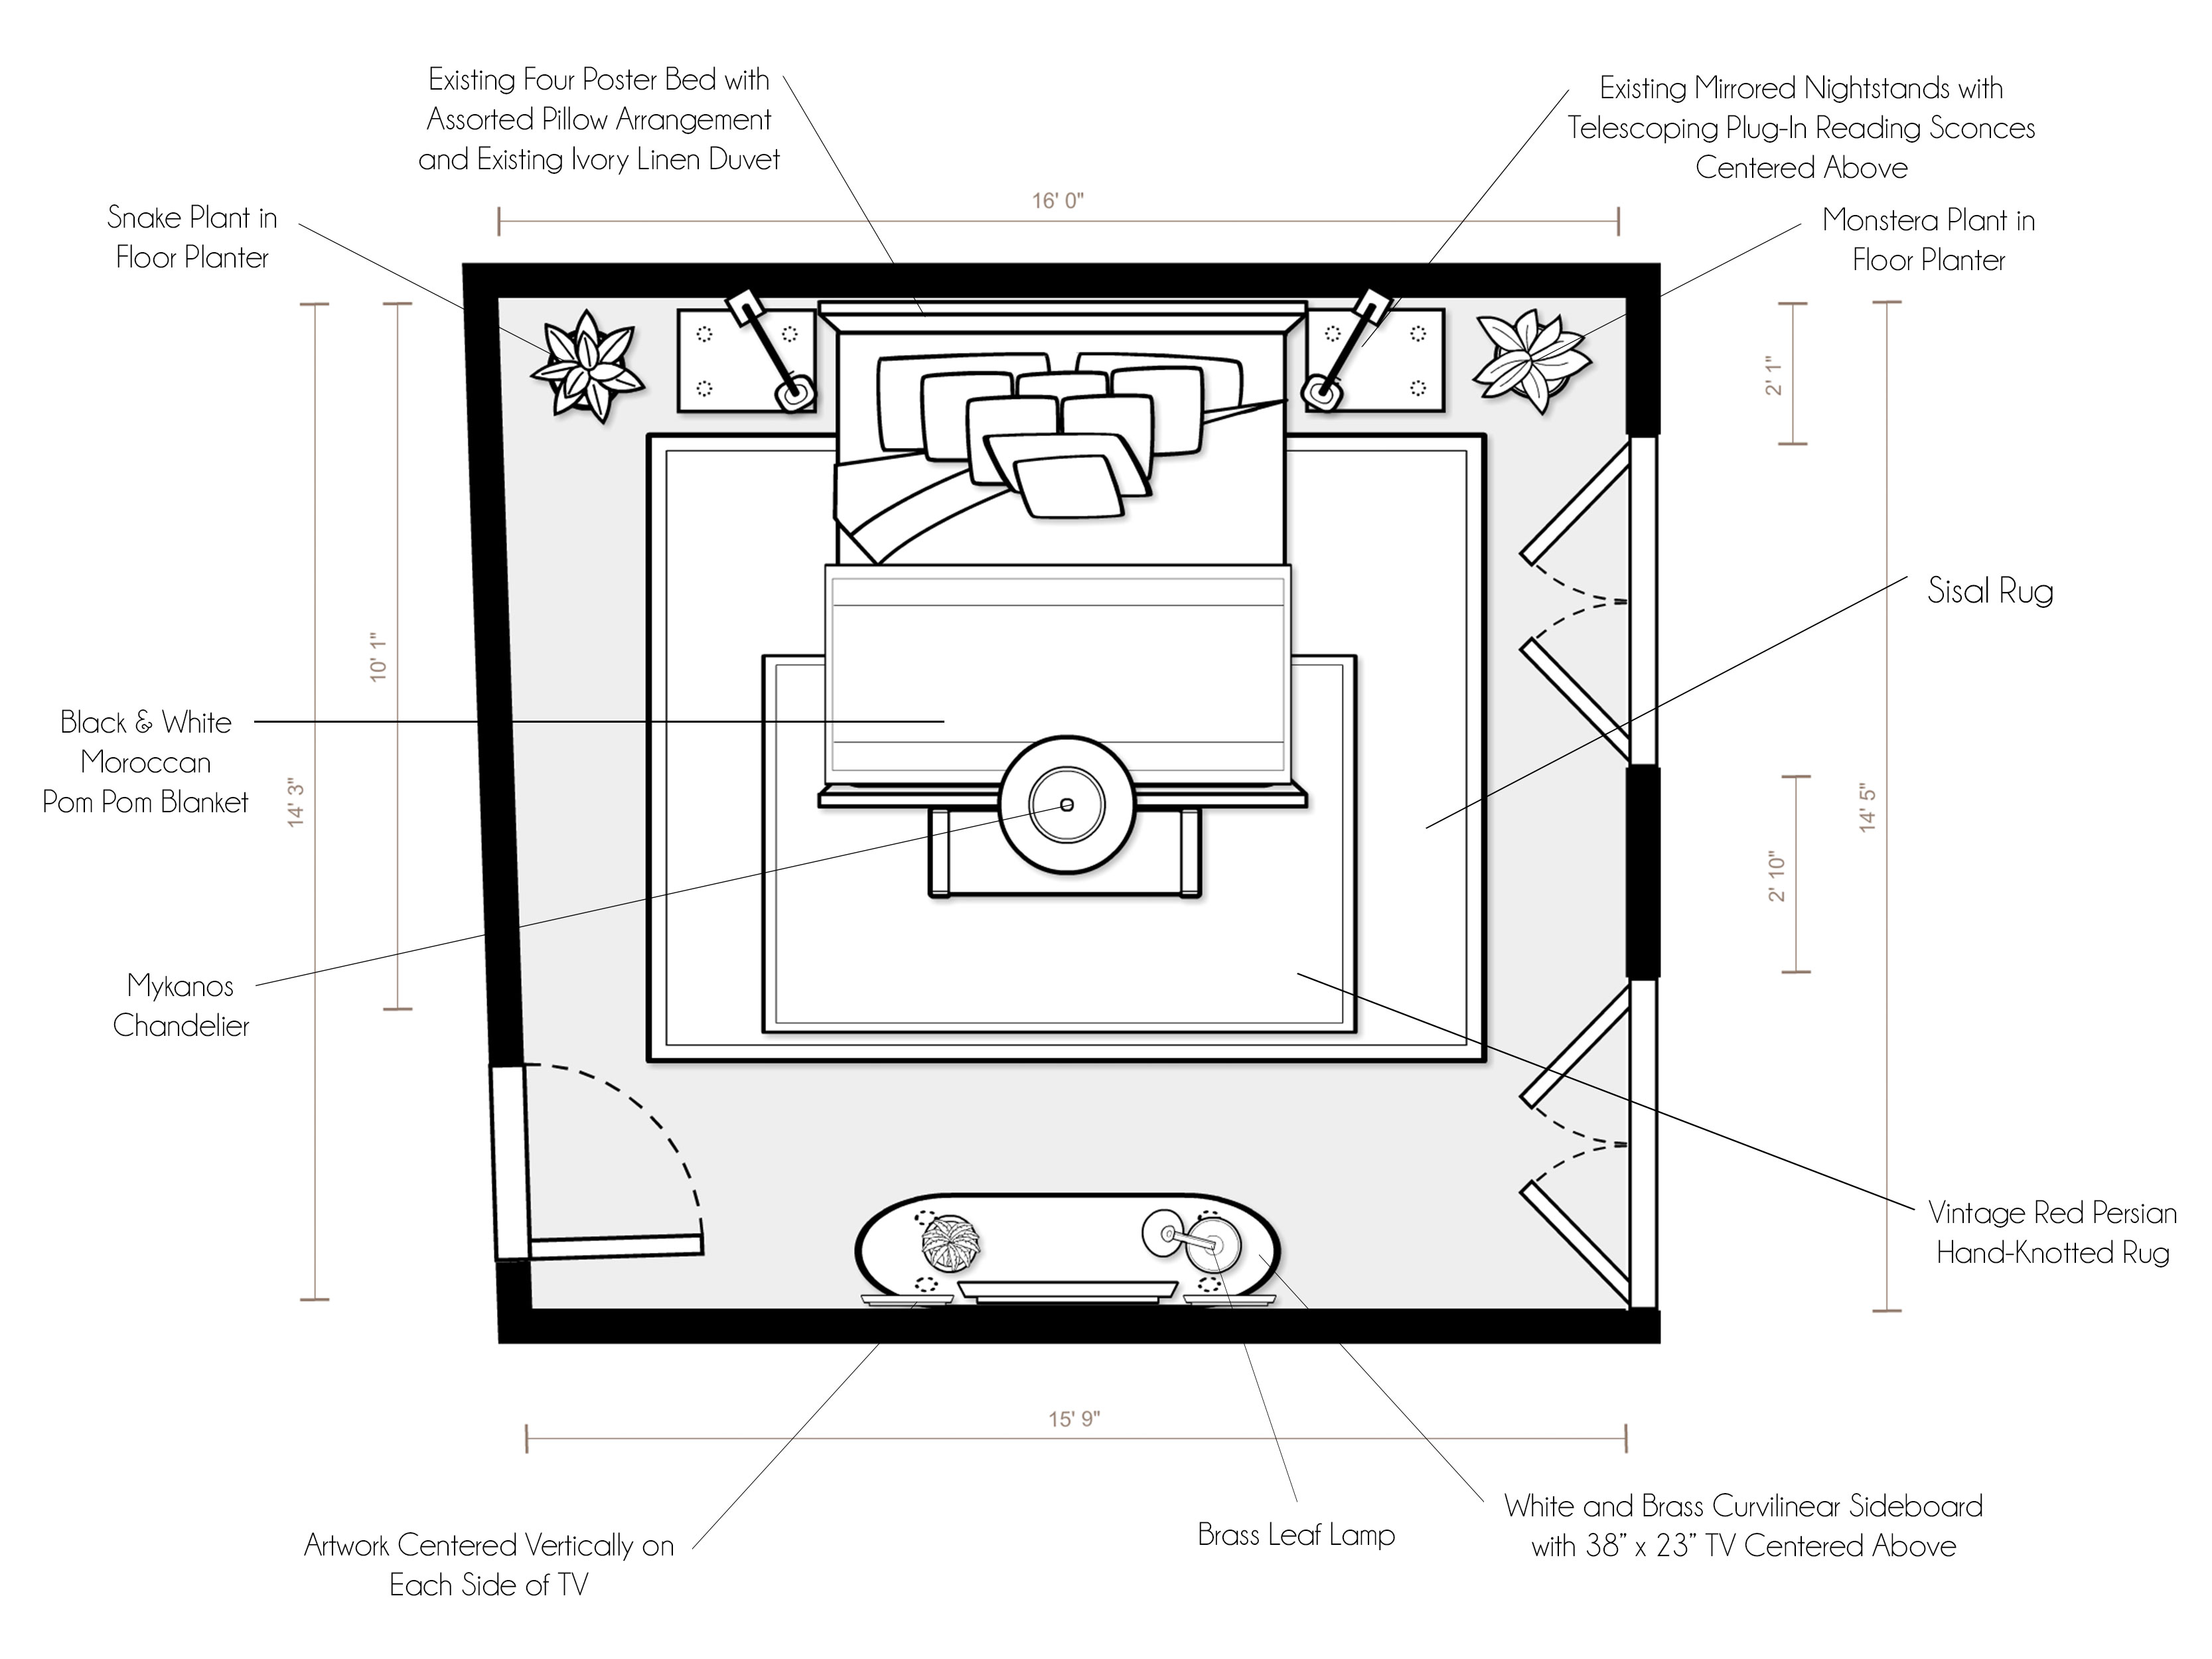
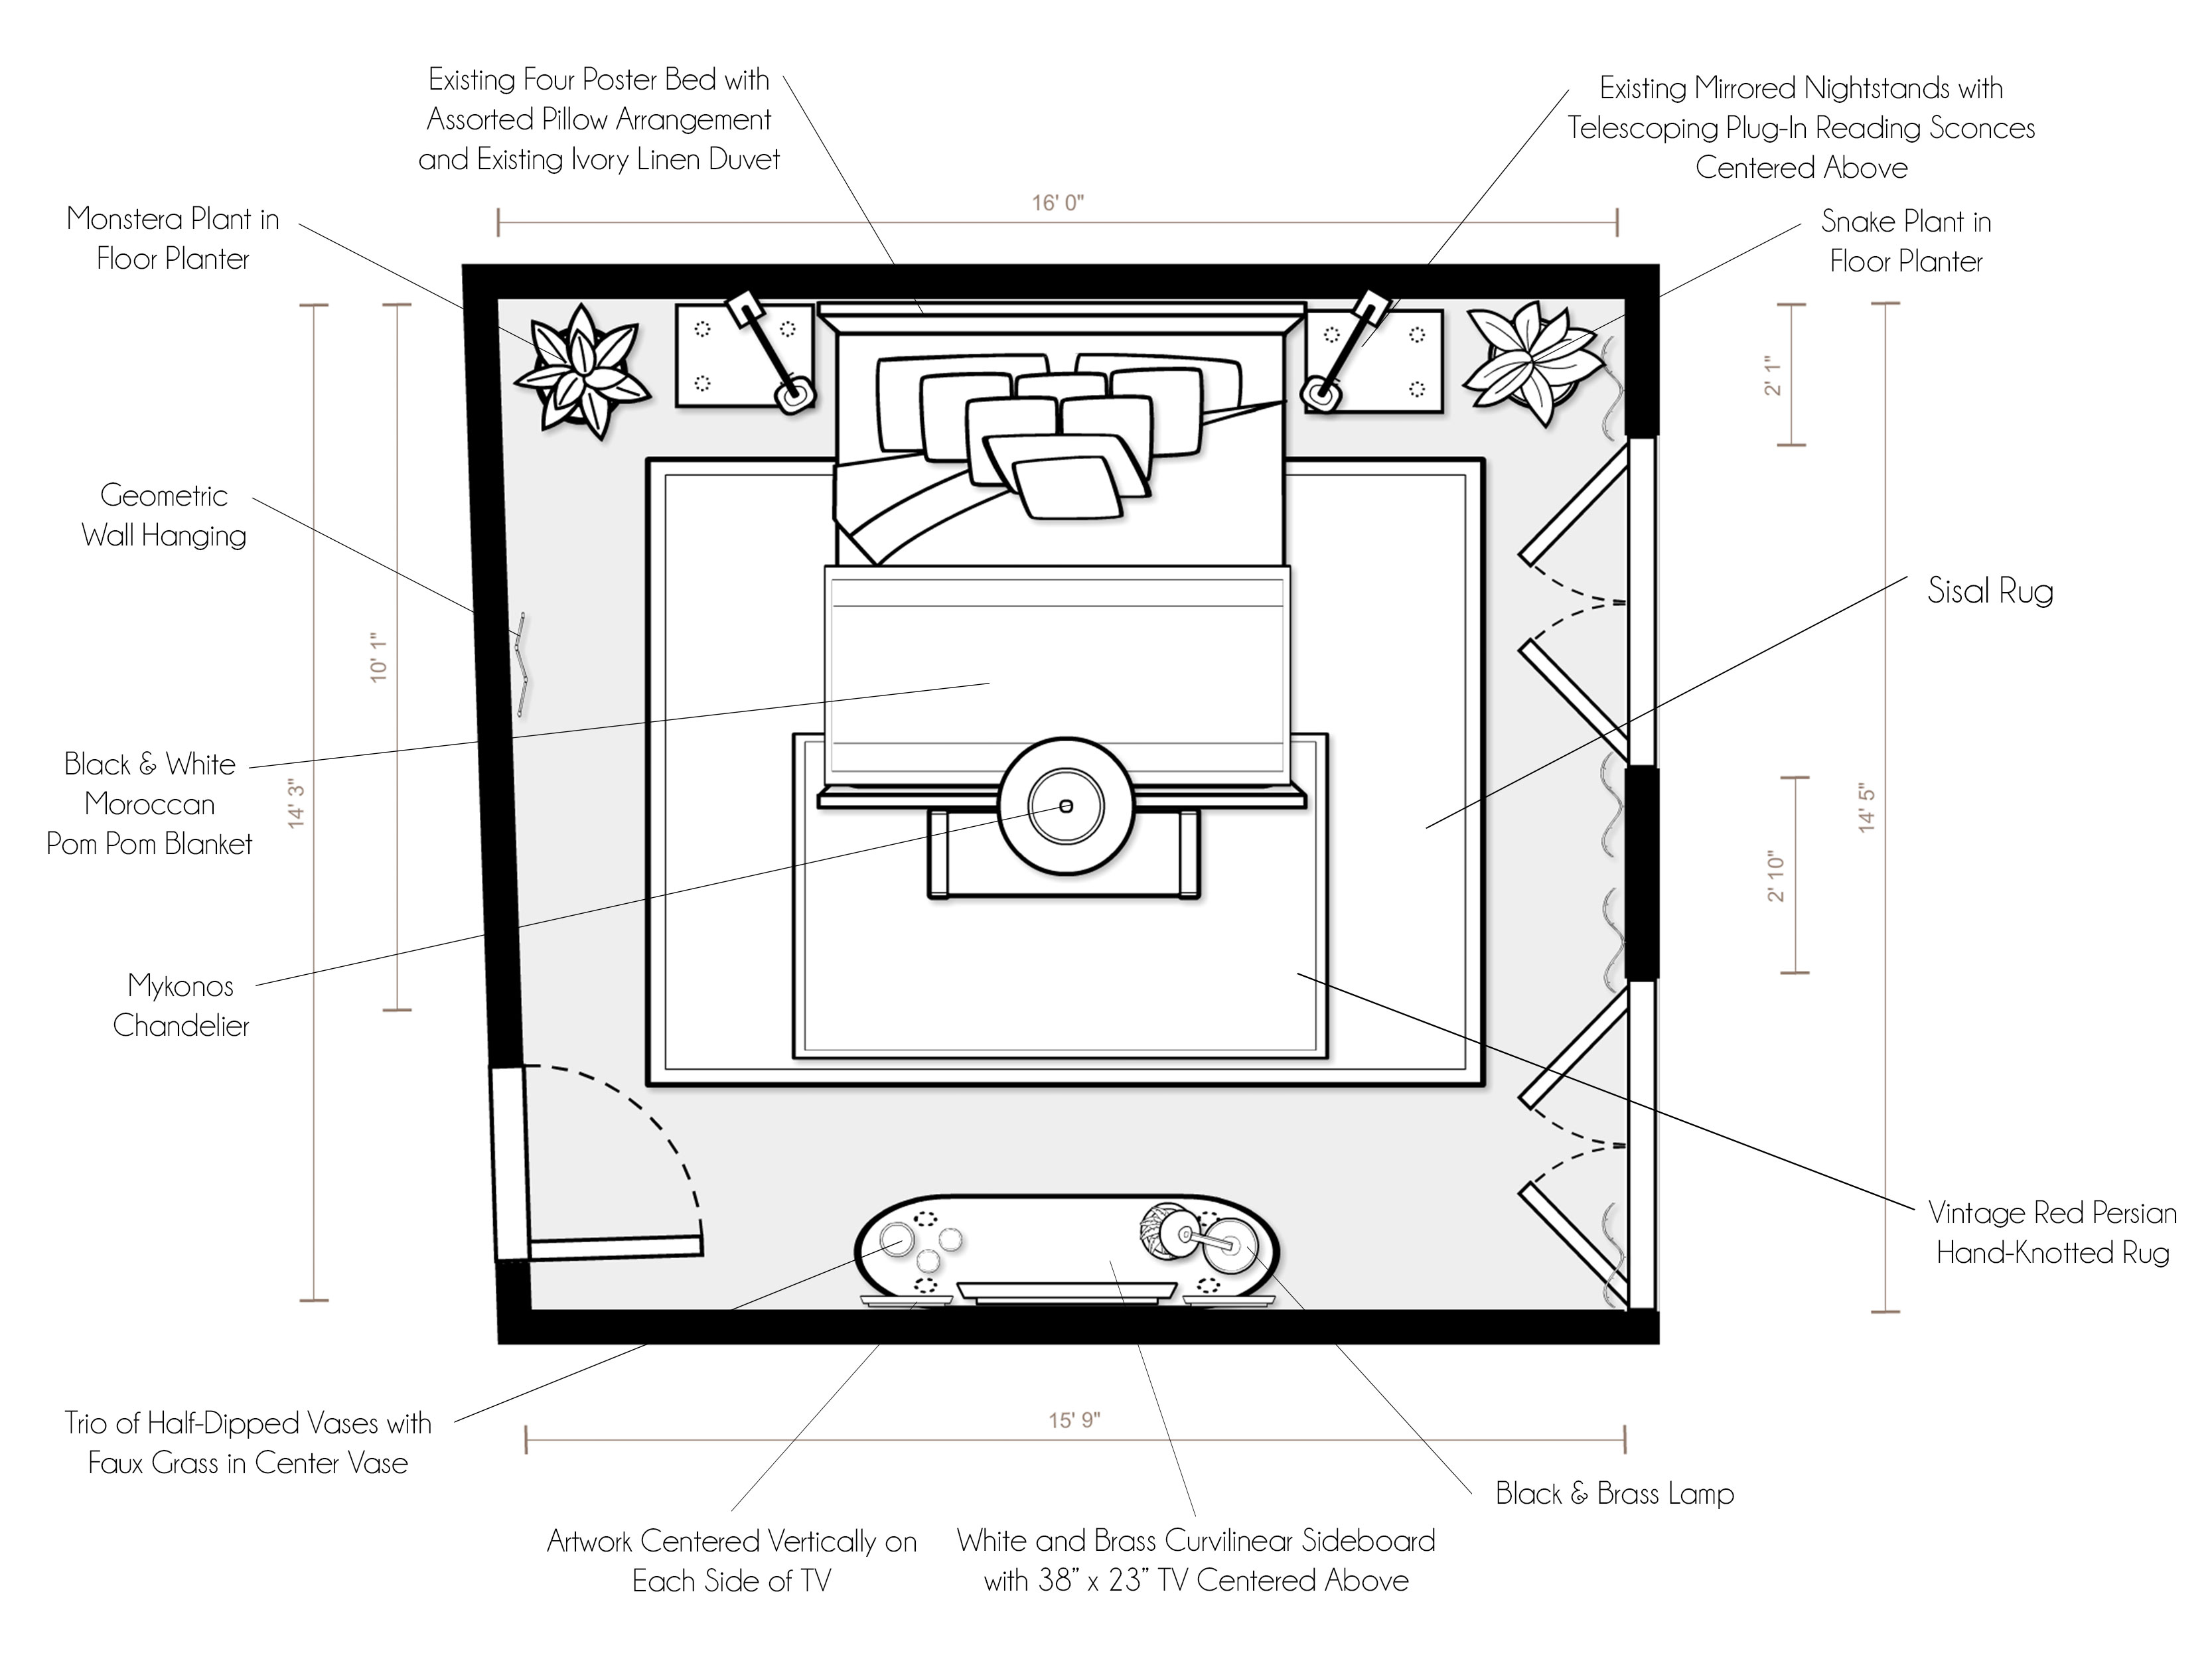
Once the client gives me feedback on a few of the main staple items, I get to work creating two unique design concepts for the space. Each of these concepts is a complete picture of the room design and includes a mood board, floor plan, and write up to help the client picture the finished space. I look at mood boards every day so it never dawned on me that they might be confusing to people when I post them on their own. However, when a client receives them in conjunction with a labeled floor plan and descriptive write up, it makes a lot more sense. Basically, the mood boards give a overall visual idea of how all of the pieces look together (trying to group little vignettes of items together when possible), while the floor plan and write up actually describe where they will concretely go in the space. If you see a console on the mood board, you can find on the floor plan where it will go in your room. I hope this clarifies things a bit! Here is what I mean:

Concept 1: Black, White, Ivory & Red

(click image to enlarge)


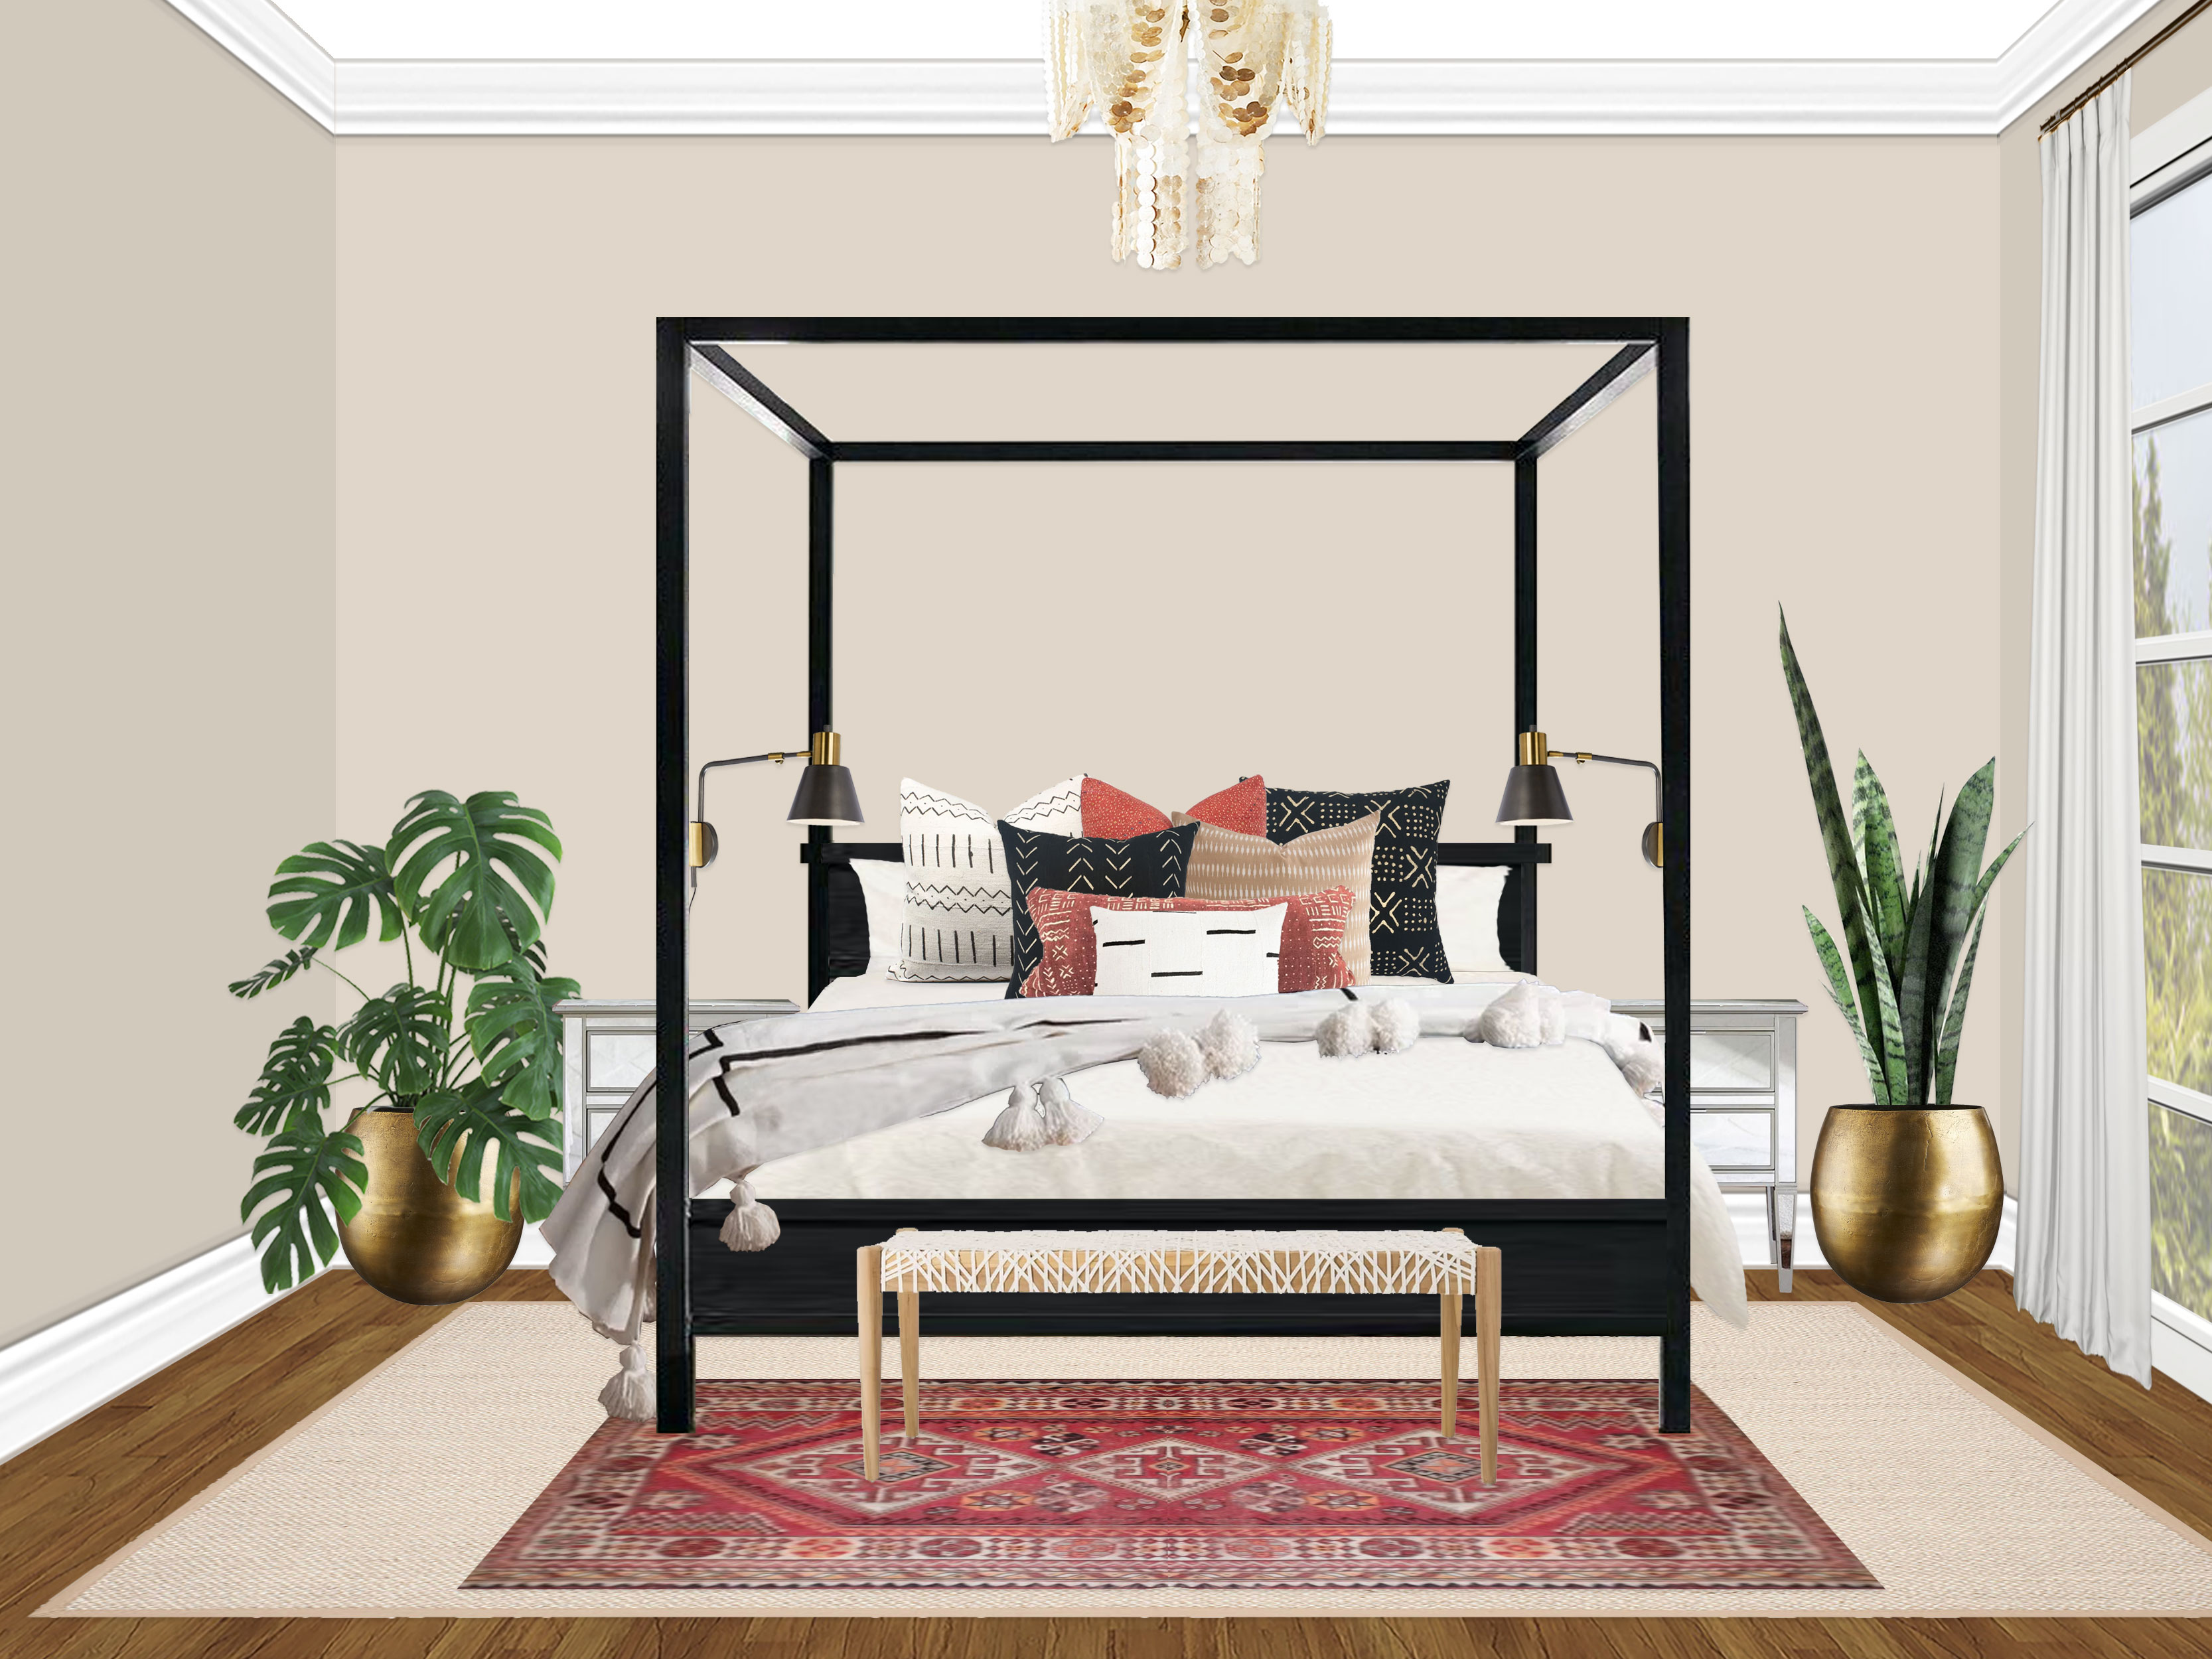
“Inspired by the neutral yet high contrast palettes in your inspiration photos, as well as the nursery we have already designed in your home, this design embraces the elegance of layered neutral tones (bright white, warm ivory, sand, and natural wood) with pops of high contrast black and red, as well as metallic accents in brass. With the walls painted a gorgeous warm and fairly saturated sandy beige (with the remaining trim to be painted BM White Dove like the rest of the rooms), the whole room envelops you with a sophisticated warmth. Keeping the beige and ivory tones feeling fresh, bright white accents make the room feel light and airy. The star of the show is the vintage hand-hooked blue Persian rug, which sits at the foot of the bed and is layered over a larger sisal rug. The stunning existing four poster bed is centered on the main wall, and is flanked by your beautiful existing mirrored nightstands. Above the nightstands are two black telescoping mid-century adjustable (plug-in) reading lamps that are modern and functional. Giving the room personality, coziness, and visual interest are the array of amazing mudcloth pillows in hues of white, black, red, and sand, as well as a black & white Moroccan Pom Pom Blanket draped across the bottom fo the bed (which has your existing ivory linen duvet). At the foot of the bed is a stunning woven white leather bench with natural wood legs. On the outside of the nightstands, two floor planters house mismatching plants to give the room a fresh breath of nature in a symmetrical but not too match-matchy way. Not to be outdone by the incredible bed, a jaw-dropping curvilinear white and brass sideboard is centered on the wall opposite the bed. Your TV is centered above the sideboard, with two pieces of artwork creating a “gallery wall” with the TV to blend everything together. The sideboard is accessorized with a brass leaf task lamp, geometric brass object, books, and a plant. Finishing it all off, a stunning iridescent chandelier is the perfect jewelry to give the space luxury and a hint of glamour! Calming, fresh, modern, packed with cozy texture, and complete with a punch of bold contrast, this elegant design creates a perfect relaxing sanctuary for you and your husband as you embark on this new journey of parenthood!”

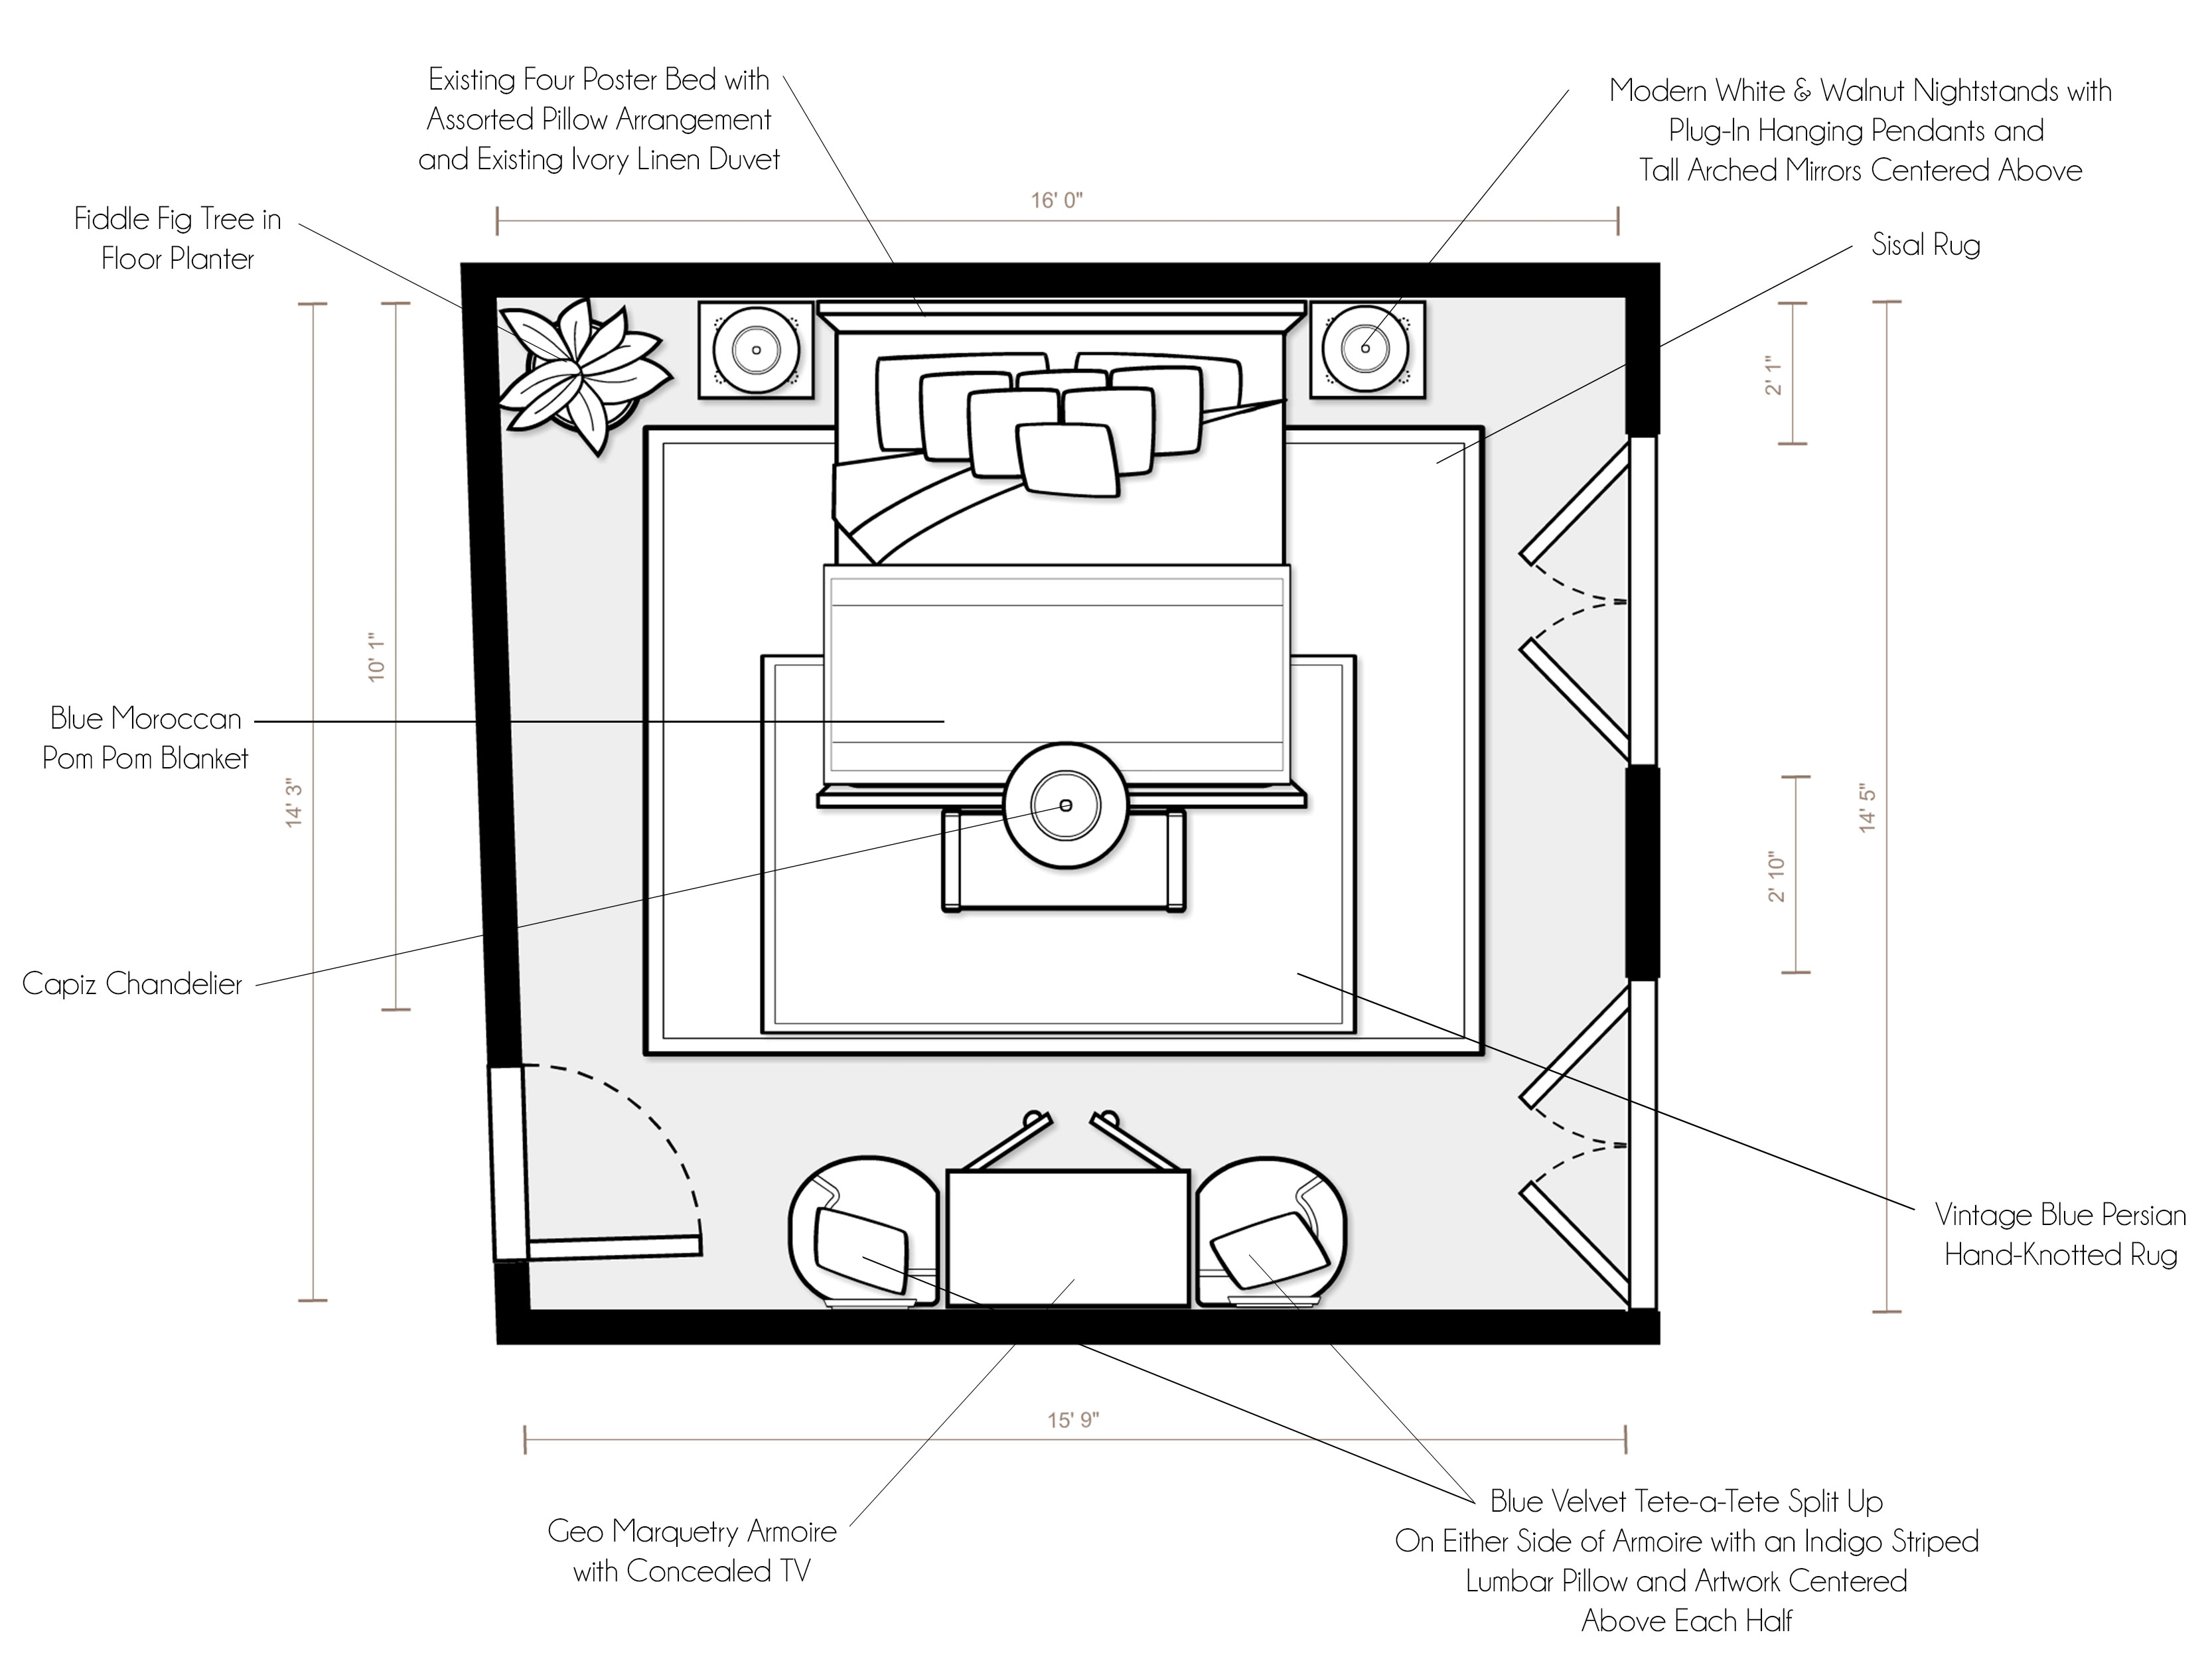
Concept 2: Indigo, Rust & Walnut

(click image to enlarge)

“Sparked by your many inspiration images with colorful yet sophisticated color palettes, this design embodies a modern vibe with a hint of a bohemian spirit, complete with a beautiful color palette of navy blue, denim blue, bright white, ivory, and rust, as well as walnut wood tones and metallic brass accents. Creating a sensual, soothing, flattering foundation, the walls are painted a gorgeous saturated rosy beige. There is a reason movie star heroines are always filmed with rosy-toned lighting… your will look utterly fantastic in this space! Setting the tone for the entire room, the incredible vintage red Persian rug takes center stage at the foot of the bed (and is again layered over a larger sisal rug). Your existing four poster bed is outfitted with the most amazing dyed indigo, denim blue striped, and rust mudcloth pillows, your existing ivory duvet, and an amazing navy blue striped Pom Pom blanket at the bottom of the bed. A natural walnut and jute woven bench sits at the foot of the bed. On either side of the bed sits two lovely modern white and walnut nightstands, both of which have tall brass mirrors and plug-in brass cage pendants centered above to create a wow moment on this bed wall. Once again, not to be rivaled by the wonderful bed, a magnificent walnut and white geo marquetry amour is centered on the wall opposite the bed and hides your TV from sight. An unbelievable navy blue velvet and brass tete-a-tete is split in half and placed on either side of the armoire to create symmetrical his and hers seating, complete with more denim striped lumbar pillows and artwork centered above. A large fiddle fig tree in a marbled glass floor planter completes the space, as does an absolutely lovely capiz shell chandelier, both of which give the room both a natural and luxurious feeling. This design walks the fine line between modern & bohemian, colorful & refined, elegant & fun, and luxurious & humble with an elegance that makes it a perfect oasis for the parents-to-be!”

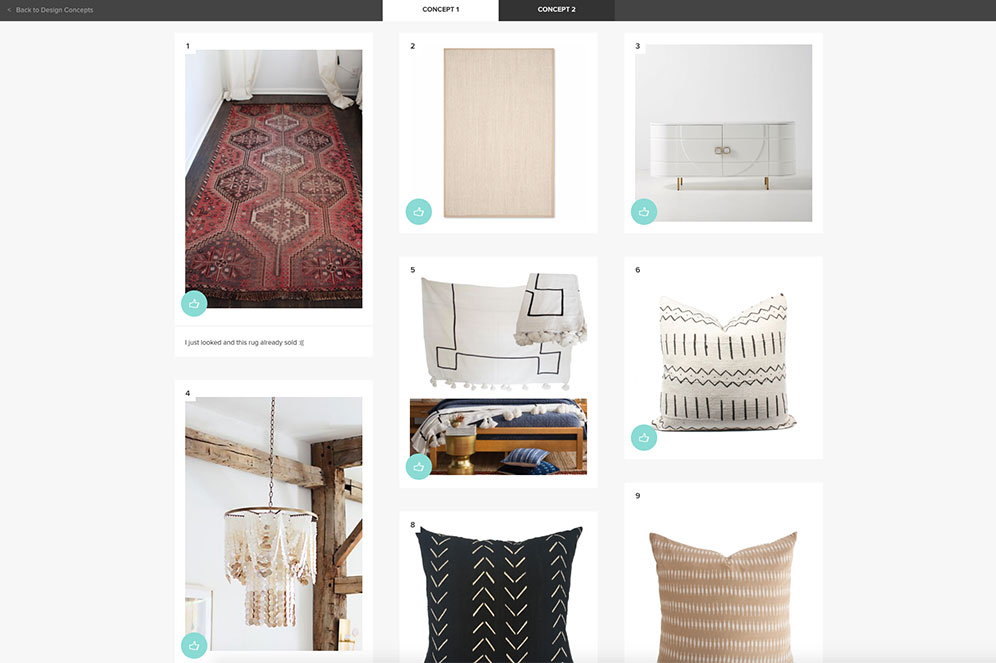
I also upload an image of each individual piece going into the room so that, in addition to rating and providing feedback on each concept as a whole, the client can actually do the same for every individual piece (with a thumbs up, okay, or thumbs down). This allows them to basically say, for example, “I like concept 1 but I don’t like this specific item/prefer the item from concept 2.” They can leave comments on each item also to give better direction if the piece isn’t quite right, or to say “LOVE THIS!!” when they can’t live without it! Here is a screenshot example of what I am taking about:

Once I get all of the feedback from the client, each project often takes a different path from here. Sometimes, one concept is dead on, with only one or two minor changes for the final design. Most often, we are about 80-90% of the way there, reselecting a few pieces or swapping them out for the corresponding items in the other concept. Sometimes, we have a bit more work to do, especially if after seeing the designs as a whole, they realize they want to make significant changes to the entire layout or function of their room because they couldn’t picture it before (i.e. “I thought I wanted this but now, seeing it, I don’t”… which by they way is TOTALLY okay! That is exactly why we go through this process and why the clients reach out for a designer’s help in the first place). So this next step in the process varies from client to client, but we do whatever we need to do to work our way to the final design, which is presented as final renderings of each relevant wall (again, varies per project depending on the space), a final labeled floor plan, detailed setup instructions, and a full shopping list of items for the client.

In Caroline’s master bedroom project, our final step fell into the first category: one concept was dead on! She chose concept 1 in it’s entirety, with just a little tweaking of some accessories and planters. The only hiccup was that the vintage red rug we selected had already sold. So we quickly swapped it with another one that was just as fabulous, and I got to work. Here are the final designs:

(click image to enlarge)

Setup Instructions:

For specific product placement, please refer to your floor plan and renderings.

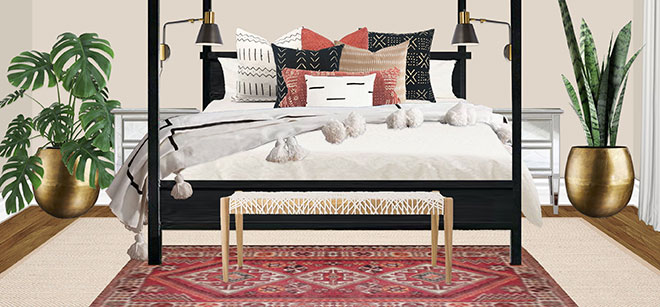
  • The star of the show is the stunning red vintage rug that is placed at the foot of your existing beautiful four poster bed (centered on wall) and layered over a larger sisal rug for texture and softness. Flanking the bed on either side are your lovely existing mirrored nightstands. The sisal rug should float in front of the nightstands to allow the vintage rug on top to be mostly visible from the foot of the bed.
  • Mounted centered above the nightstands are two modern black & brass telescoping adjustable reading lights, which are plug-in fixtures rather than hardwired.
  • Giving the bed personality, texture, and coziness are an assortment of printed and textured pillows (please see the rendering for recommended placement), as well as a gorgeous black & white Moroccan pom pom blanket. These all sit on top of your existing ivory linen duvet.
  • Finishing off the bed wall are two large rough cast brass planters (complete with a Snake plant and a Monstera plant) and an amazing woven leather bench at the foot of the bed.
  • Adding an elegant and luxurious sparkle to the space, the Mykonos chandelier is hung from your existing fixture box, which is centered over the four poster bed. Since the bed is 91″ high and the fixture is 30″ high, I recommend splitting the difference between the remaining 16″ and hanging the fixture 8″ from the ceiling (and therefore 8″ from the top of the bed). However, I recommend holding it up and making adjustments higher or lower if necessary once you see it in the room.
  • I recommend using a white (or very light ivory) linen with blackout lining for the window treatments you are having made. I think floor-to-ceiling white curtains keep things airy and pop against the sandy colored walls. I also recommend reinstalling the curtain rods so that they go 8-12″ over the sides of the french doors on each side (where possible) so that they can be fully opened without curtains blocking it.
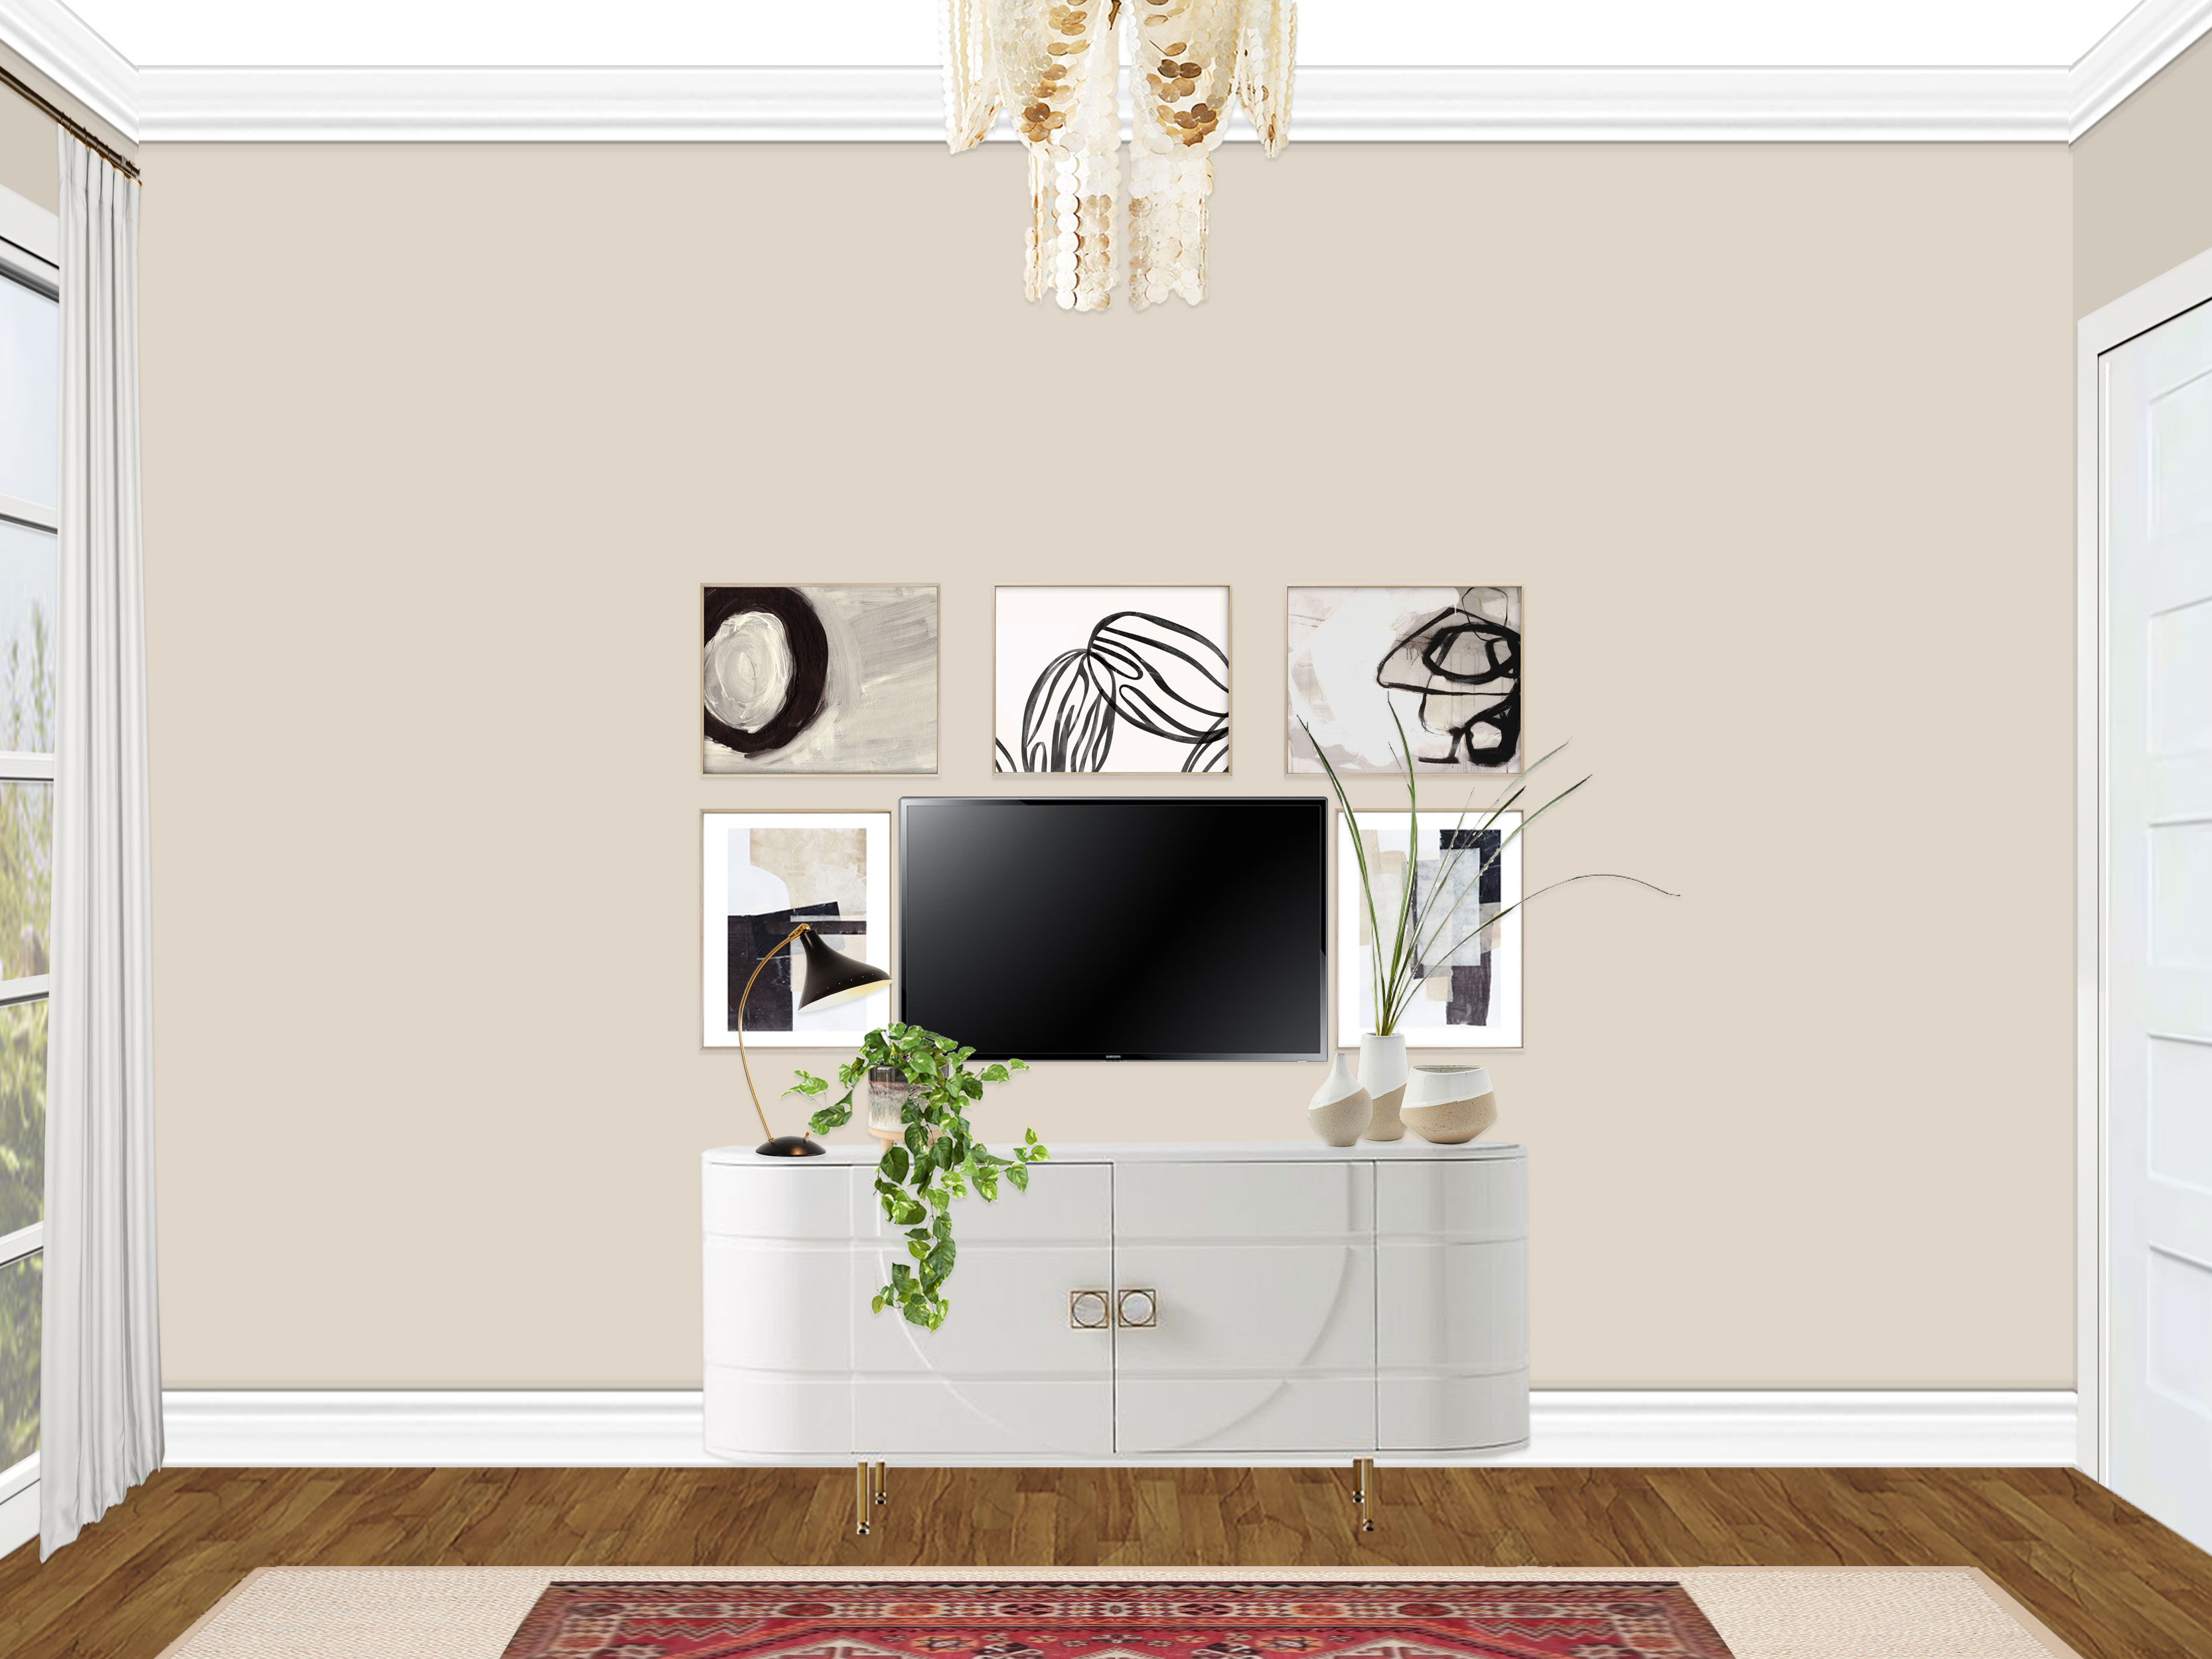
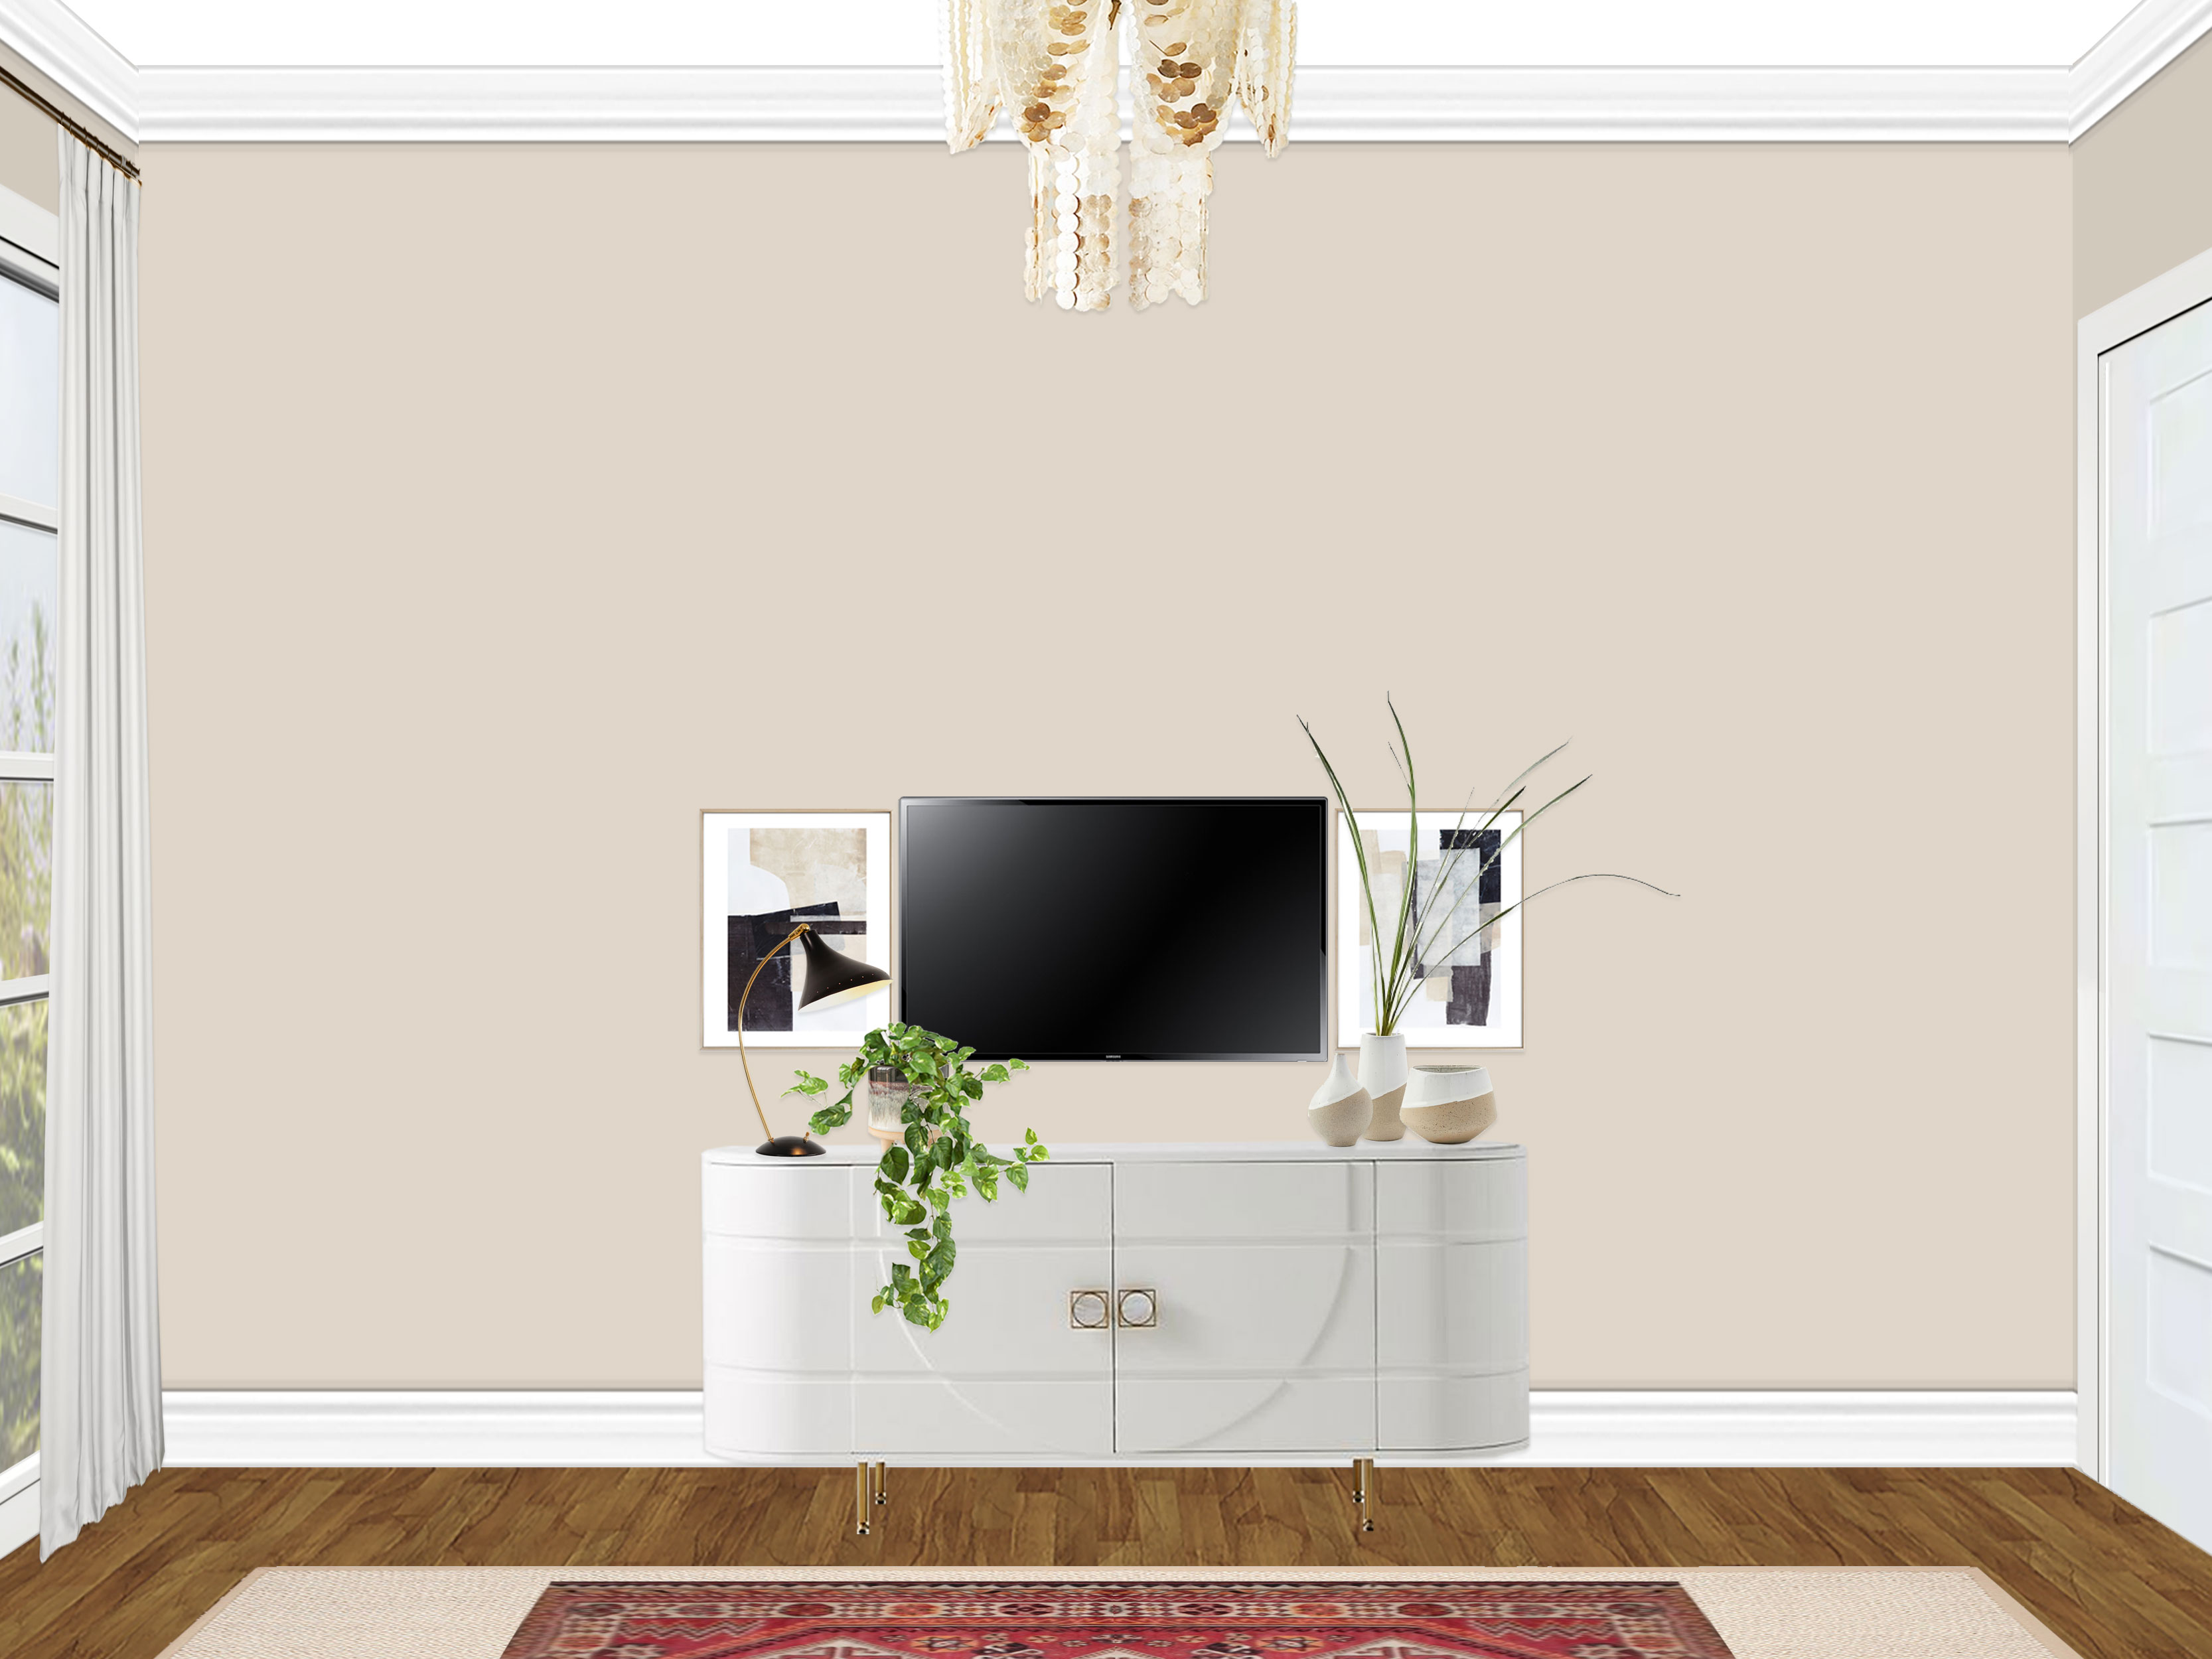
  • On the wall opposite of the bed is a show-stopping white & brass curvilinear sideboard. Centered above the sideboard (and about 6″ +/- above it), your existing 38″ x 23″ TV is mounted on the wall. Blending in the TV, two pieces of coordinating artwork are hung on either side of the TV, centered vertically. I also recommend lining up the outside edge of the artwork with the outer edge of the console so everything lines up. This should give you about 1″ between the TV and each piece of art.
  • If you choose to go with the larger gallery wall, the other three pieces of artwork are to be hung over the TV. Line up the two outer pieces in the same way you did with the artwork flanking the TV, by lining up the outer edges. Then center the middle piece of art, lining all three up vertically. The entire row should sit a couple inches above the top of the TV. I recommend cutting out templates of each one with pieces of paper or cardboard from old boxes so that you can put the templates on the wall first and plan everything out without putting holes in the wall. Please also note that I hung one of the pieces of artwork upside down so that the black accents in the piece worked better in the arrangement (see rendering for details).
  • The sideboard is styled with a fantastic black modern task lamp (which coordinates with the bedside fixtures), hand-painted footed planter (with a pothos plant), a trio of half-dipped vases, and a sprig of faux grass (no maintenance!).
  • On the large wall next to the bed (the one with the door leading to the hall), a stunning geometric iridescent wall hanging ties in the natural beauty of the chandelier with the angular modern charm of the mudcloth pillows. It catches the light from the french doors and adds a just the right amount of interest to the large wall (while still feeling minimal and clean). This is to be roughly centered on that wall but eyeball it to see where it naturally works best, keeping in mind the plant in the corner.”

As you can see, in this case, I actually provided two alternate rendering options for the TV wall, one of which had a more robust gallery wall around the TV. Usually this doesn’t happen, but since it was a little different than we had discussed, I wanted to show her both options. The labeled floor plan and setup instructions help the client understand how to execute the design and take it from the paper to reality.

Once the client sees the final design, there is one more opportunity to make final changes/tweaks to the design, which does happen occasionally. Once these minor changes are adjusted, the client can then purchase the design (in it’s entirety or whichever pieces they want) from the shopping list I create for them. They can do this through Decorist’s free purchasing service (which by the way price matches and takes coupon codes if you have them, plus provides free shipping… win/win!) or on their own if they prefer. It can also be done all at once or over time, as the shopping list will stay put for clients to use again in the future.

In general, the process is really fun and seamless for the designer and client to work together! There is a lot of back-end stuff for the designers, but it is all worth it because I think it makes the client experience positive and as clear as possible. I work to try and get more efficient with every project so that I am delivering quality designs as quickly as possible. I have gotten into a groove at this point, now that I have done  about 15 projects but there is always room for improvement!  Most times, we do not get to see after photos, but once in a while a client sends them our way and it is thrilling! :)

I hope this cleared up a few questions about the e-design process! I will post about Caroline’s guest room soon, as that one was a really fun, unique process as well.

In case anyone is interested in working with me on one of their rooms, you can purchase a package on my Decorist page using my friends & family promo code Designer233073 that allows you 30% off!

Make It Work: Pasadena Cottage Edition

Look who it is!!! It’s Erika. Blogging. For the first time in AGES! Hooray!

It has been a wild year since I last updated the blog, which was when I was about 30-ish weeks pregnant. Truthfully, I just got super busy right around that time, doing essentially three jobs at work (my own, my coworker’s who left unexpectedly, and then prepping for maternity leave/training a new person), prepping the house for baby, last minute travels & visitors, end of summer craziness, and all around just being super pregnant! I was too exhausted at the end of every day to manage to get a blog post together (my drafts folder, on the other hand, is very robust haha!). Then our incredible little bundle of joy arrived 2 weeks early and our time was even more occupied!

I am not going to go into a huge update post about our whole year, as many of you follow my social media updates and have seen every amazing milestone we are celebrating with our sweet baby girl, Juniper Jane. I will do a life update post another time, but this post is shaping up to be long enough without me going into a long saga about how much our lives have changed. I’ll stick to the relevant house-related details! Here are the basics:

After returning from maternity leave, Juniper managed to get herself kicked out of daycare for crying too much after only a day and a half (ridiculous, I know. SHE’S A BABY. They cry. Still baffled by how quickly they booted her!). We decided the best solution for our family, based on many reasons, was for me to work freelance from home during her naps and at night so that I could be home with her. It has been an absolute joy (and overwhelmingly exhausting at some moments, of course! Parenthood, amiright!?), and I am endlessly grateful we made the decision we did because I love spending every day with her. This has meant that we took a significant decrease in income, which brings me to our current situation…

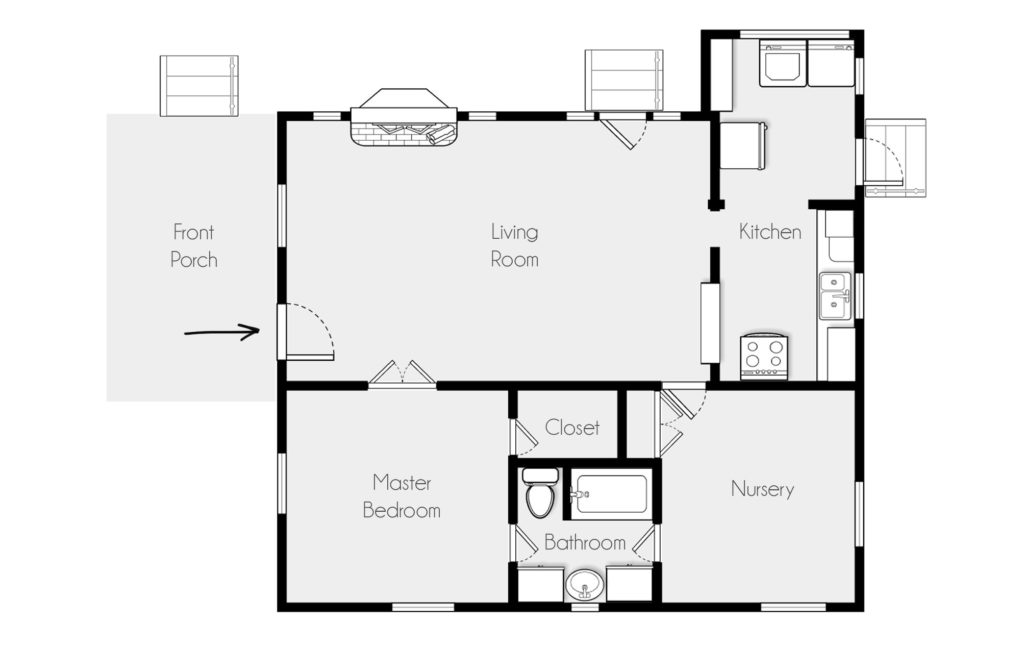
(click to expand)

We are at absolute max capacity in our 820 square foot Pasadena Cottage, but have no intentions or funds to upgrade any time in the foreseeable future. So I wanted to gather my thoughts here for all of the big and little solutions/updates that would make our space function better for us. Hmmmm… this sounds super familiar. Oh, right! I did an entire blog segment with this exact same theme when we were outgrowing our Burbank apartment called Make It Work! The idea is that I look at each room in the house, declutter, and assess what needs immediate attention, as well as what we daydream about doing “someday” to make it a happier, more functional house. So we are bringing it back again! It’s time to MAKE IT WORK. Below is a room-by-room to do list of all of the (realistic… we are in a rental after all) things we would change to make this place as close to perfect as we can envision at the moment.

Oh, and anything we do has to be accomplished on little to no budget haha! Thus the “make it work” idea… repurpose what we can and sell what we don’t need in order to pay for our upgrades. Being on one full income plus a freelance income in Los Angeles means money is super tight, so we really have to prioritize what changes we need the most, as well as which ones we can financially swing. I have noted the items that are most important to us for the functionality of the space with three asterisks, as well as added a “dream world” scenario for someday!

One thing to note is that a huge factor in this is the decluttering and purging aspect that HAS to happen first before we can make more breathing room in our space.

Another note: I have made little video tours of each room because the thought of taking a billion photos of each space, uploading them, editing them, and all of that sounds debilitating. I’m too much of a perfectionist so it would never get done. Instead you get to listen to me blab about each space, pointing out the main items on our list and seeing the house in its real, natural state. What a treat for you (sarcasm)! Without further ado, THE LIST!

Juniper’s Room

Perhaps the most “complete” and functional room in the house, Juniper’s nursery has very few projects to do! This is mostly due to the fact that it was fully designed from a blank slate to make the best use of this particular space just last year (whereas the rest of the house was designed with the furniture and belongings we already owned for the most part). Obviously there is a bit of a learning curve putting together a nursery before you actually become a parent, but since it took us a while to get our act together, we didn’t finish the space until she was about 4-5 months old. So we actually were able to tweak things as we went a bit and are really happy with the way it functions for us! There is one small exception: Juniper’s growing book collection! We are at max capacity, so we are looking into getting a tall bookshelf to replace the teal cart (boooo… I love that thing!) she has now.

To Do:

  • Replace teal cart with tall bookshelf***
  • Hanging plant for corner above the rocking horse

Kitchen

When we first toured our cottage, I instantly fell in love with the original mint cabinets. I still love them but now we have completely filled them, and I wish we could somehow find another set in a hidden adjacent room (that’s totally possible, right!?). While I keep searching for the secret entrance, we need to do a lot of decluttering, reorganizing, and improvements.

To Do:

  • New (closed) cabinetry around the fridge to create a large pantry I can actually reach***
  • Cabinet reorganization and decluttering***

In My Dream World:

  • Dishwasher. PLEASE. PLEASE. PLEASE.
  • New runner for the floor (or at least to get the existing one professionally cleaned and see where we stand!)
  • New cabinet hardware

Living Room

The actually living part of our living room works pretty well for us. We adore the sofa and television set up, as well as the records and record player. In order to use the one long blank wall for our sofa, we actually ended up using what is technically the dining room side of the space for our living area. What was supposed to be the living room around the fireplace has been record and books storage with a comfy chair to create a little book nook. However, as much as we love the chair, we don’t use it much and it tends to just collect stuff we toss on there as we come through the door. My thought, even though it is a bit untraditional since the spaces are flipped, is to use that space for a small dining area in front of the fireplace. As Juniper is getting older, I want to be able to have meals together around a real table, which we do not have at the moment! I would love to repurpose this relatively unused space as a cozy little dining area to make lots of family memories.

To Do:

  • Repair and refinish the crumbling fireplace (this is in the works with the landlord already so YAY)***
  • More functional desk with storage for printer and files***
  • Make a dining area in front of the fireplace with a 30″ round table and two chairs (with the option to add a third when we are post-highchair)
  • New desk chair… the existing one makes our legs & butt fall completely dead asleep
  • Add a floor lamp to the sofa area
  • Make a top for the shoe cabinets in the entryway
  • Maybe add additional storage to the small walls on either side of the fireplace, as well as “build in” the amp with a matching cabinet frame
  • New pillows for the sofa

In My Dream World:

  • Revisit the rug situation once we have a dining space for both living and dining
  • Consider a new coffee table
  • Upgrade the record player and speakers

Master Bedroom

Our small bedroom has already been given some love to make it as functional as possible, but could always use improvements!

To Do:

  • Earthquake prep bag/supplies for storing under the bed***
  • Refinish or replace bench
  • Headboard
  • Finish/fine-tune the art on the walls
  • Potentially replace bookshelves on either side of the bed with taller ones
  • Closet reoranization

In My Dream World:

  • New highboy dresser that fits our style better
  • Add a rug under the bed
  • New bed (the one we have now is partially broken, and I hate how bulky it is… but we need the storage so we may just have to live with it)

Bathroom

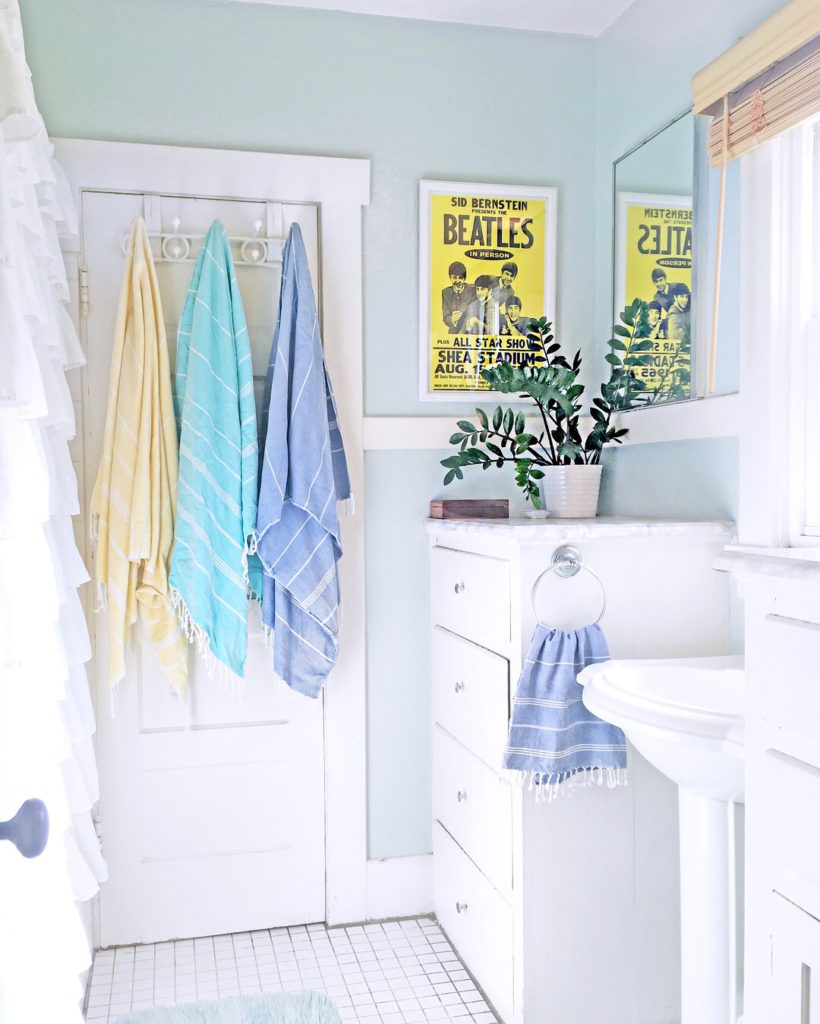
No video tour here, as it is just too small for that. Instead, here is a recent photo:

We recently had some water damage issues, so the entire bathroom was patched and repainted to this fresh, happy color! We also upgraded the peeling painted wood countertops, rainfall shower head, and bamboo shower storage between move-in and now, so we are 95% done with the bathroom now!

To Do:

  • Sand and repaint an additional repair patch that was done after the paint job (annoying haha)***
  • Paint and install the shelf we already bought for the area over the shower and add plants

Outside

Once again, no video tour here but I will post photos at some point! The outdoor space (a nice front porch, partially fenced front yard, and a fully fenced back & side yard) we have now works pretty well for us, but there are a few things we need to figure out.

  • Tricycle storage for June’s new stroller trike***
  • Better bike storage for my beach cruiser
  • Install a large sunshade we already bought for the backyard

In My Dream World:

  • Freshen up the front porch area with a new side table, as well as maybe some outdoor pillows and a rug
  • Get a second shed to put next to the existing one

There you have it! Our Pasadena Cottage in it’s true (albeit nice and clean) state. If you are still with me, thanks for reading and watching all of our hopes and dreams for making this home work better for us. Living in 820 square feet with a family of three plus a pup is totally possible, as long as we are always willing to reorganize and adapt as things change. We have hit one of those points, so I wanted to share our journey as we “Make It Work!”

My goal with all of this and the blog in general is to get back to sharing our lives with the people we love. I think a part of the reason I ended up drifting from the blog is because, as an interior designer, I feel pressure to only post things that are picture perfect in case people see it as a reflection of my work. Obviously no one really lives like that, so it became more of a chore than a joy. So now I am saying screw it… I’d like to have this outlet back to share our lives, our work-in-progress but still very loved home, and yeah, maybe a bit of my work. I can’t promise I will post every week, but I would like to bring this blog back into our lives in some capacity. I think leaving it free and open like that will make it fun again!

So welcome back to Our Cozy Cubbyhole. It’s small but it’s ours! And we are happy to have you all back on this journey with us! :)