Decorist: Caroline’s Guest Bedroom
Happy Friday, all! It’s been a busy one around here trying to get unpacked and readjusted to our normal routine after the long trip. But we have no plans this weekend, so hopefully we can fit in a bit of relaxing around all of the remaining cleaning and loads of laundry!
As promised, I wanted to share the third project I worked on for my sweet client, Caroline, in the lovely old house in New Orleans. As with the master bedroom, she wanted this room to have an eclectic modern feeling with a hint of bohemian flair, tons of cozy texture, and a sophisticated color palette that flowed with the other rooms in her home. This room was a blank slate, with no existing items to work with (besides some AMAZING floor to ceiling windows if that counts!), which is always super fun! Caroline wanted a comfortable, functional, and gorgeous guest room to host the myriad of visitors that would inevitably come through once her little bundle of joy arrived. While her original thought was just a bed and some sort of clothes storage (as there is no closet), I also thought we should explore some additional seating, suitcase storage, and workspace options to make her guests more comfortable on their stay. So after selecting a couple of the staple pieces, here are the concepts I created for her.
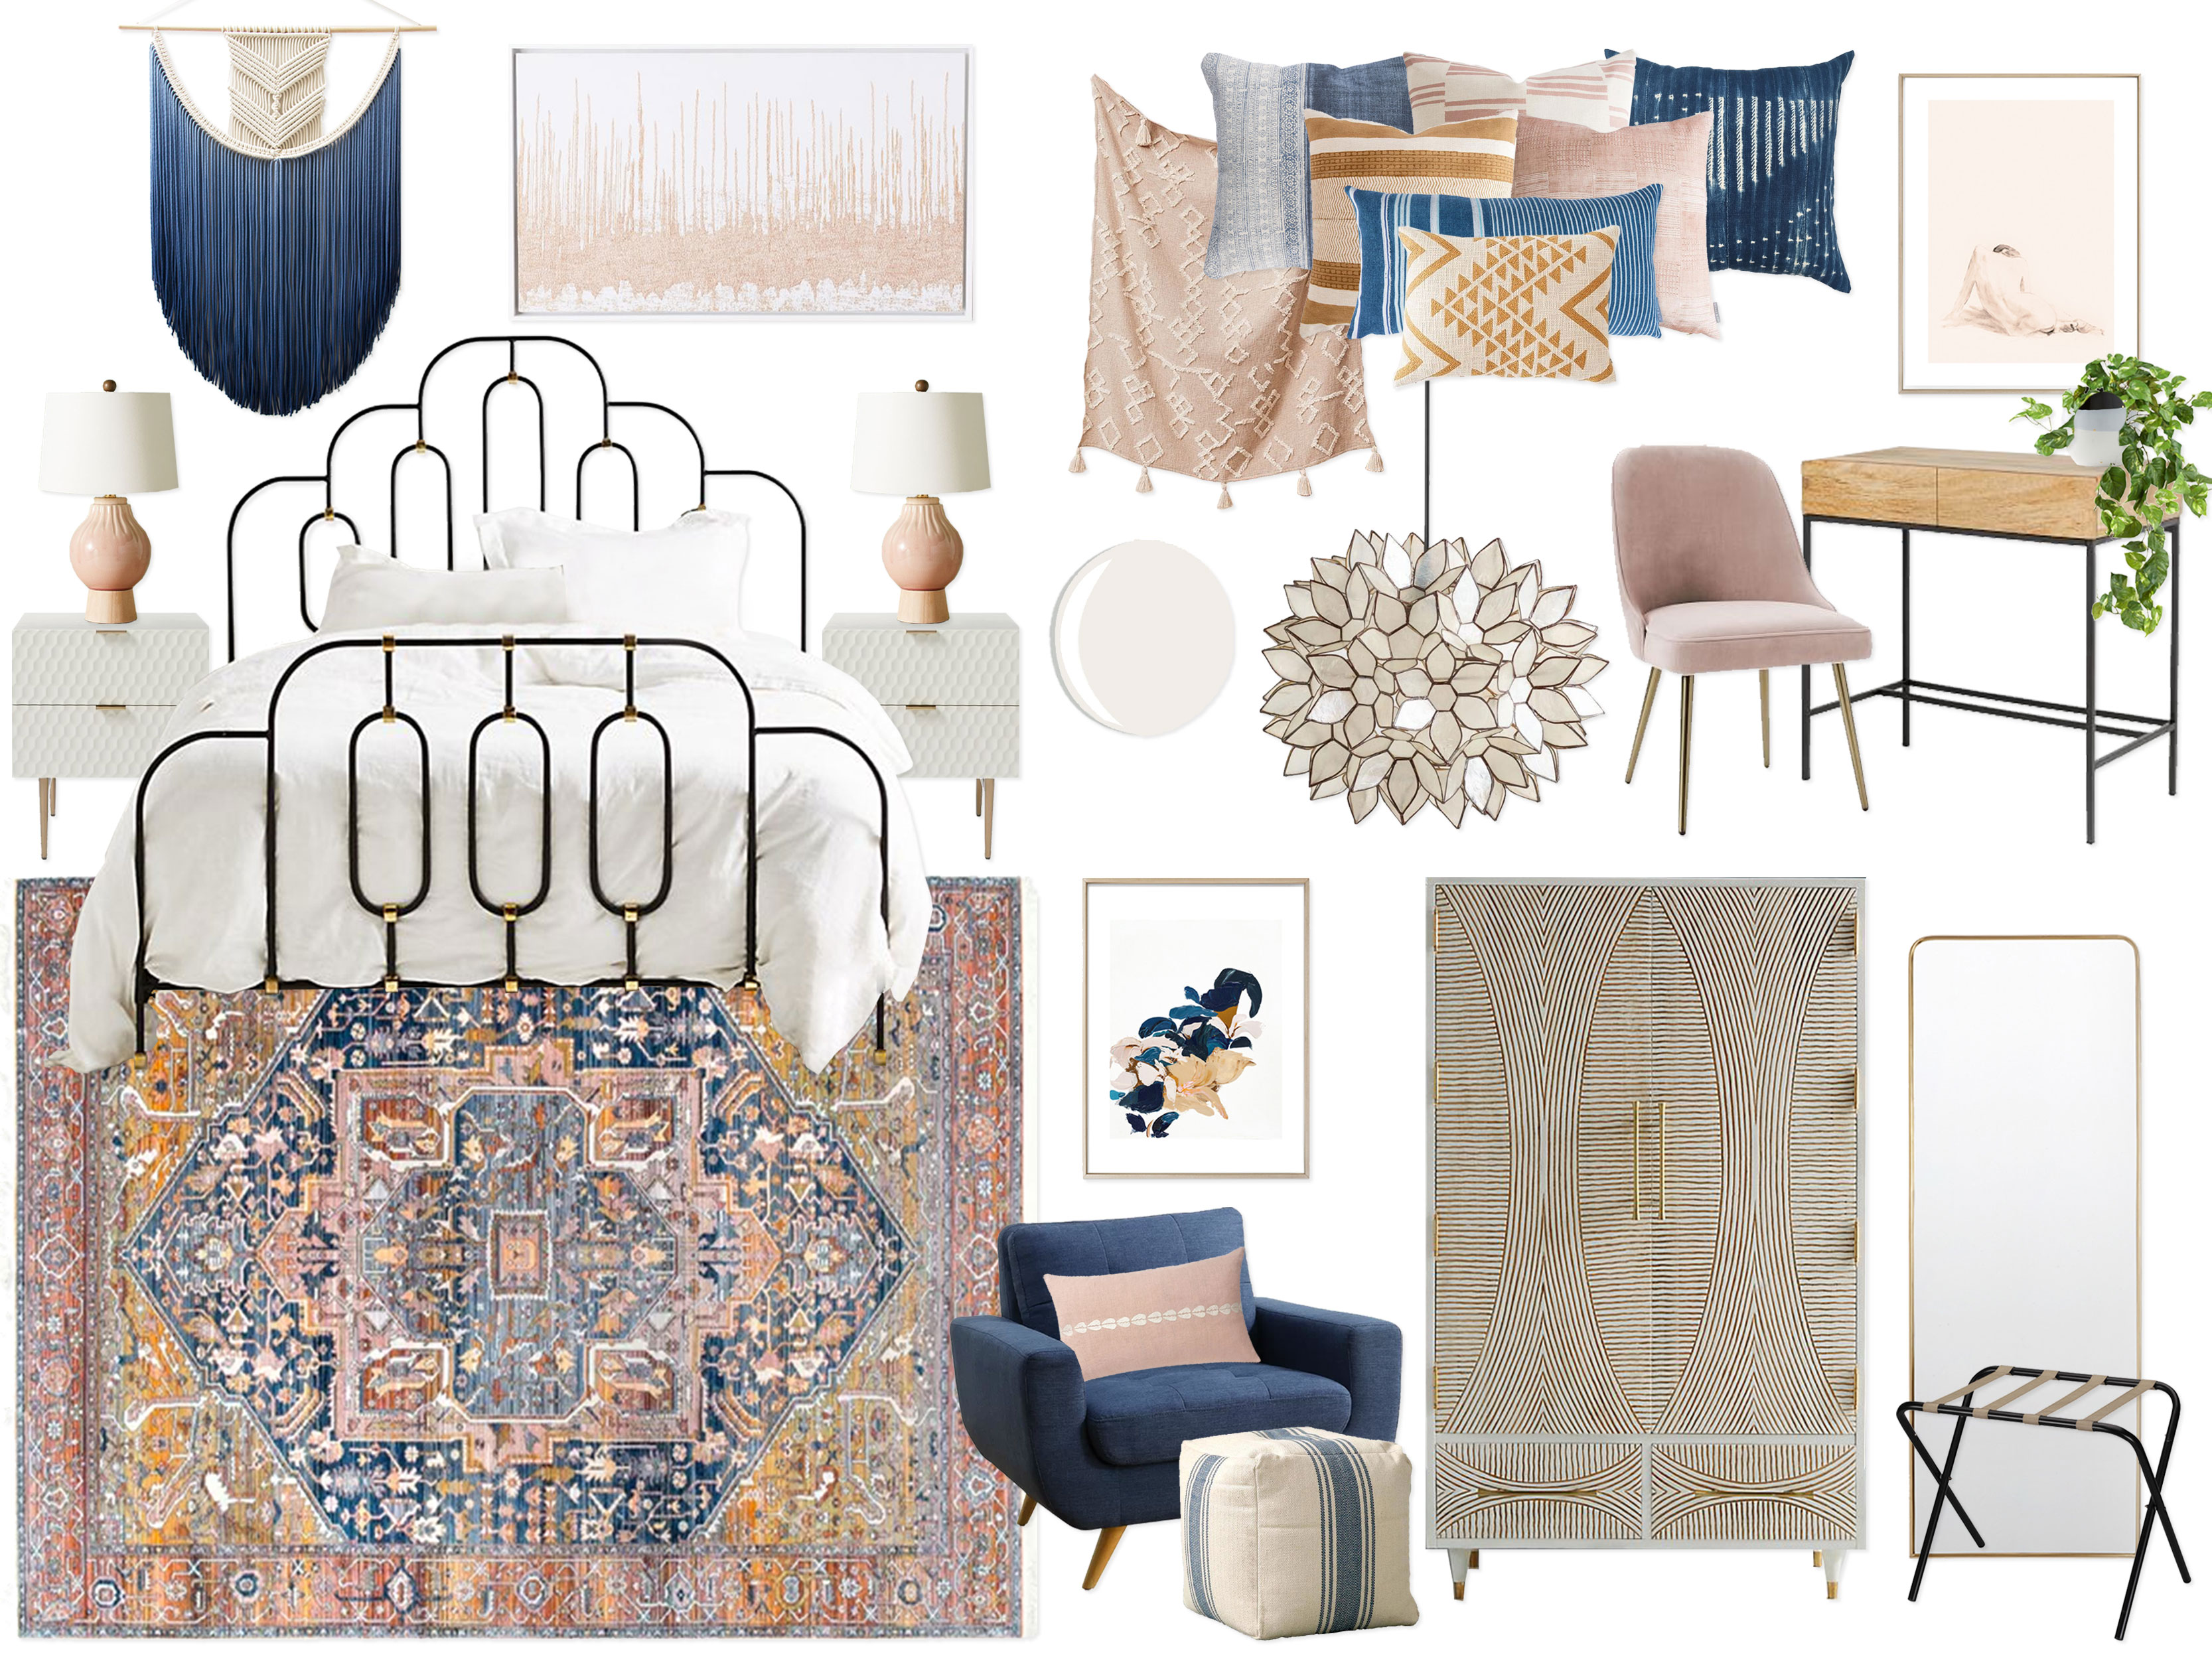
Concept 1: Deep Indigo, Blush & Cognac
(click image to enlarge)
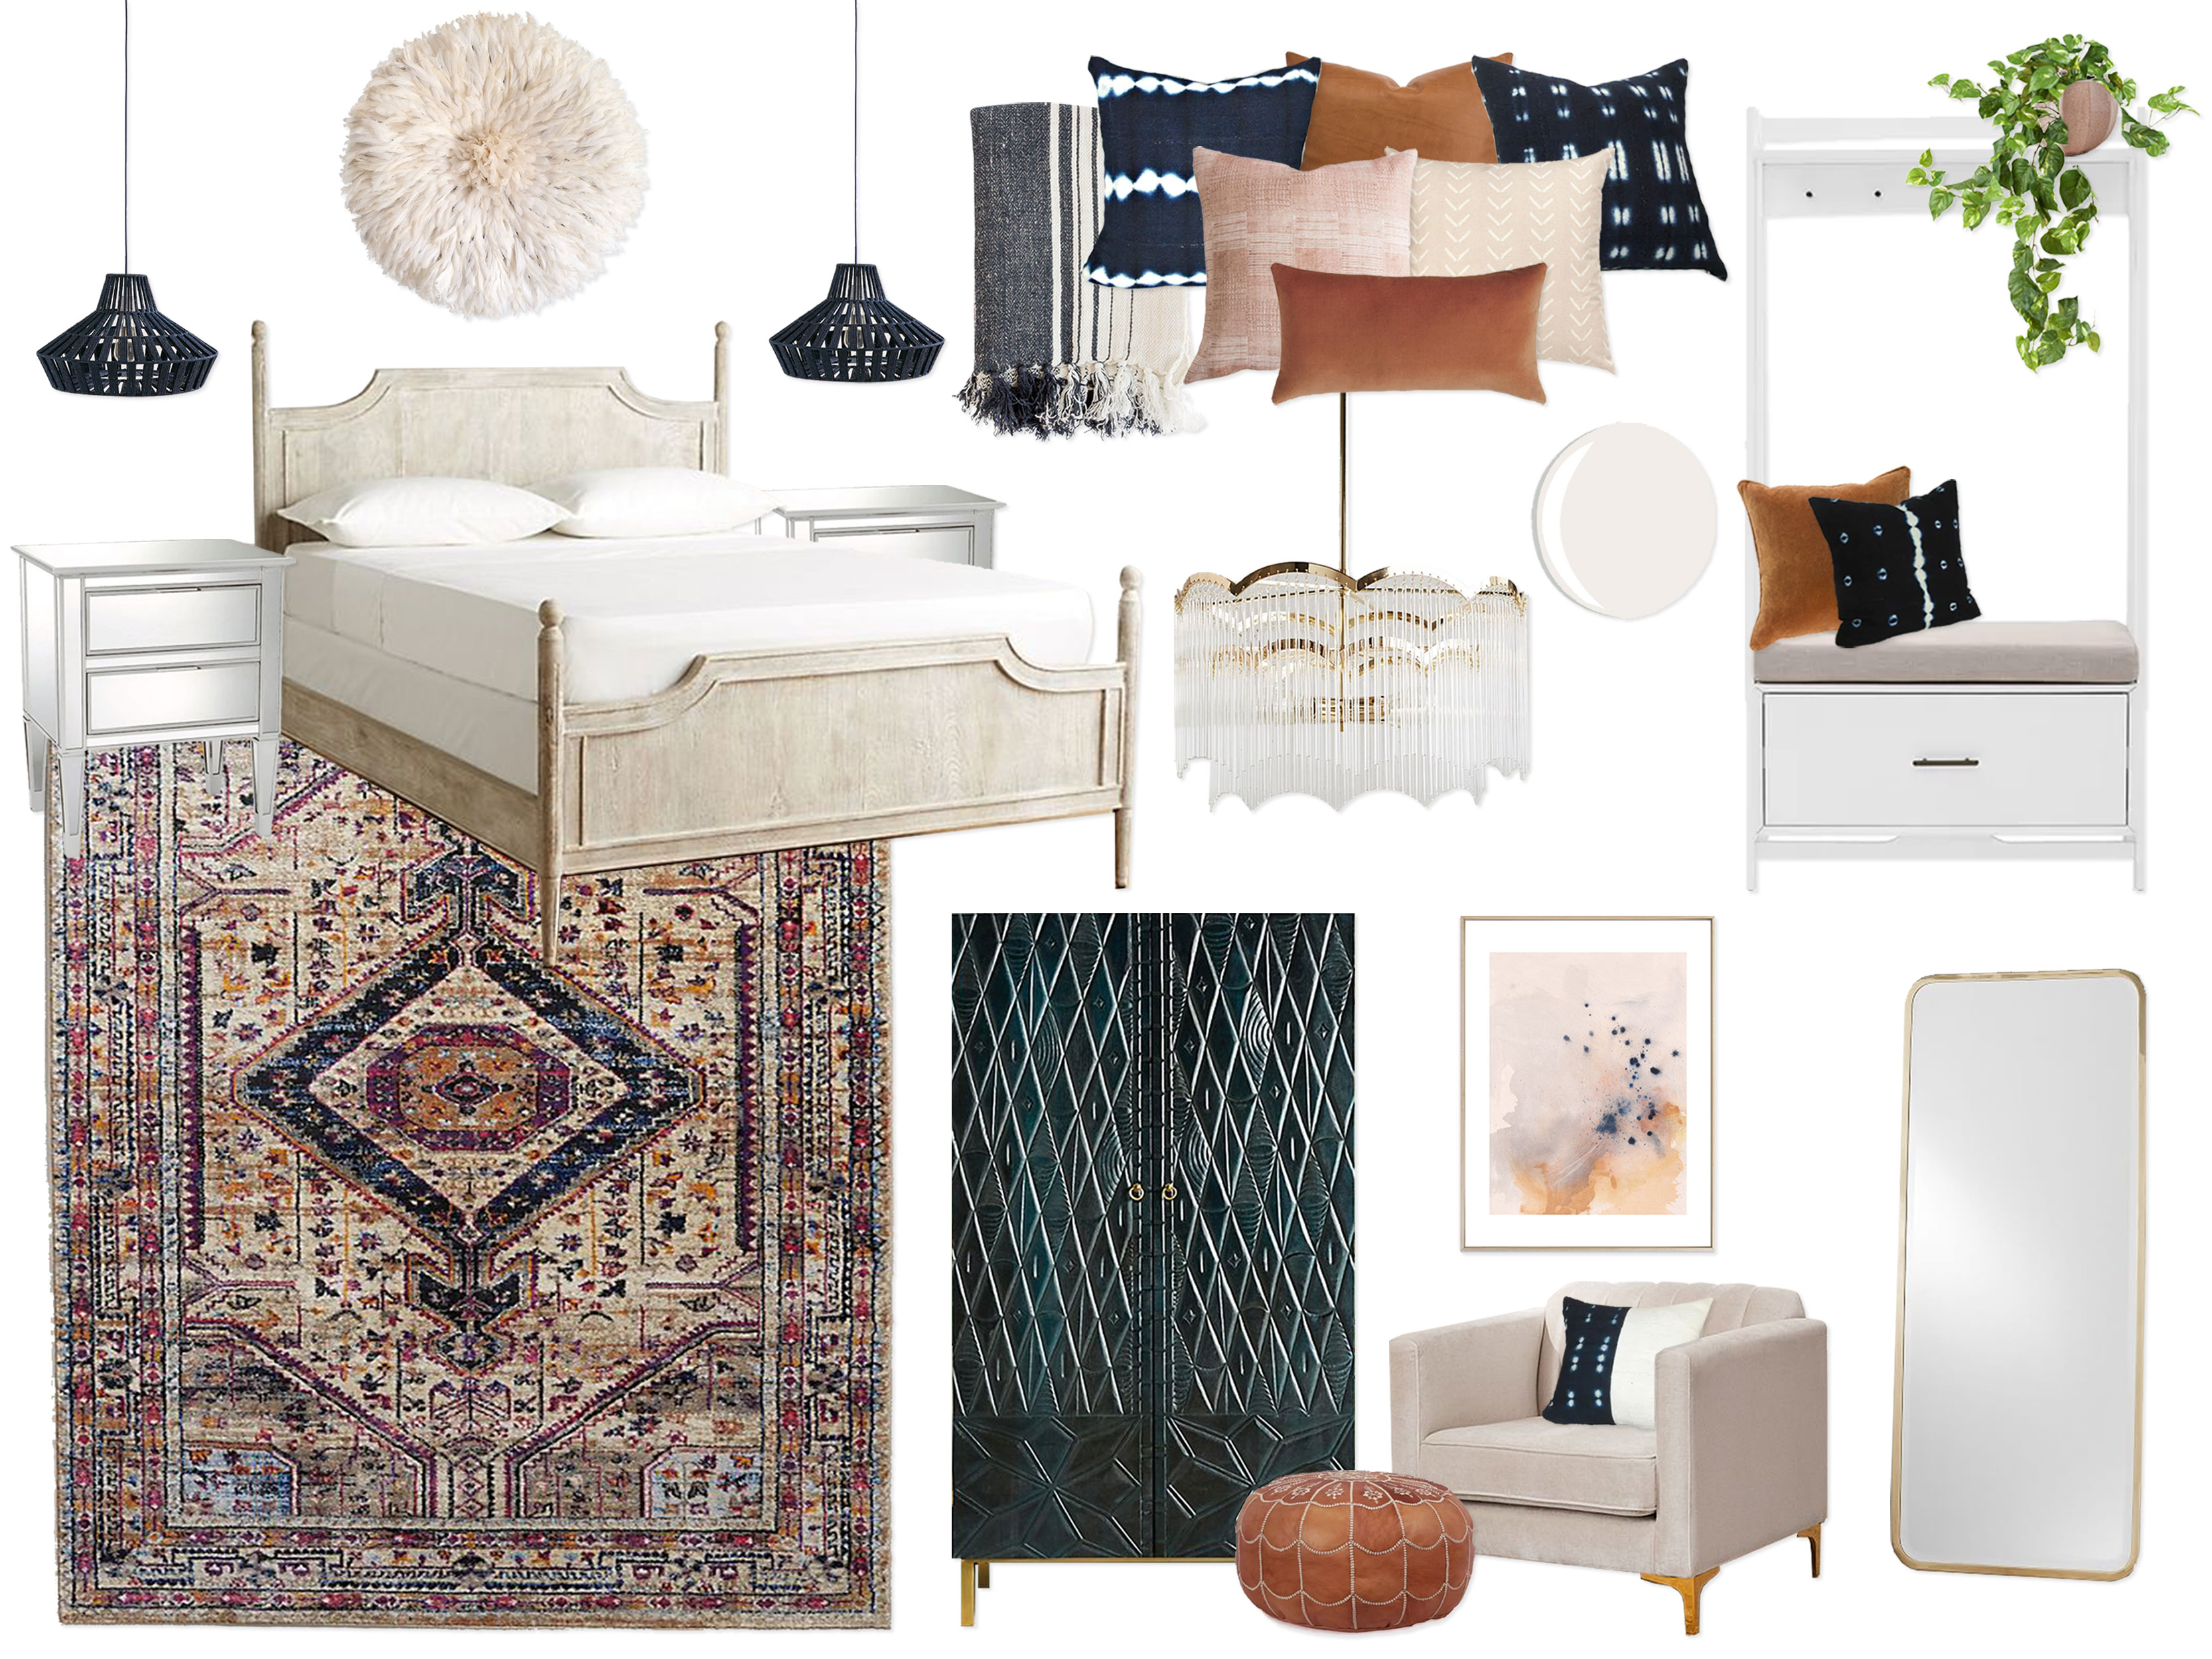
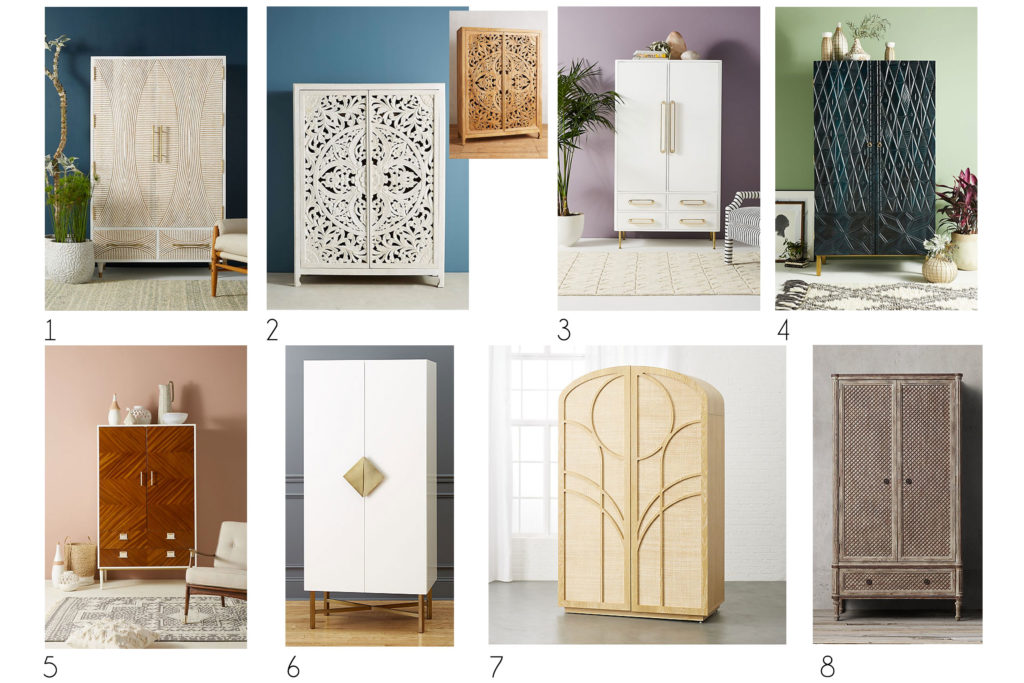
“Inspired by the neutral yet high contrast palettes in your inspiration photos, this design embraces the elegance of layered neutral tones (bright white, warm ivory, and sand) with pops of high contrast deep indigo and rich cognac, as well as metallic accents in brass. The walls are painted in the same crisp off-white (BM White Dove) as the rest of your home, creating the perfect clean, fresh foundation to let the color palette really pop. Setting the tone for the entire color palette in the space is the show-stopping medallion rug. A lovely washed wood bed is surrounded by your existing mirrored nightstands, as well as two plug-in indigo jute pendant lights. Centered above the bed is a jaw-dropping feather African Juju Hat, which gives the modern elegant space a hint of natural bohemian charm. Giving the room personality, coziness, and visual interest are the array of amazing pillows of deep indigo dye, cognac leather & velvet, sand mudcloth, and blush patchwork, as well as a striped indigo throw blanket draped across the bottom of the bed (which has a crisp bright white duvet). Not to be outdone by the incredible bed and rug, a jaw-dropping deep indigo and brass carved armoire sits on the wall opposite the bed and provides lots of clothes storage space for your guests. Floating next to the armoire is a lovely beige velvet chair for guests to sit, complete with a deep indigo pillow, cognac leather pouf ottoman, and beautiful piece of artwork centered above. Adding a few more convenient and comfortable touches for your guests, the room also boasts a gorgeous floor length brass mirror for outfit checks, as well as a white midcentury hall tree and bench (with two lovely throw pillows) for taking off shoes and hanging jackets, which also doubles as a suitcase station if needed with the cushion removed! These multi-purpose touches will ensure your guests have a comfortable and functional stay. No room would be complete without it’s eye candy, so the final touch in the space is a magnificent curved arch waterfall chandelier. Calming, fresh, modern, packed with cozy texture, and complete with a punch of bold contrast, this elegant design creates a perfect luxurious and functional guest suite for all of your friends & family already booking their visits to come meet the new bundle of joy!”
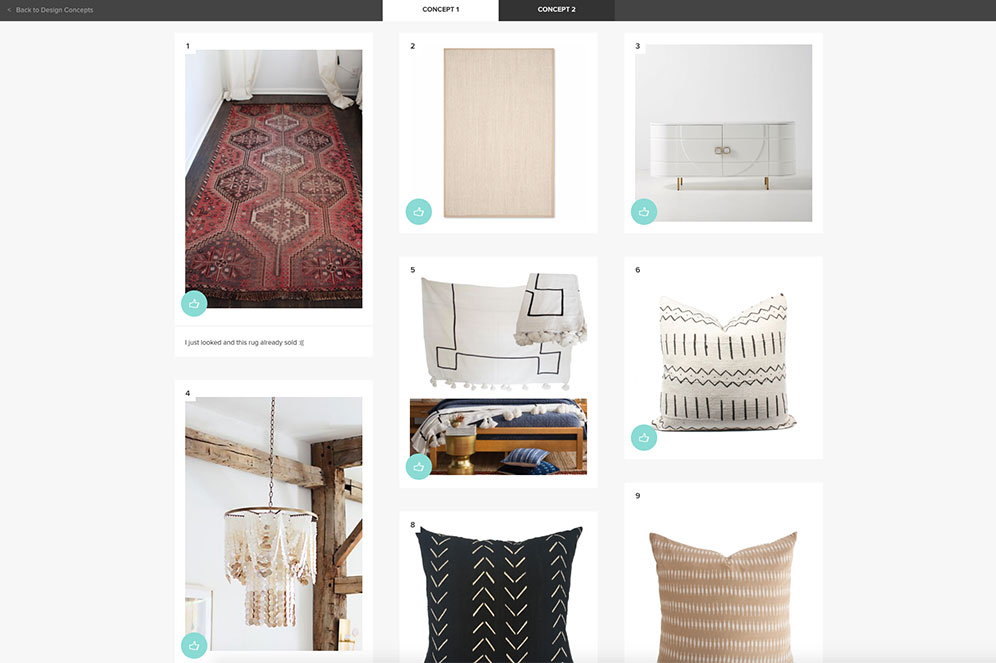
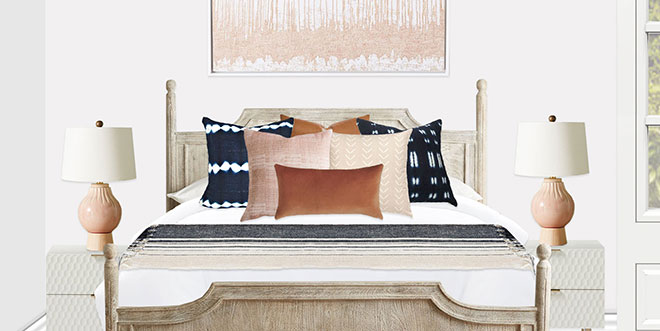
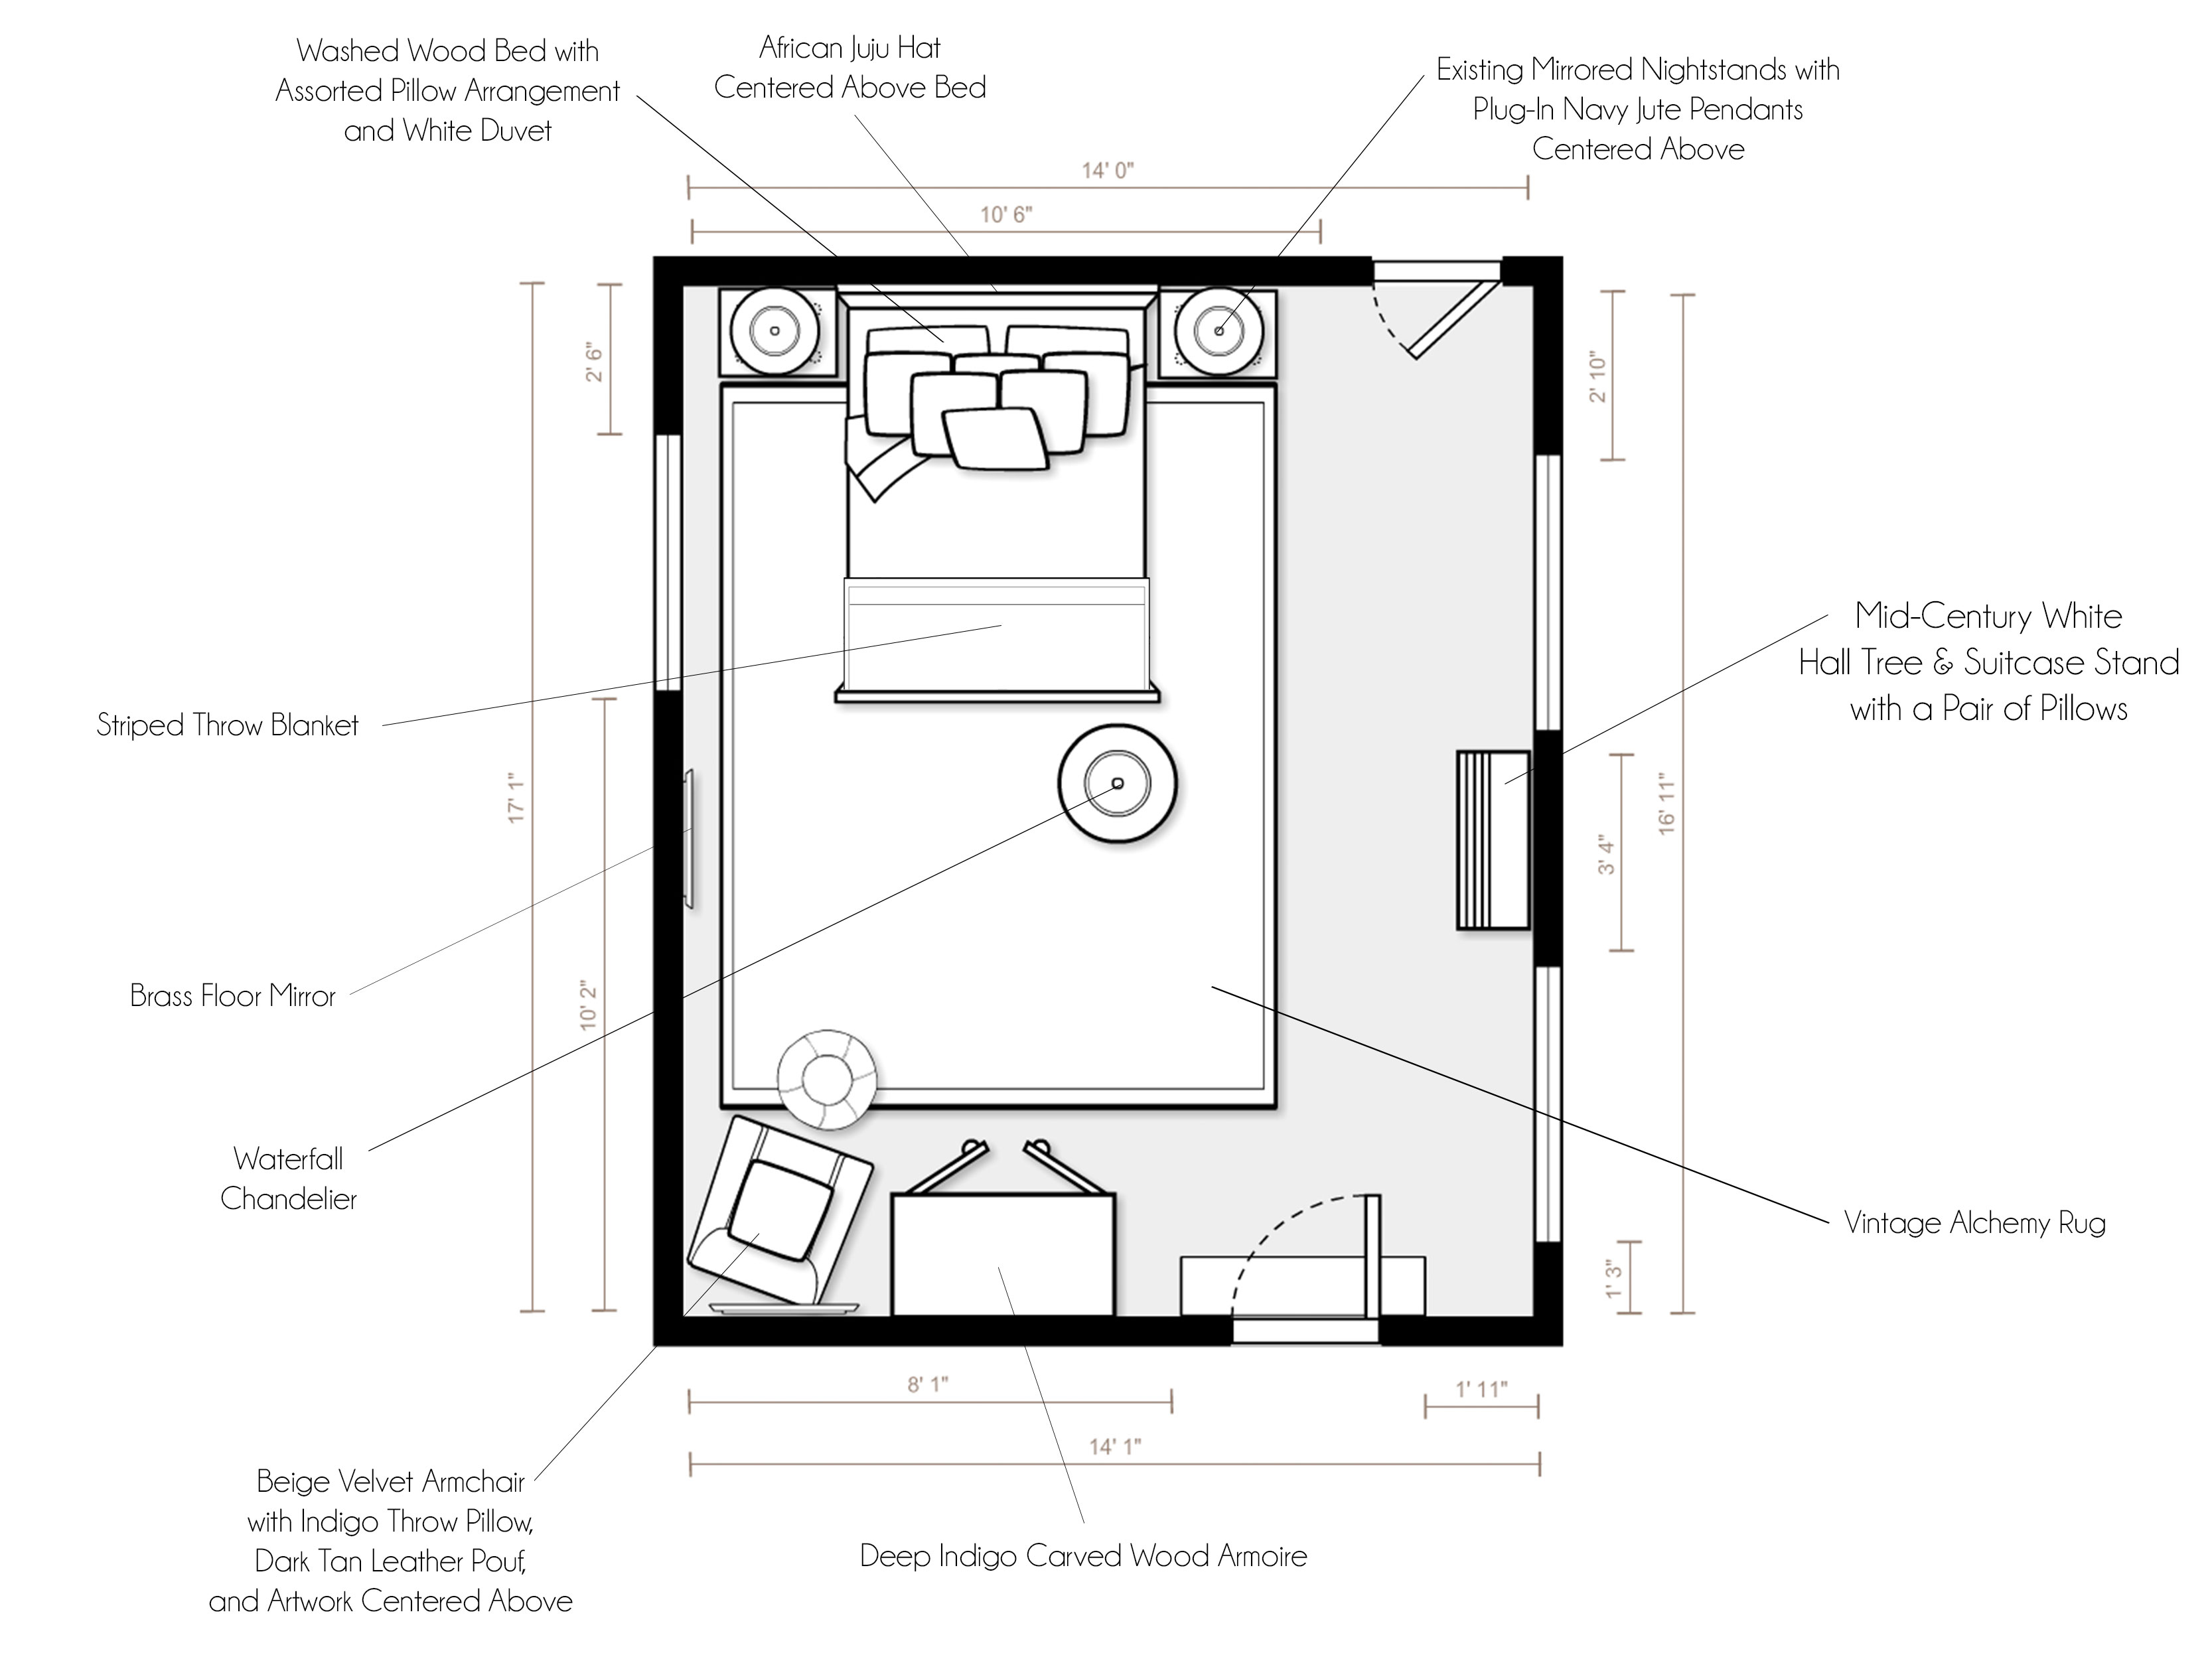
Concept 2: Denim Blue, Blush, Mustard & Natural Wood
(click image to enlarge)
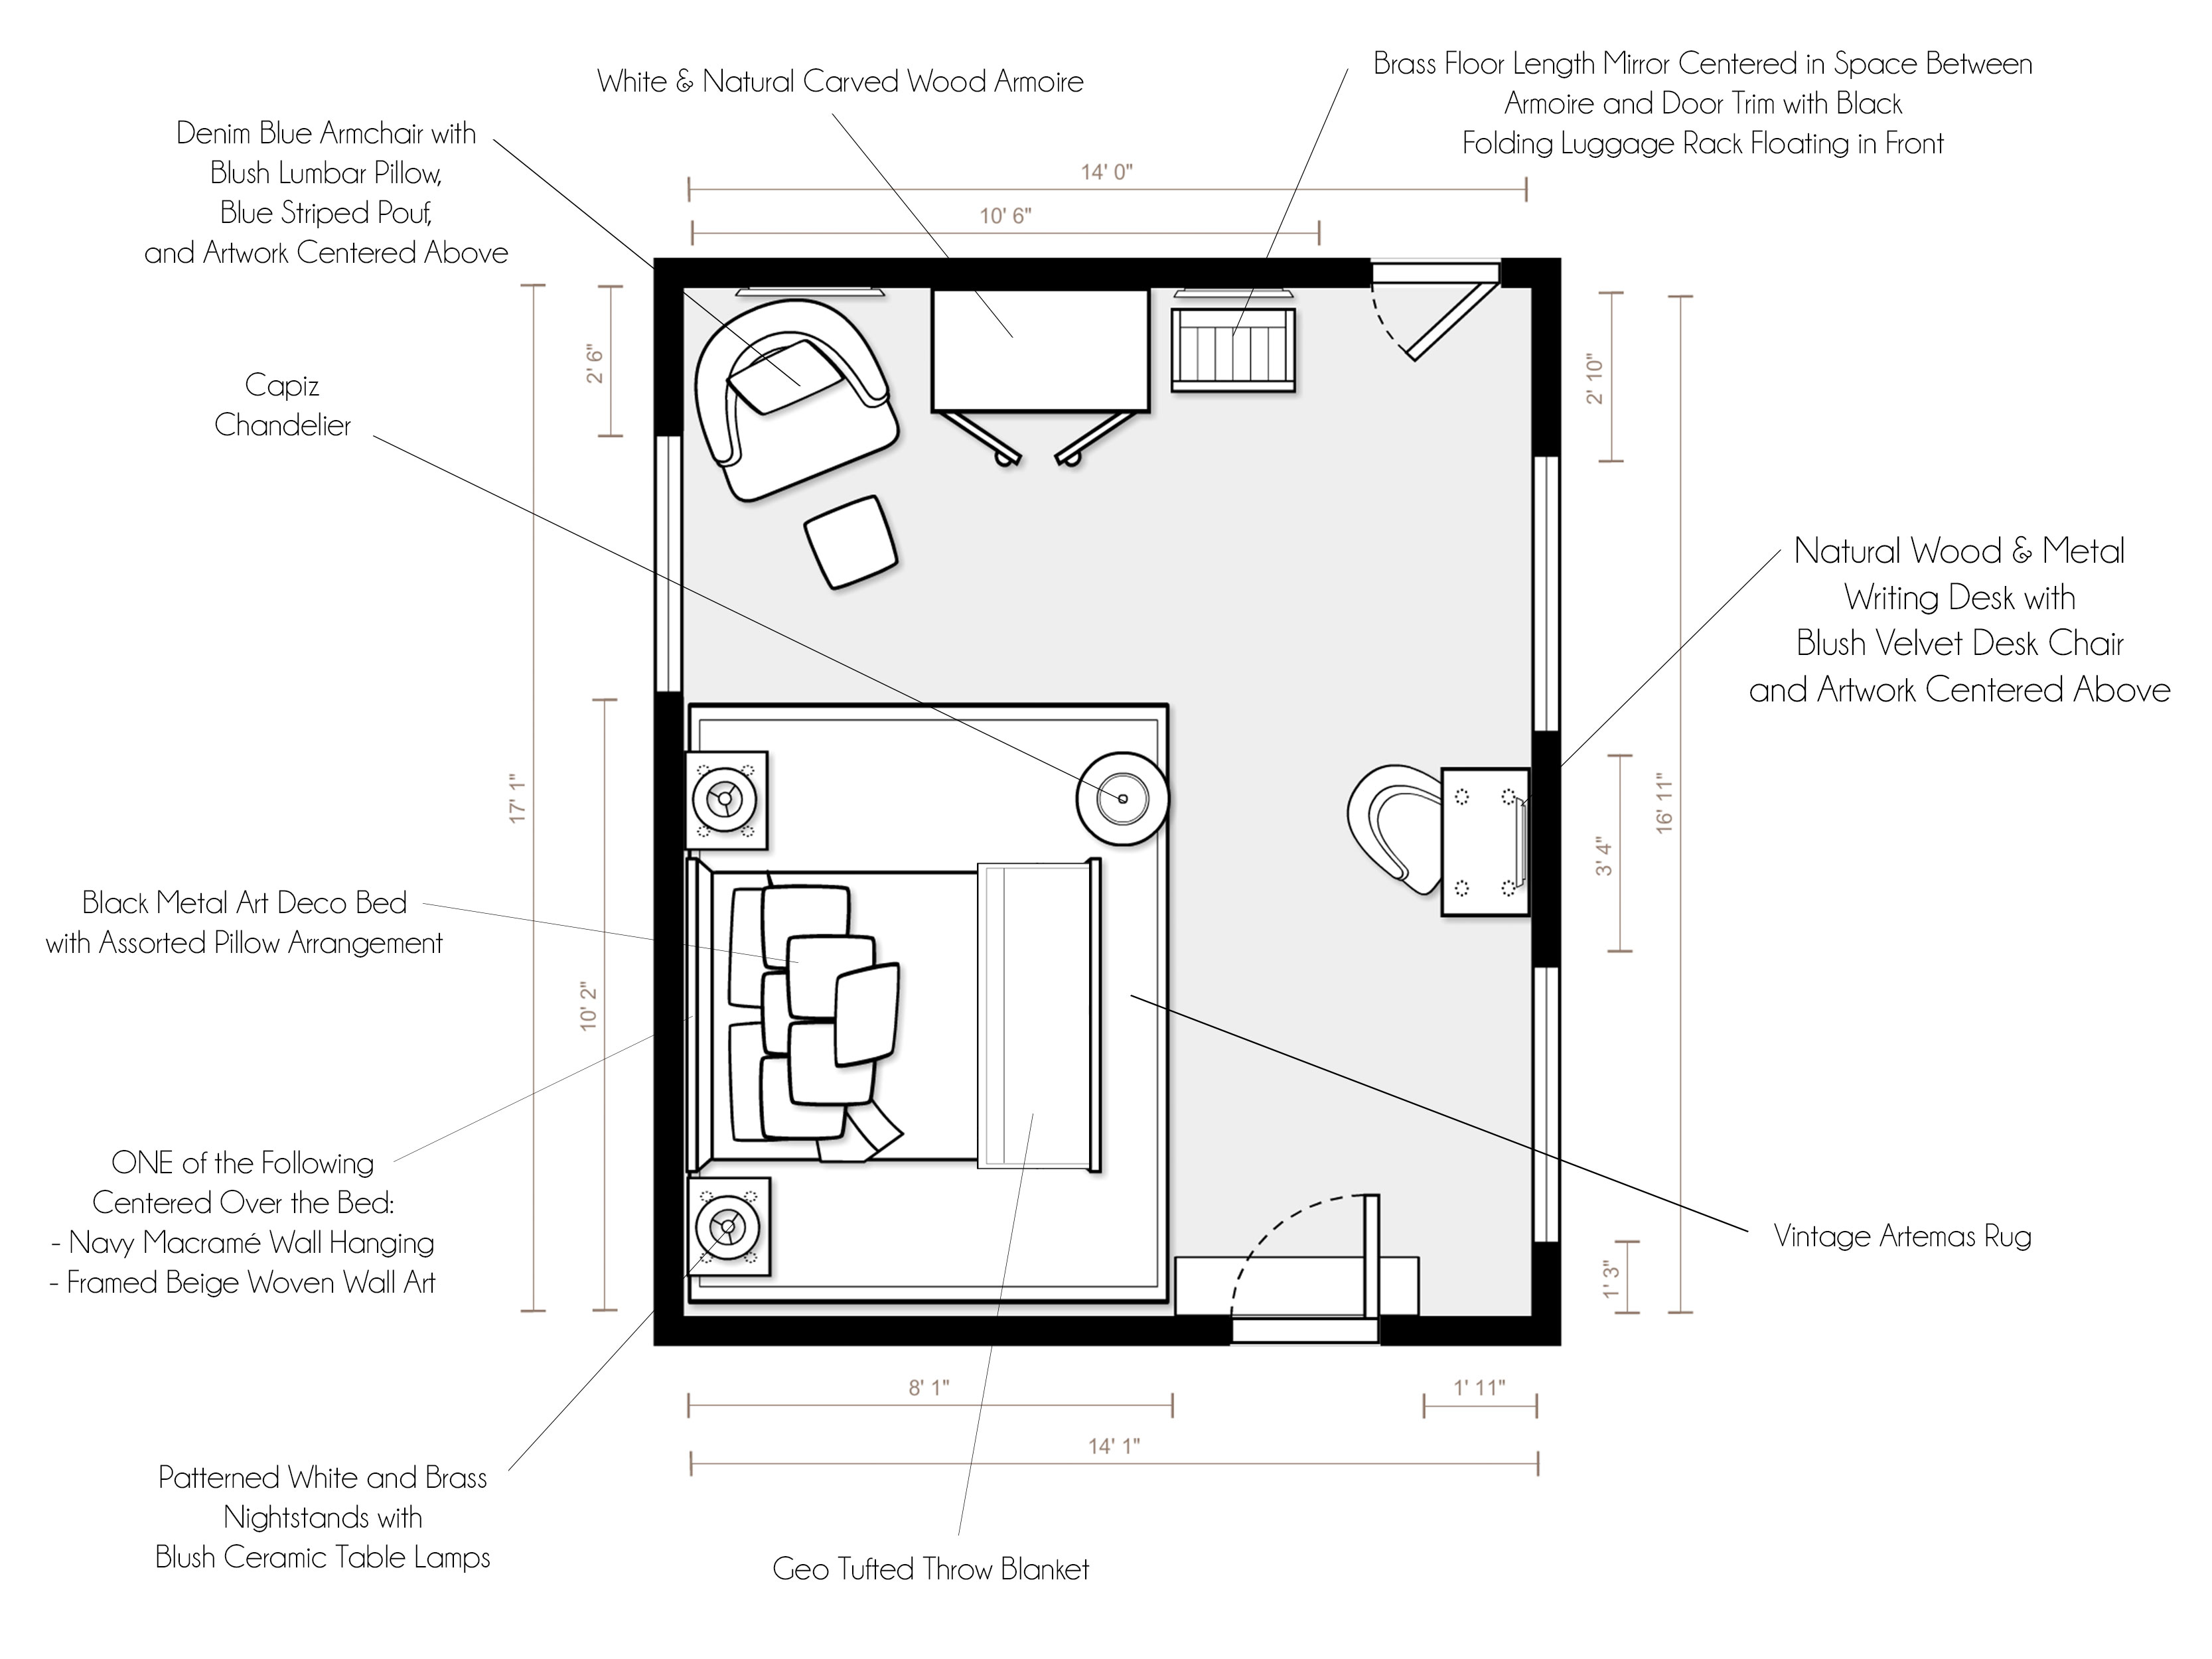
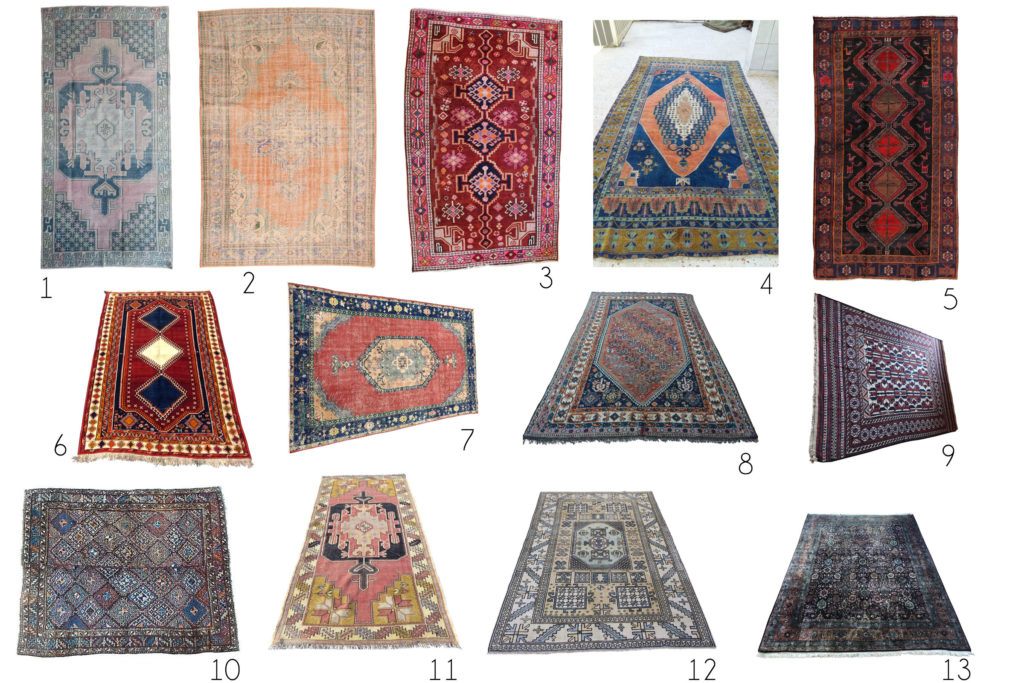
“Sparked by your many inspiration images with colorful yet sophisticated color palettes, this design embodies a modern vibe with a hint of a bohemian spirit, complete with a beautiful color palette of navy, denim blue, bright white, blush, and mustard, as well as natural wood tones and metallic brass accents. To flow consistently with the rest of your home and create a fresh backdrop for the space, the walls are painted the same crisp off-white as the other rooms in your home (BM White Dove). Creating the color palette for the entire room, the incredible Persian rug takes center stage. An outstanding black metal Art Deco bed is outfitted with the most amazing dyed indigo, denim blue striped, blush striped & textured, and mustard patterned pillows, as well as a crisp bright white duvet and a rosy beige geo tufted throw blanket at the bottom of the bed. On either side of the bed sit two lovely textured modern white and brass nightstands, both of which have beautiful blush ceramic table lamps on top. Centered above the bed, you have a choice of a more bohemian navy ombre macrame wall hanging or a more modern framed beige woven wall hanging. Both have a handmade, natural feeling while creating an incredible focal point on the bed wall. Once again, not to be rivaled by the wonderful bed, a magnificent natural wood, white, and brass carved wood armoire sits on the wall leading to the bathroom and is the first thing you see when you enter. The armoire is flanked on one side by a denim blue armchair (complete with a blush lumbar pillow, striped denim square pouf, and a lovely piece of artwork centered above) and a full length brass mirror and folding, portable black metal luggage rack on the other, creating the perfect area for guests to store clothes, get dressed, relax, and make themselves at home. Another touch to ensure guests will have a comfortable, convenient (and productive) stay is the small natural wood and black metal writing desk with blush velvet desk chair and artwork centered above… now they can get a little work done while the baby (and you!) nap. A geometric capiz shell chandelier finishes off the space with a modern, natural, bohemian flair! This design walks the fine line between modern & bohemian, colorful & refined, elegant & fun, and luxurious & humble with an elegance that makes it a perfect oasis for all of your visitors in town to meet your baby!”
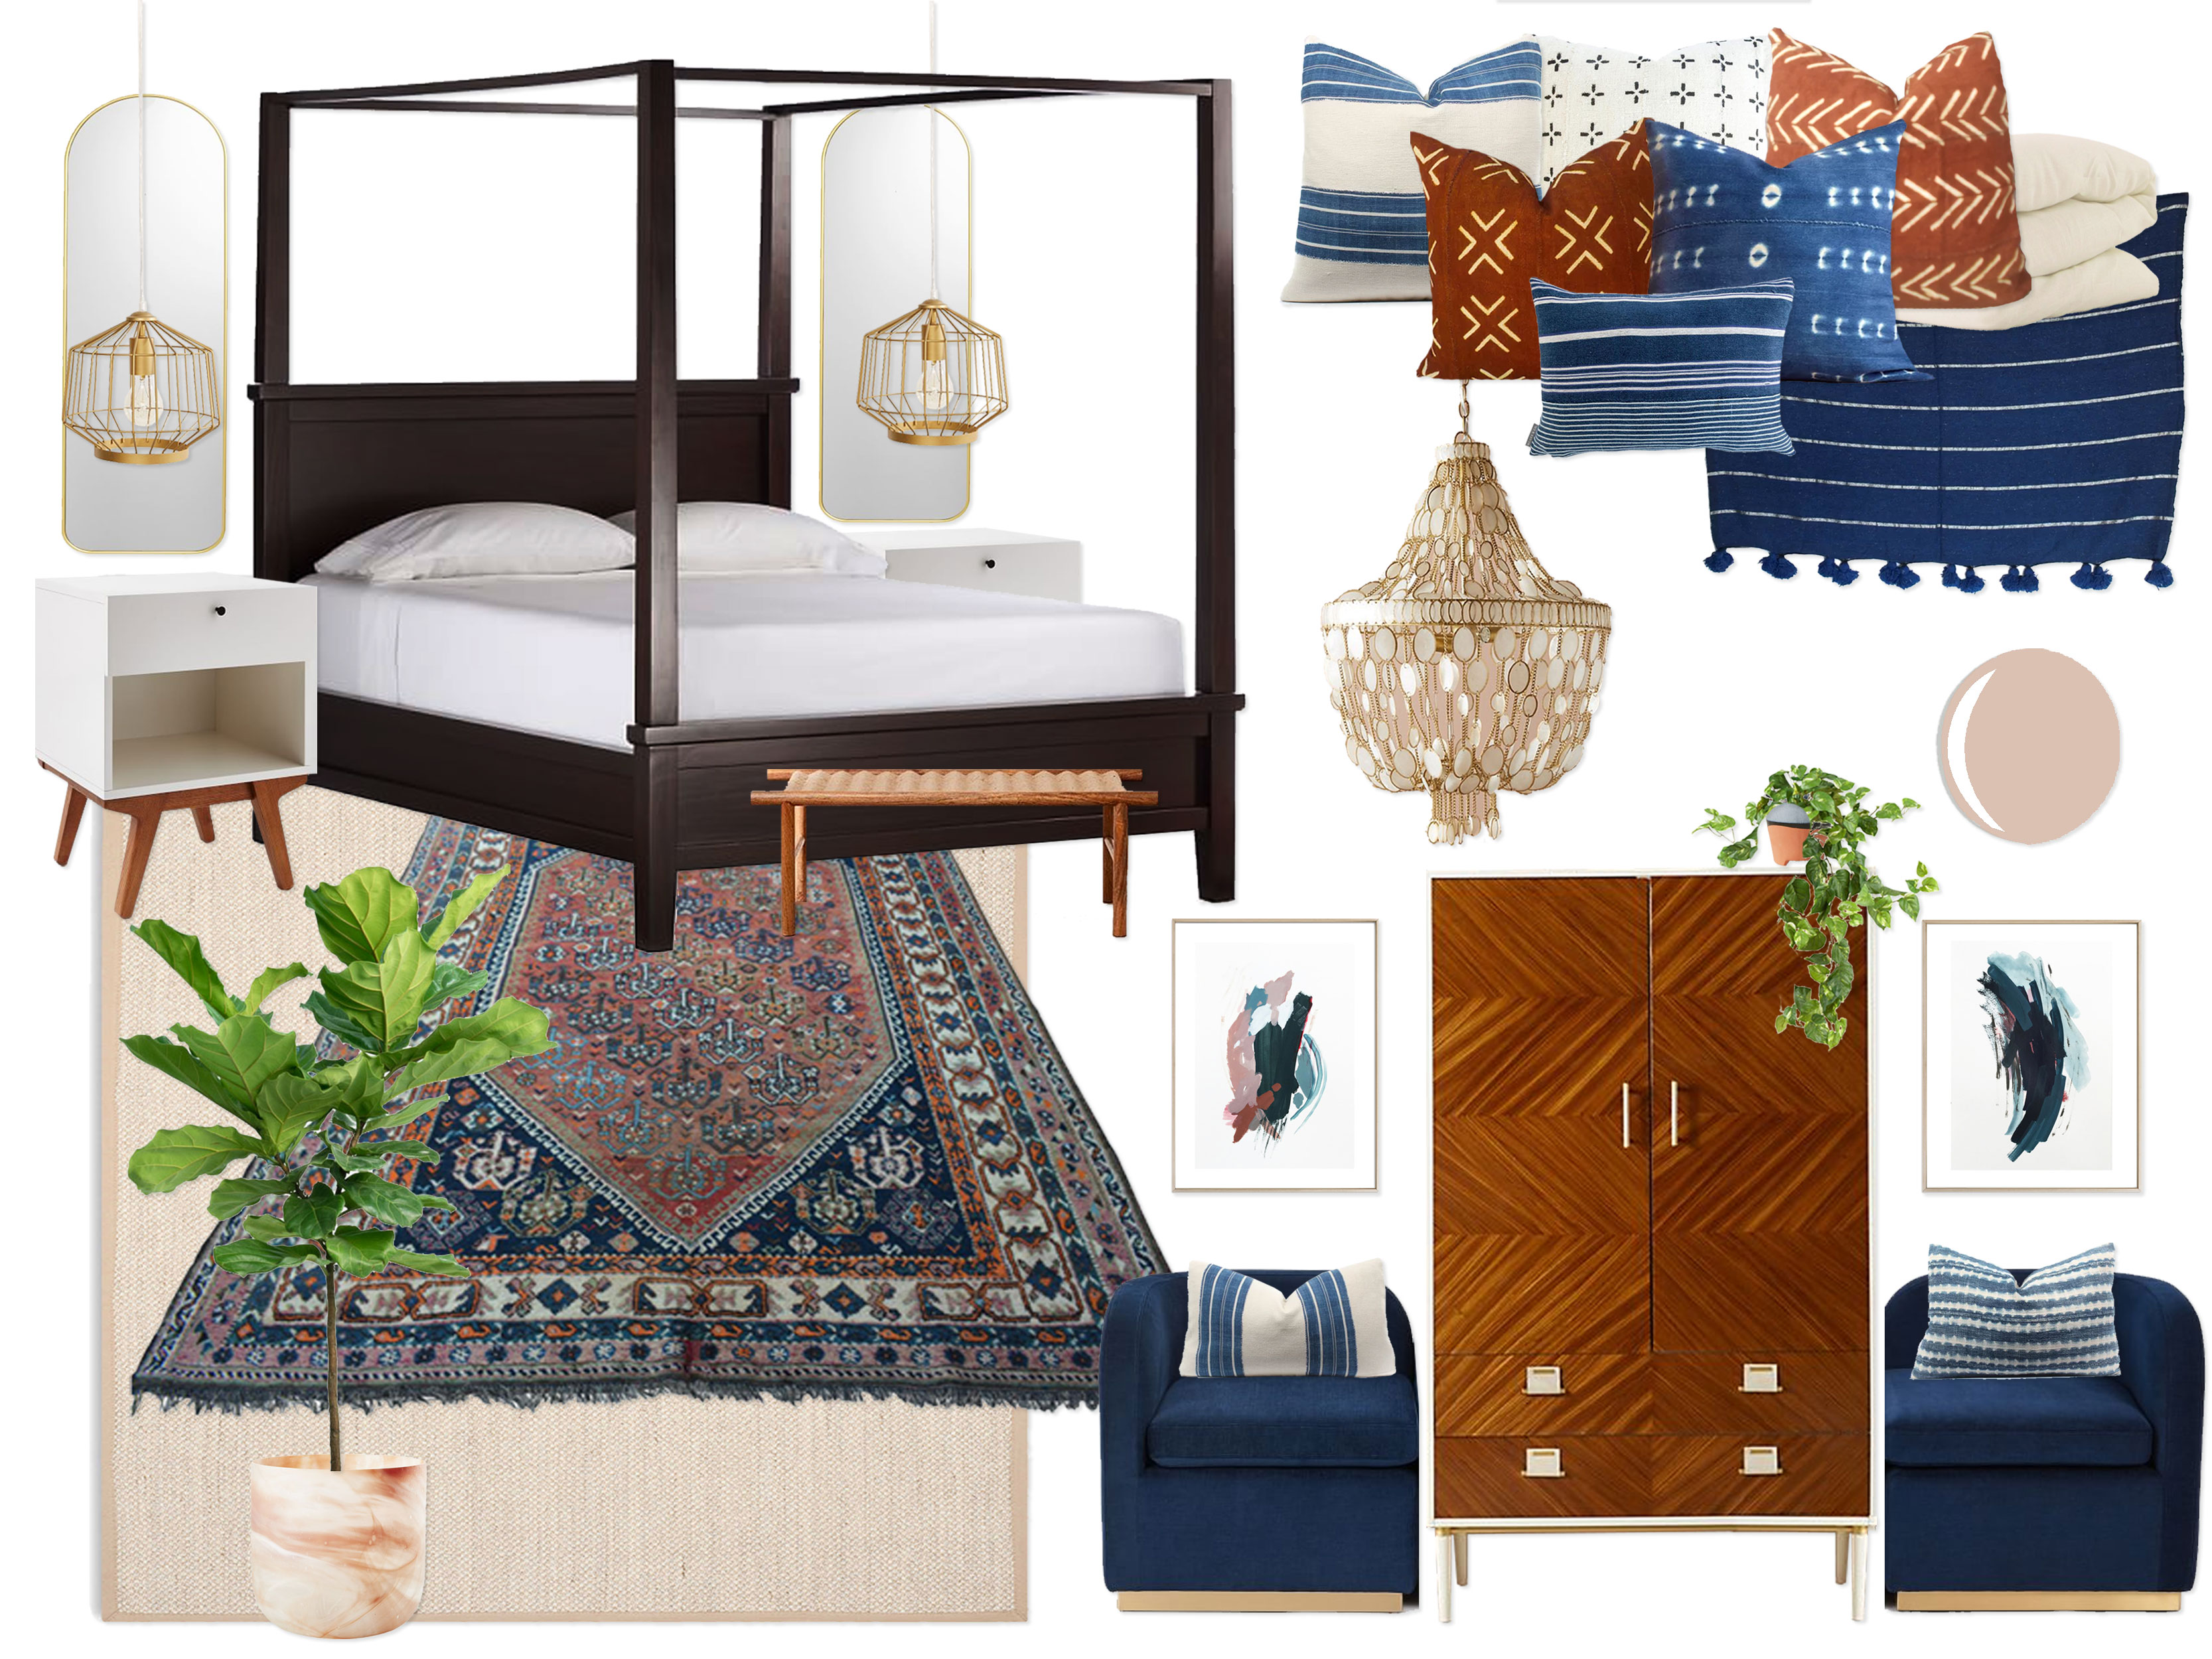
After reviewing these guest room concepts, as well as her master bedroom concepts at the same time, Caroline’s feedback sent this project down a super fun path! Usually the client loves one concept or blends the two concepts to an extent. As you recall, Caroline chose concept 1 outright for her master bedroom. However, there were elements of master bedroom concept 2 that Caroline loved and couldn’t get out of her head! So what she wanted to do was blend all three of the remaining concepts to create the perfect final design for her guest space! Here is the second master bedroom concept as a reminder:
So here is what she decided she wanted from each one:
GUEST 1:
From the first guest room concept, Caroline loved the overall color scheme, pillow arrangement, blanket, and bed.
GUEST 2:
From the second guest room concept, Caroline loved the room layout, rug, armoire, framed art piece above the bed, desk area, nightstands, and table lamps.
MASTER 2:
From the second master bedroom concept, Caroline loved the way the tete-a-tete was split and surrounding the armoire. She also loved the art above the tete-a-tete, light fixture, and the blue vintage rug.
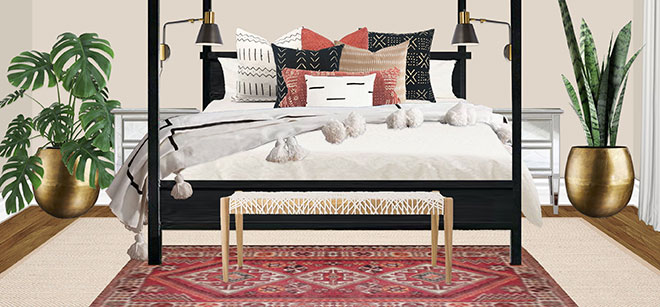
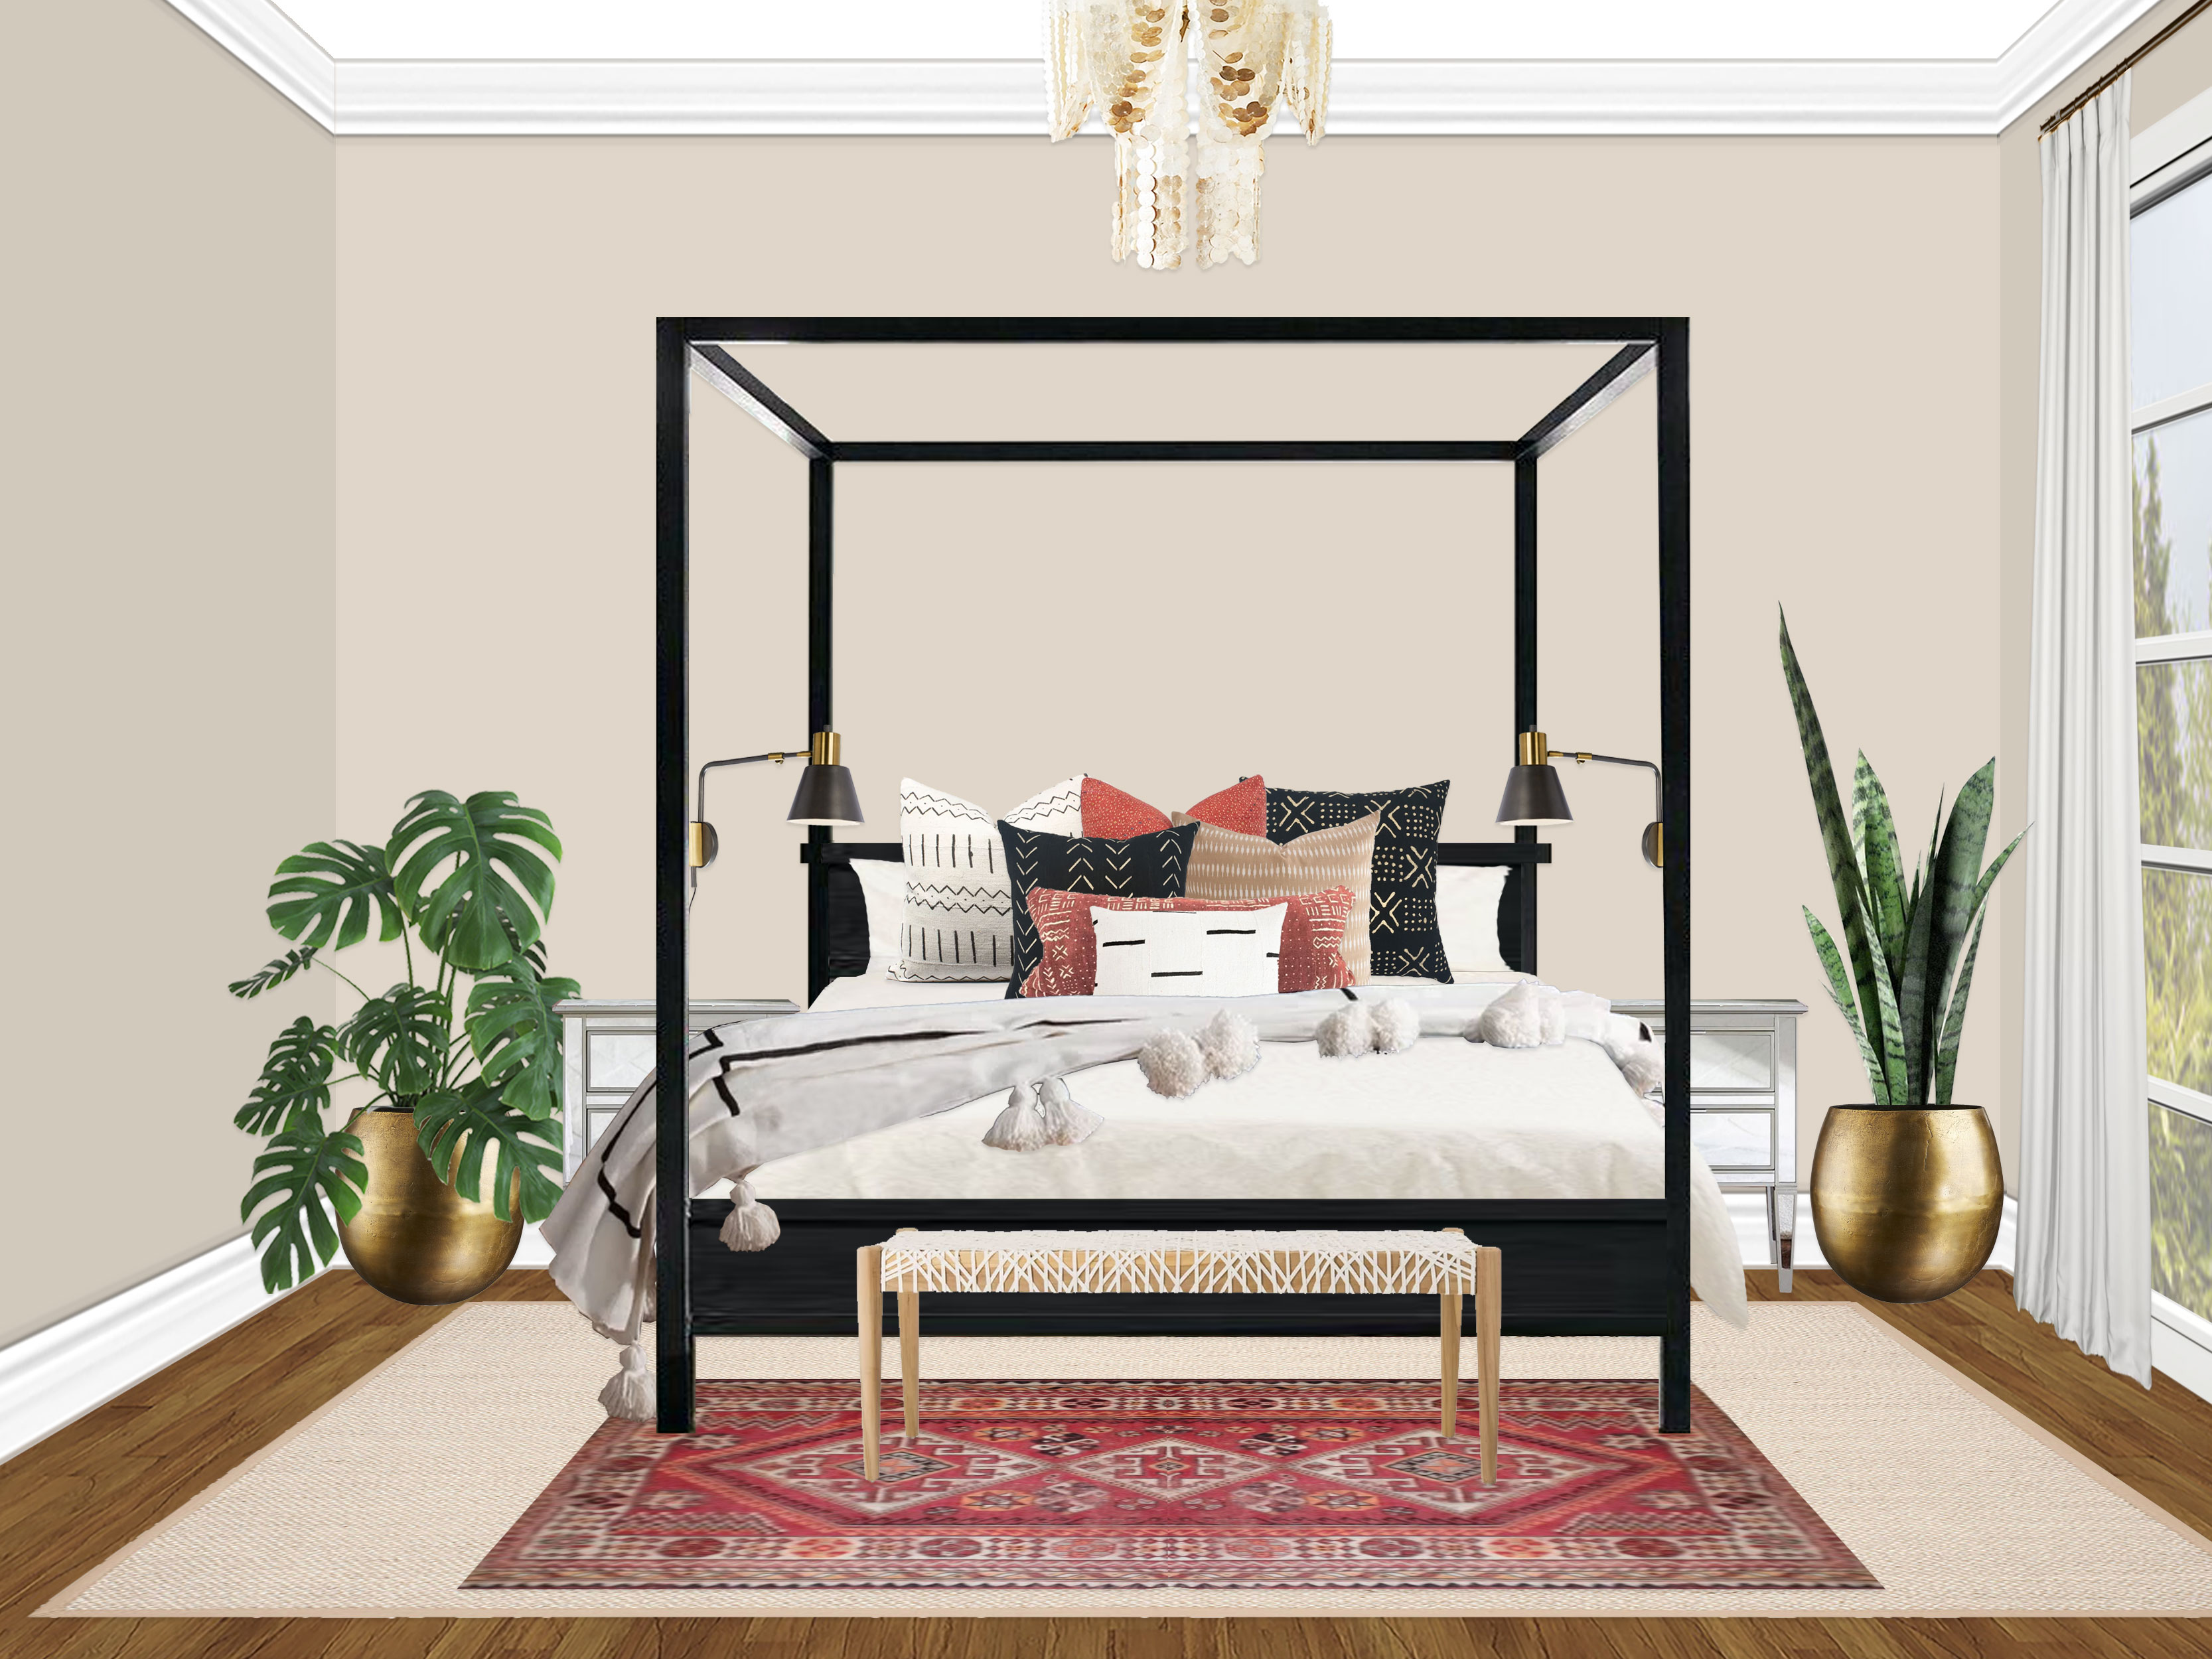
I combined all of these elements together for her, made a couple more tweaks, and here is the final design!
(click image to enlarge)

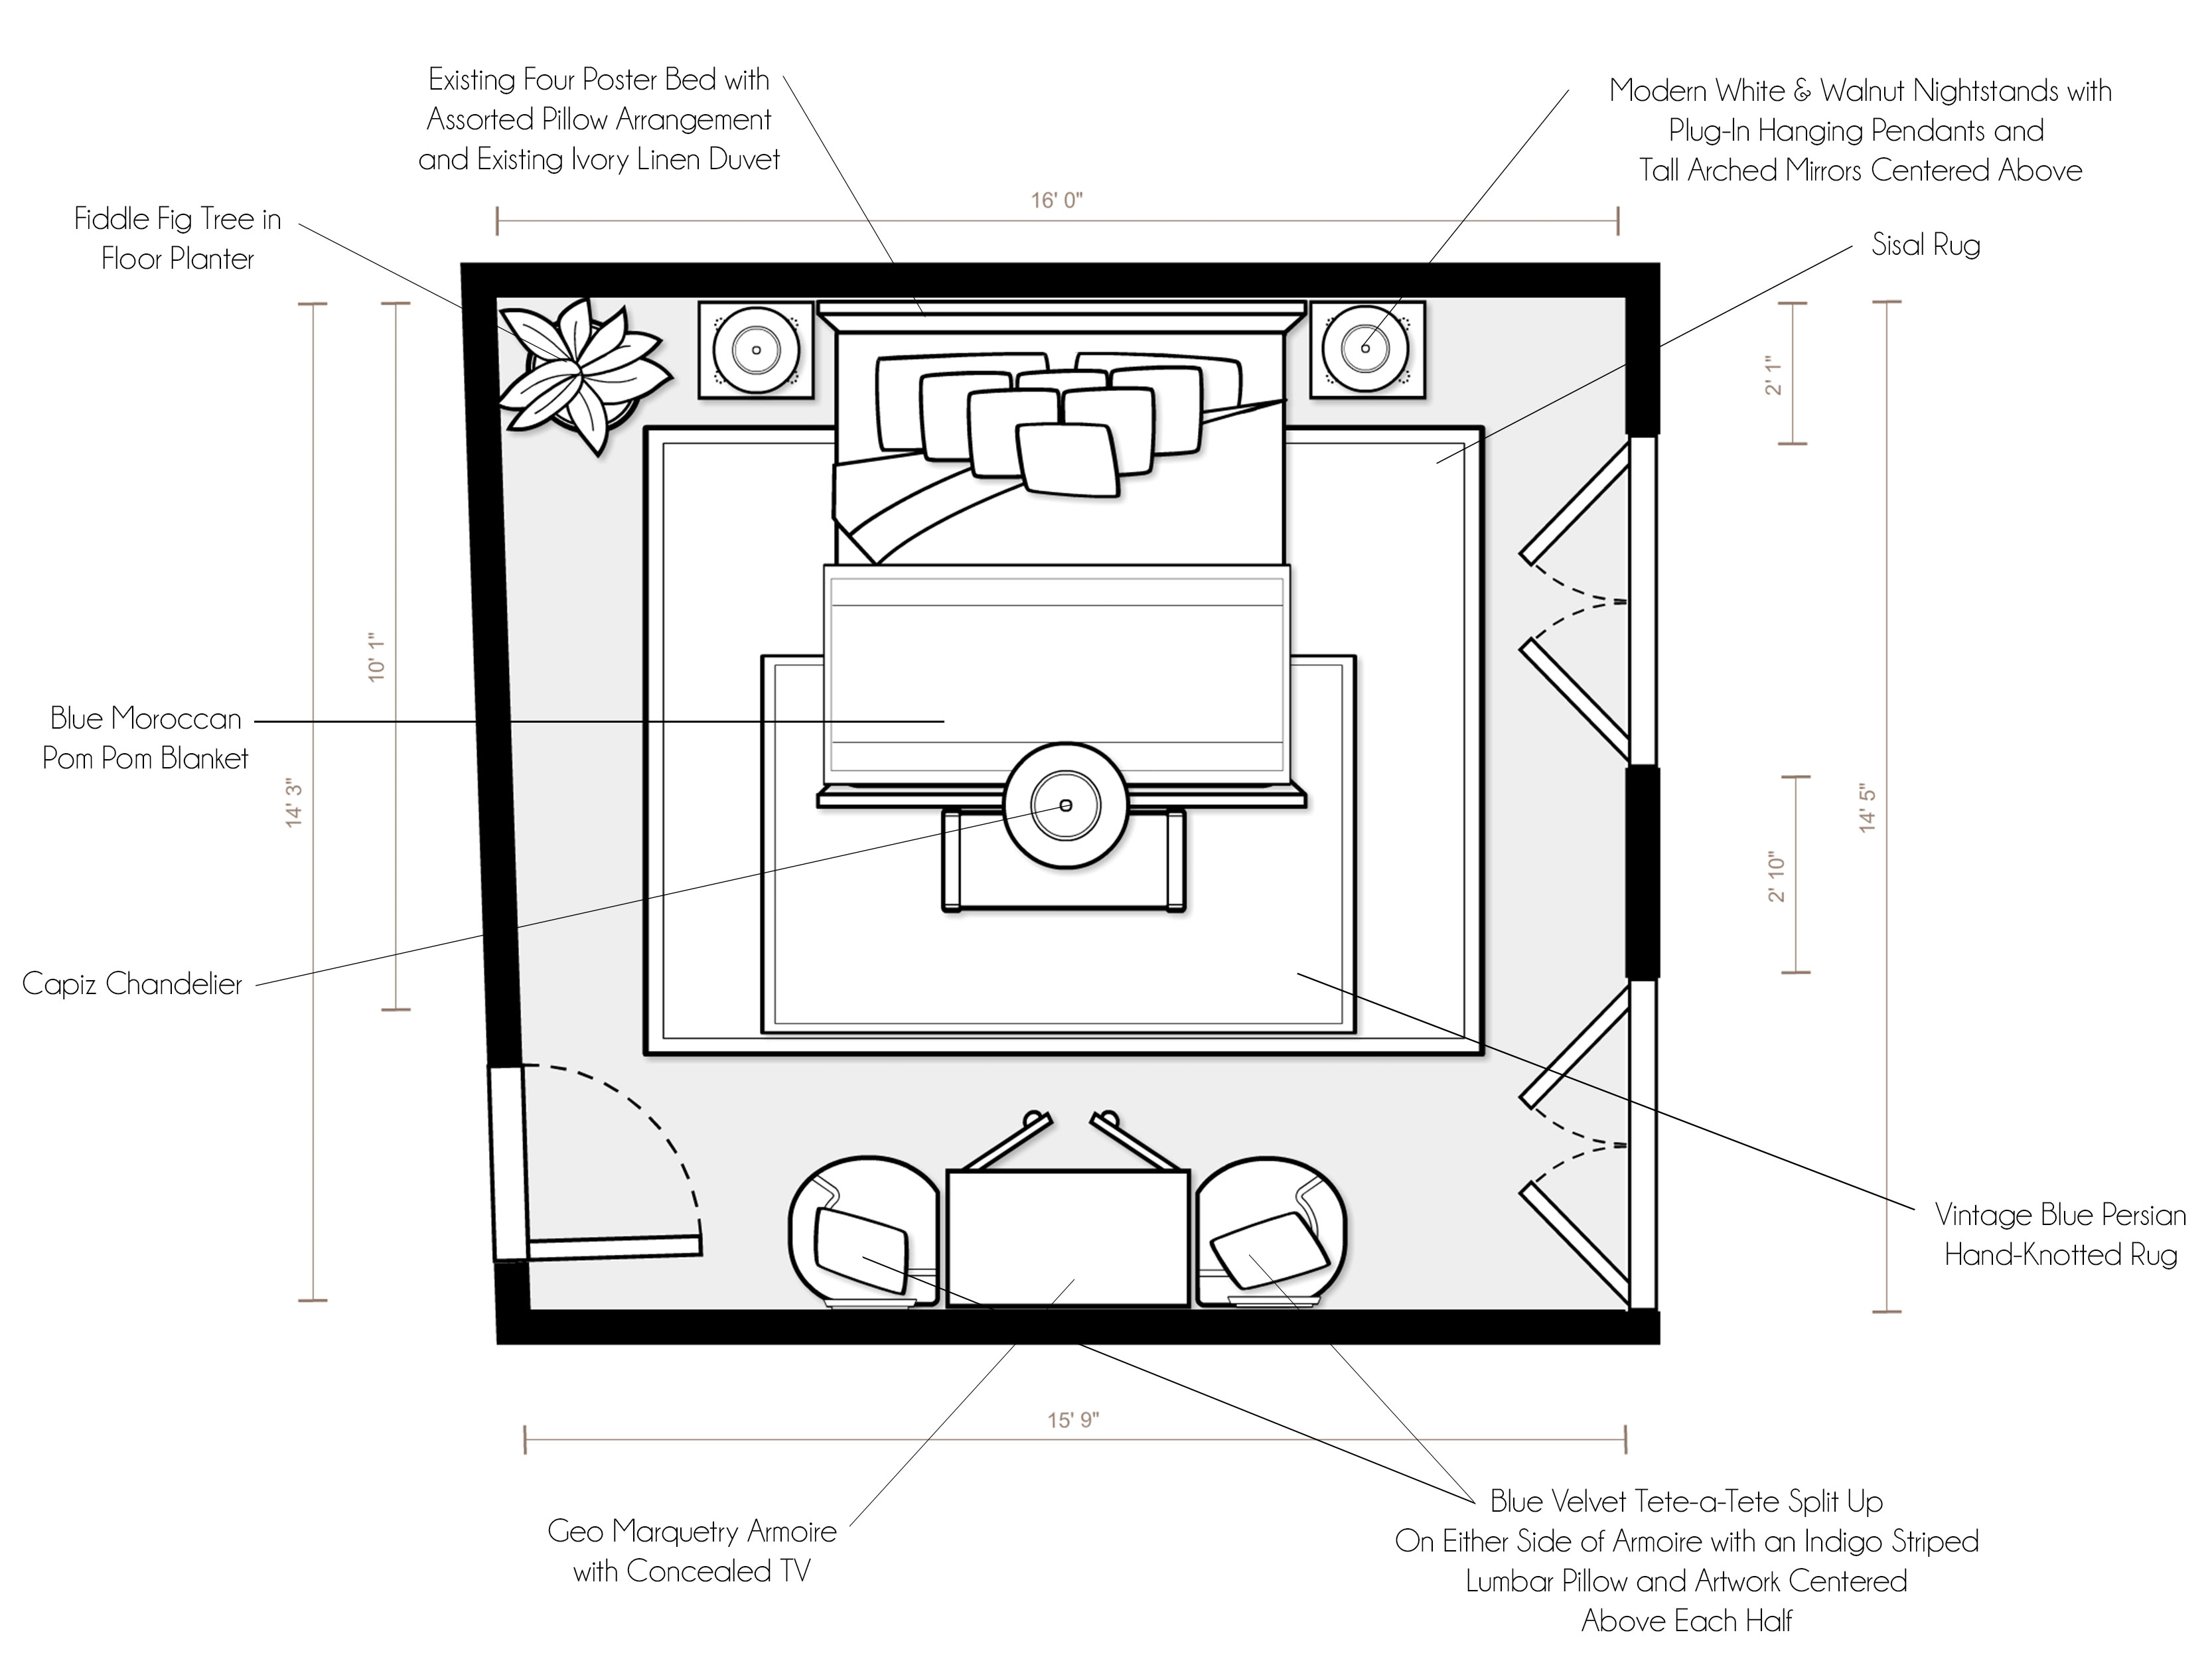
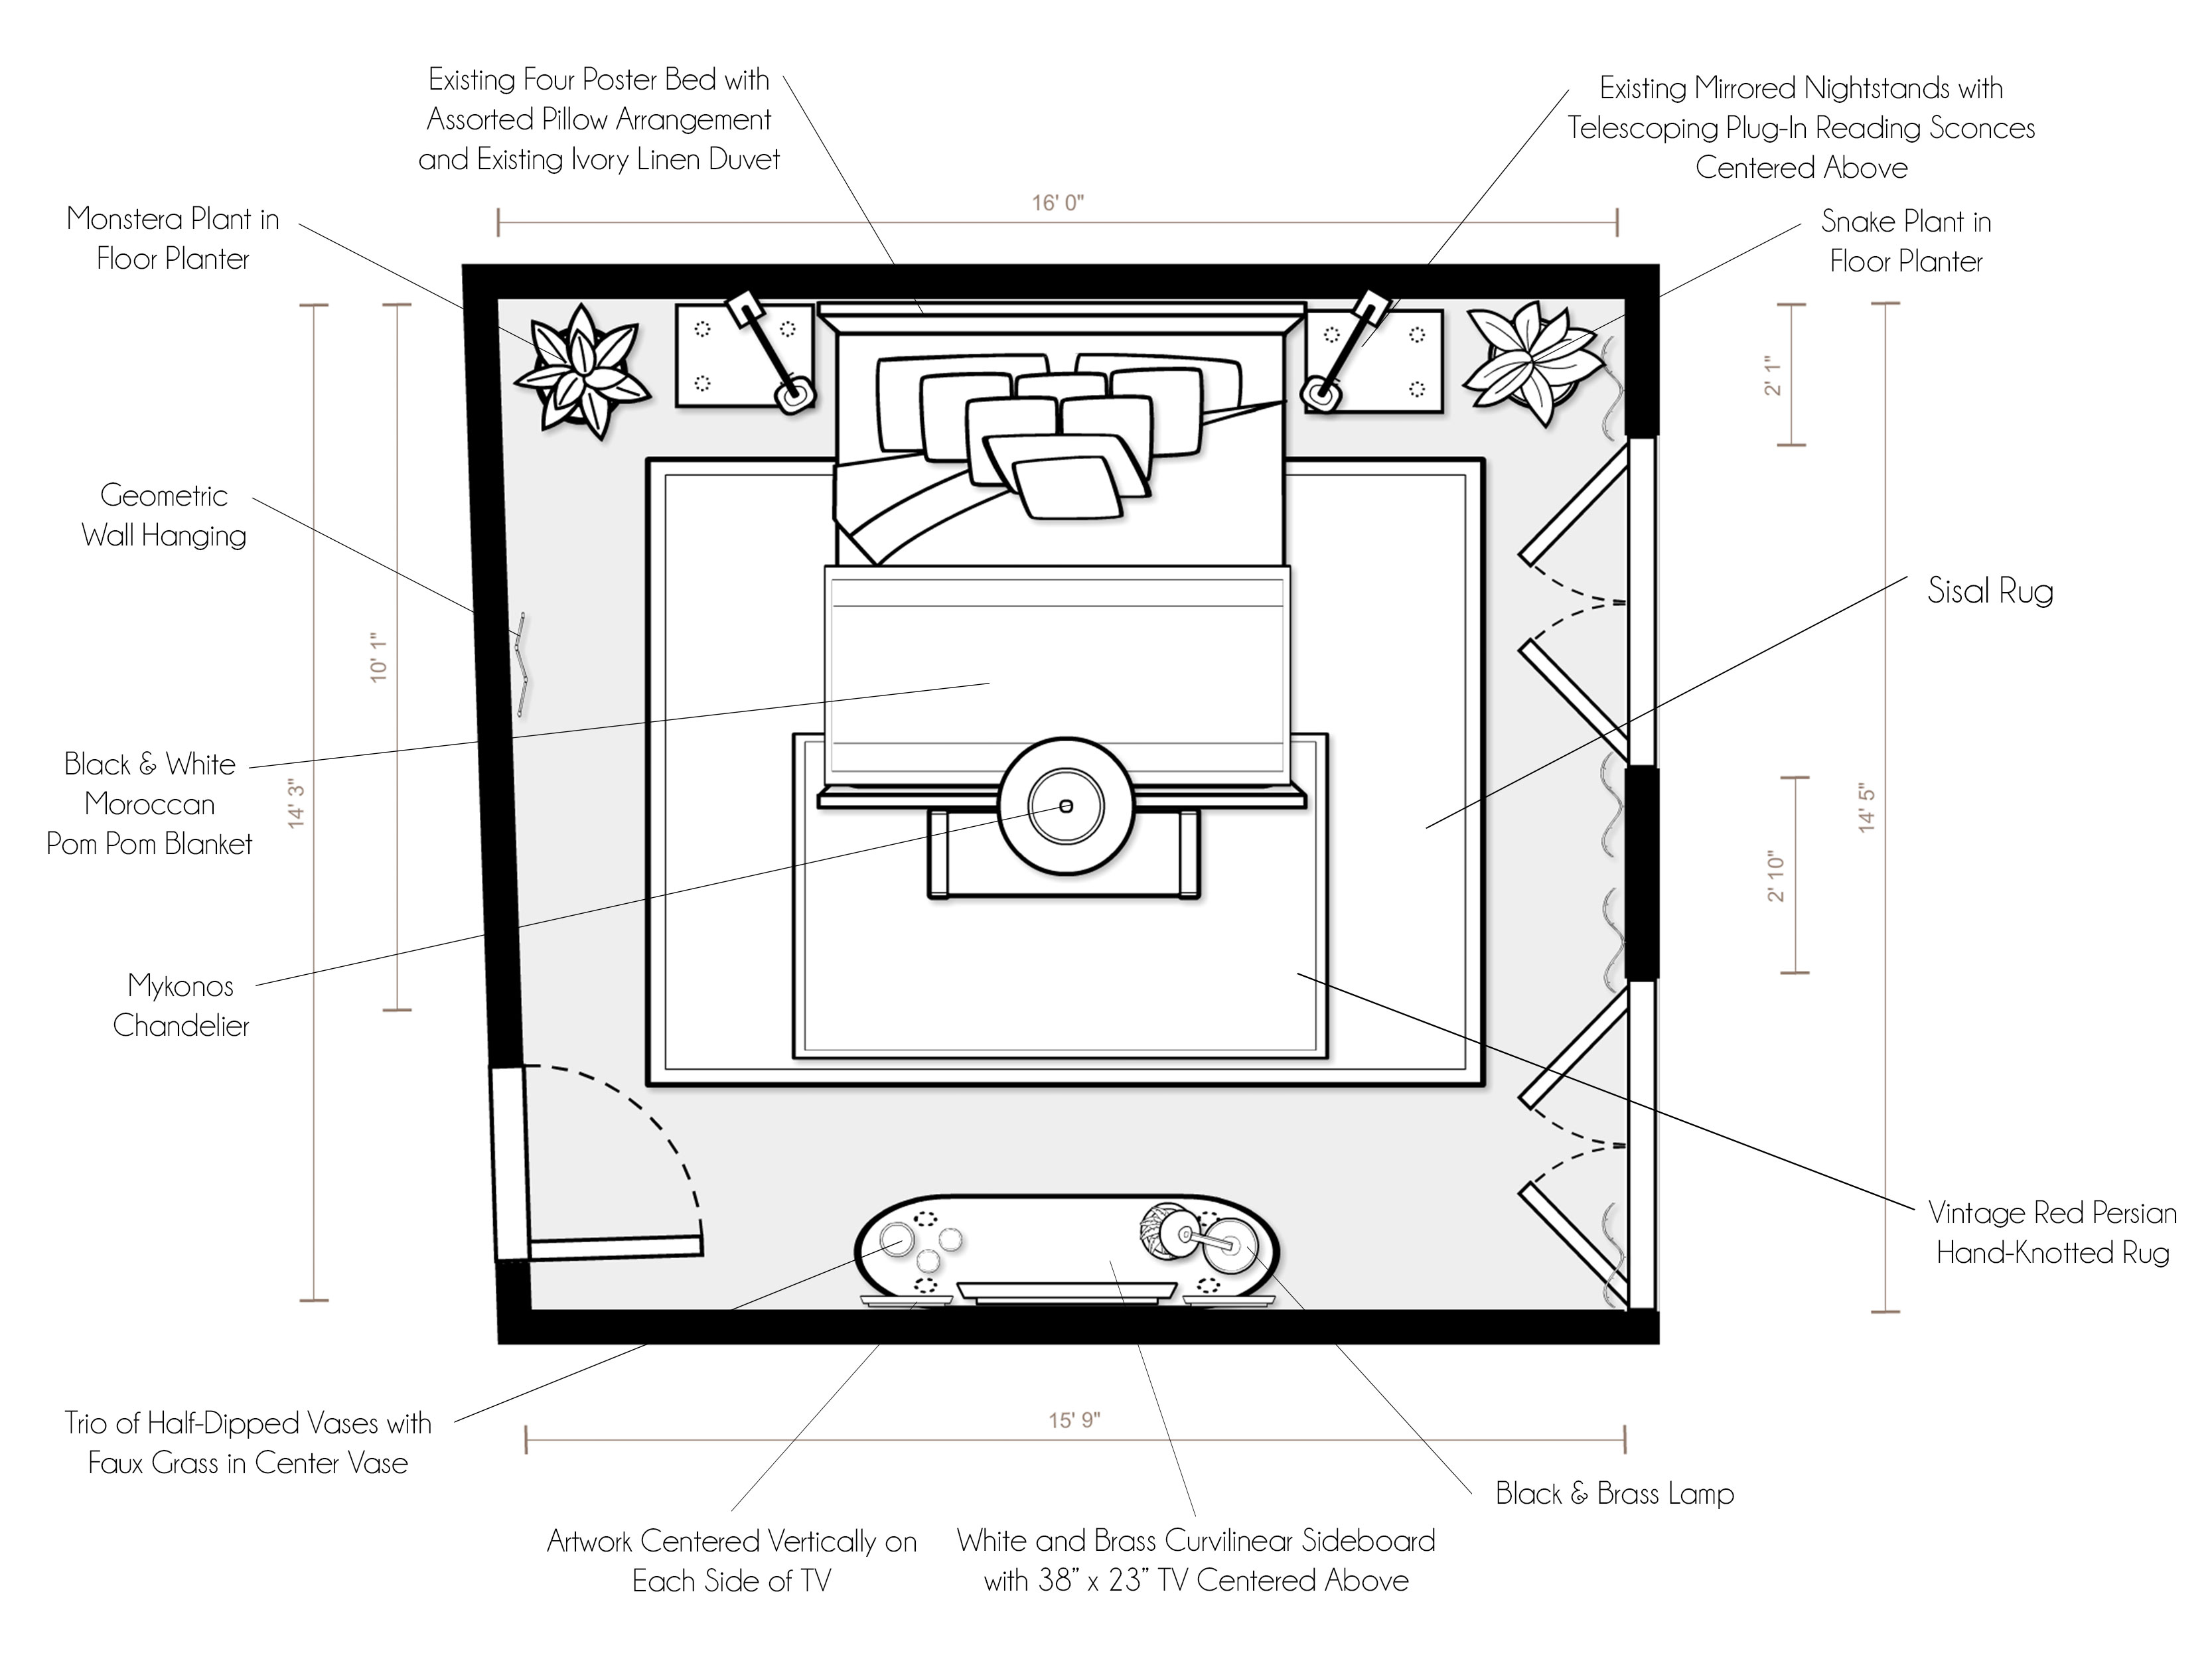
“Setup Instructions:
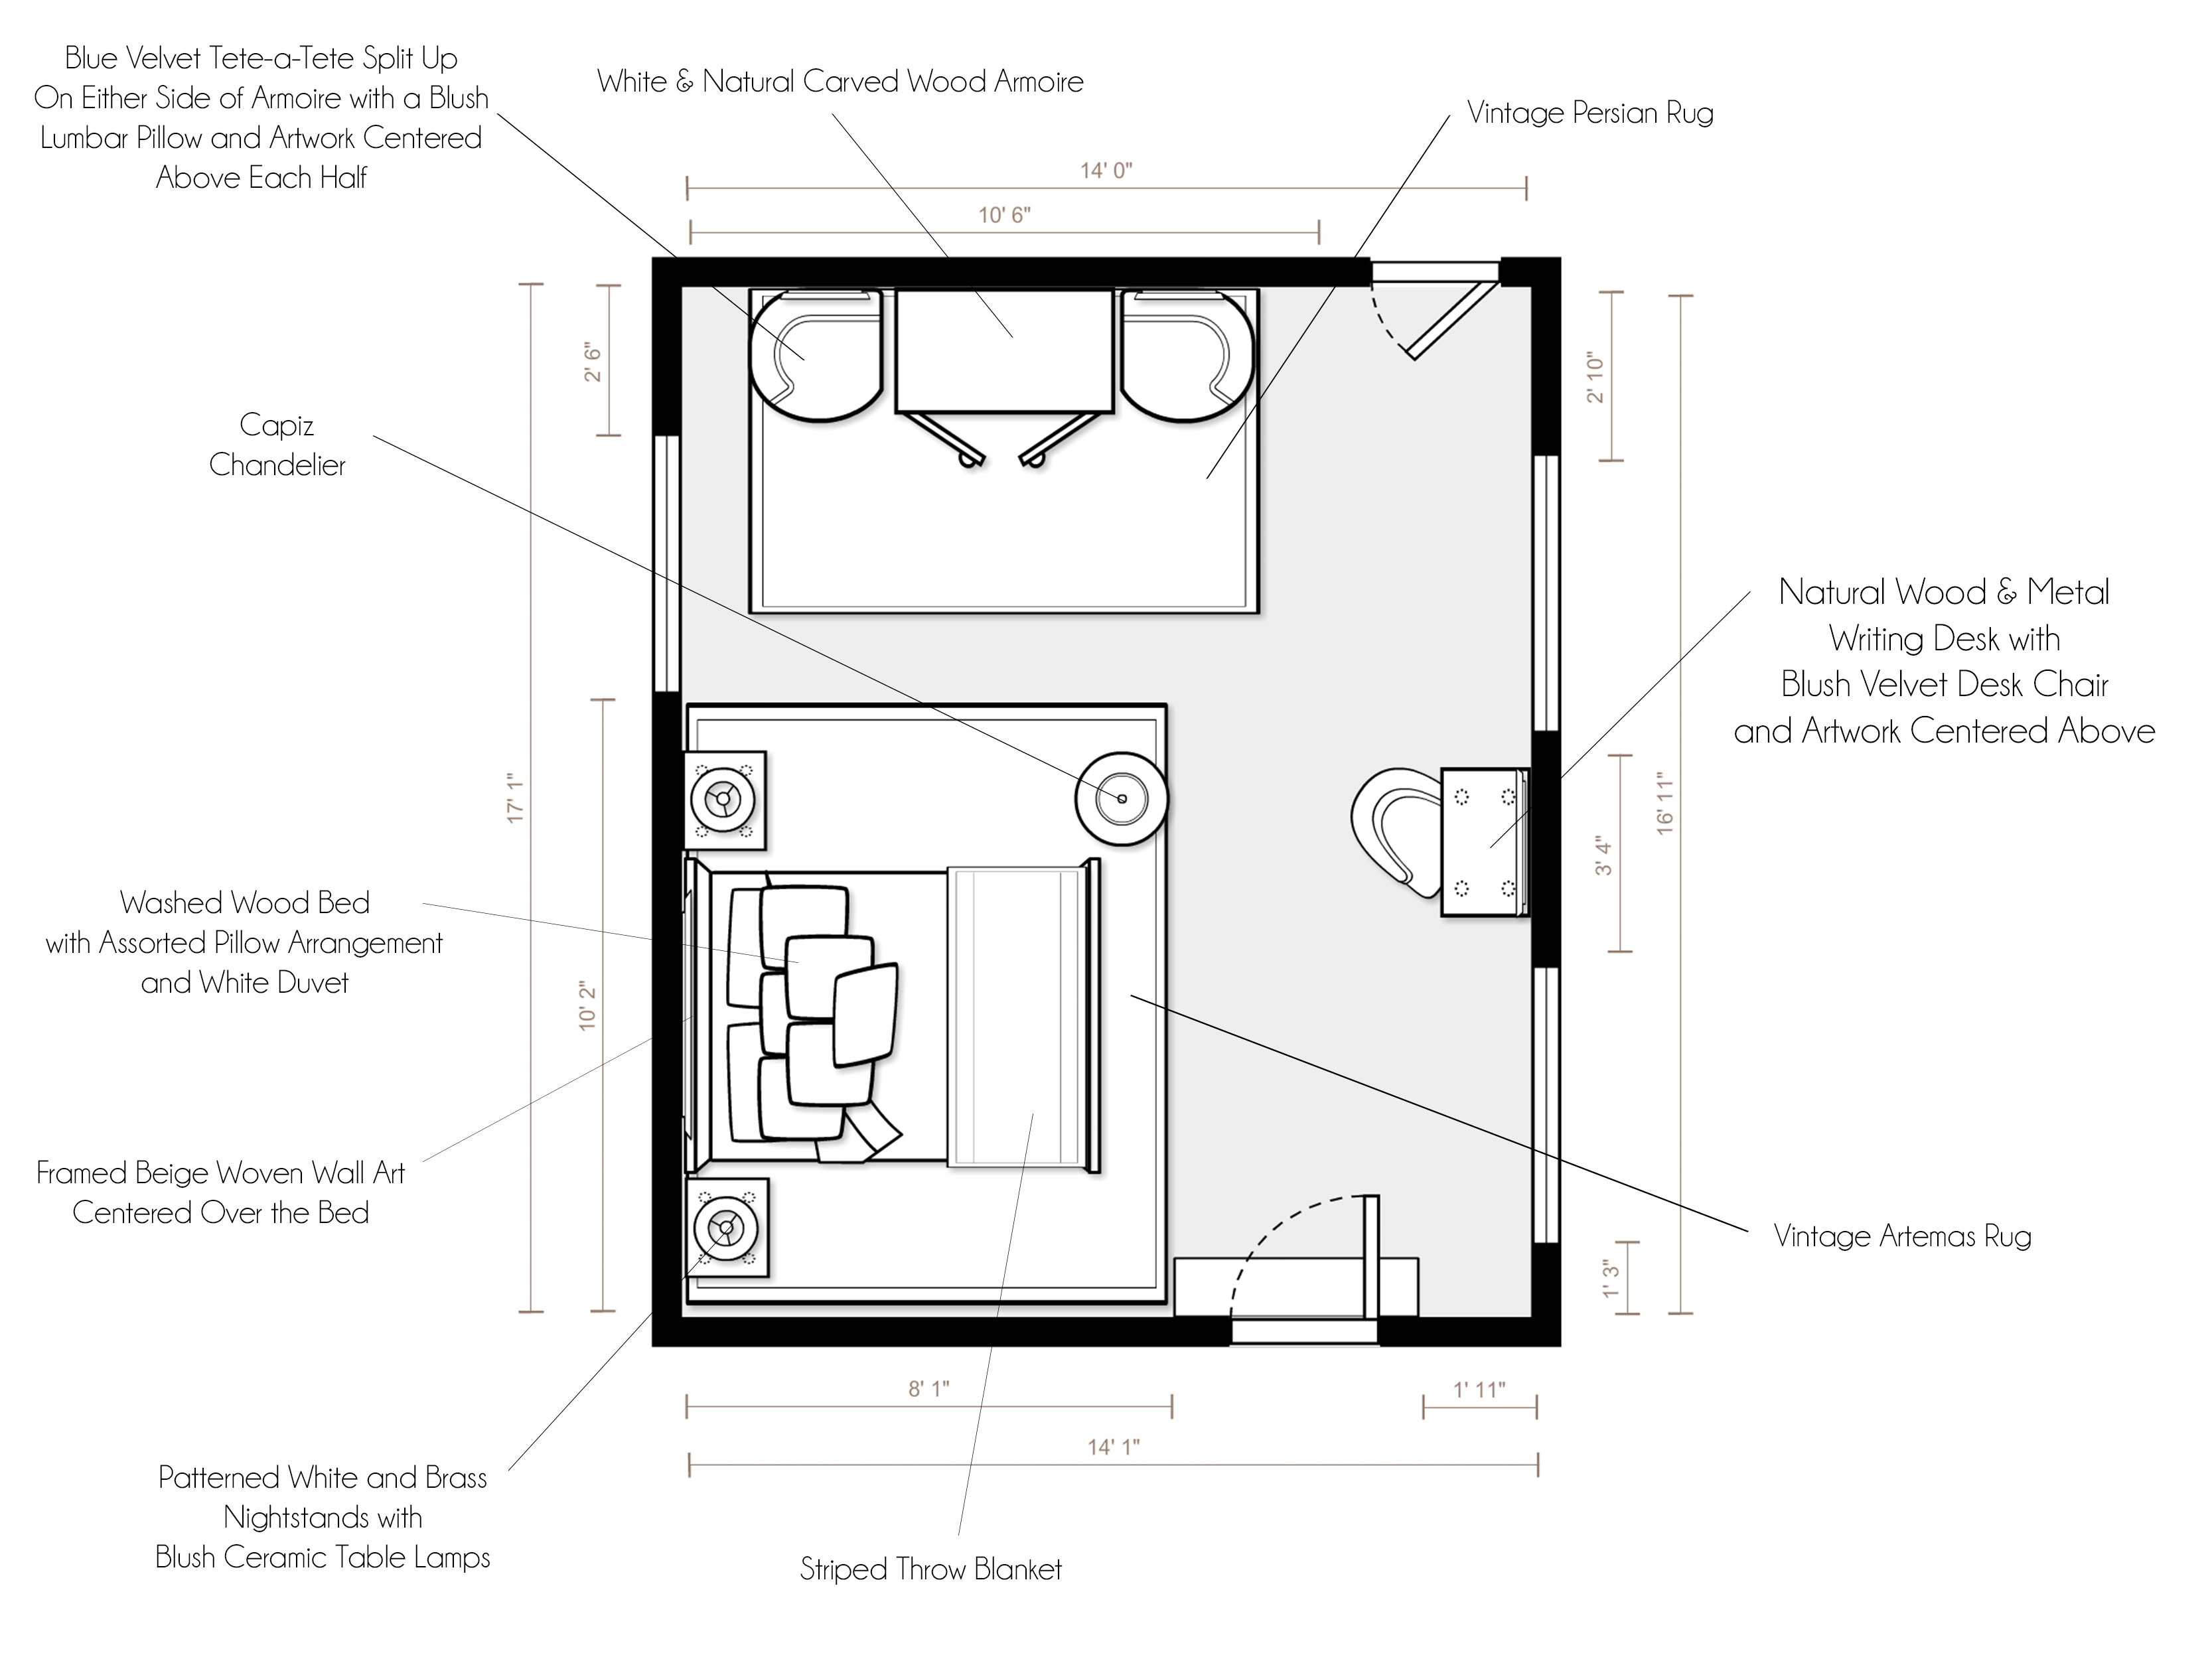
For specific product placement, please refer to your floor plan and renderings.
- Creating two stunning, well-defined areas in the space, as well as creating a sophisticated color palette, are the pair of amazing Persian rugs. The 8’x10′ rug fits snugly in the area next to the entrance, while the the smaller vintage rug is centered on the armoire wall with the door leading to the bathroom.
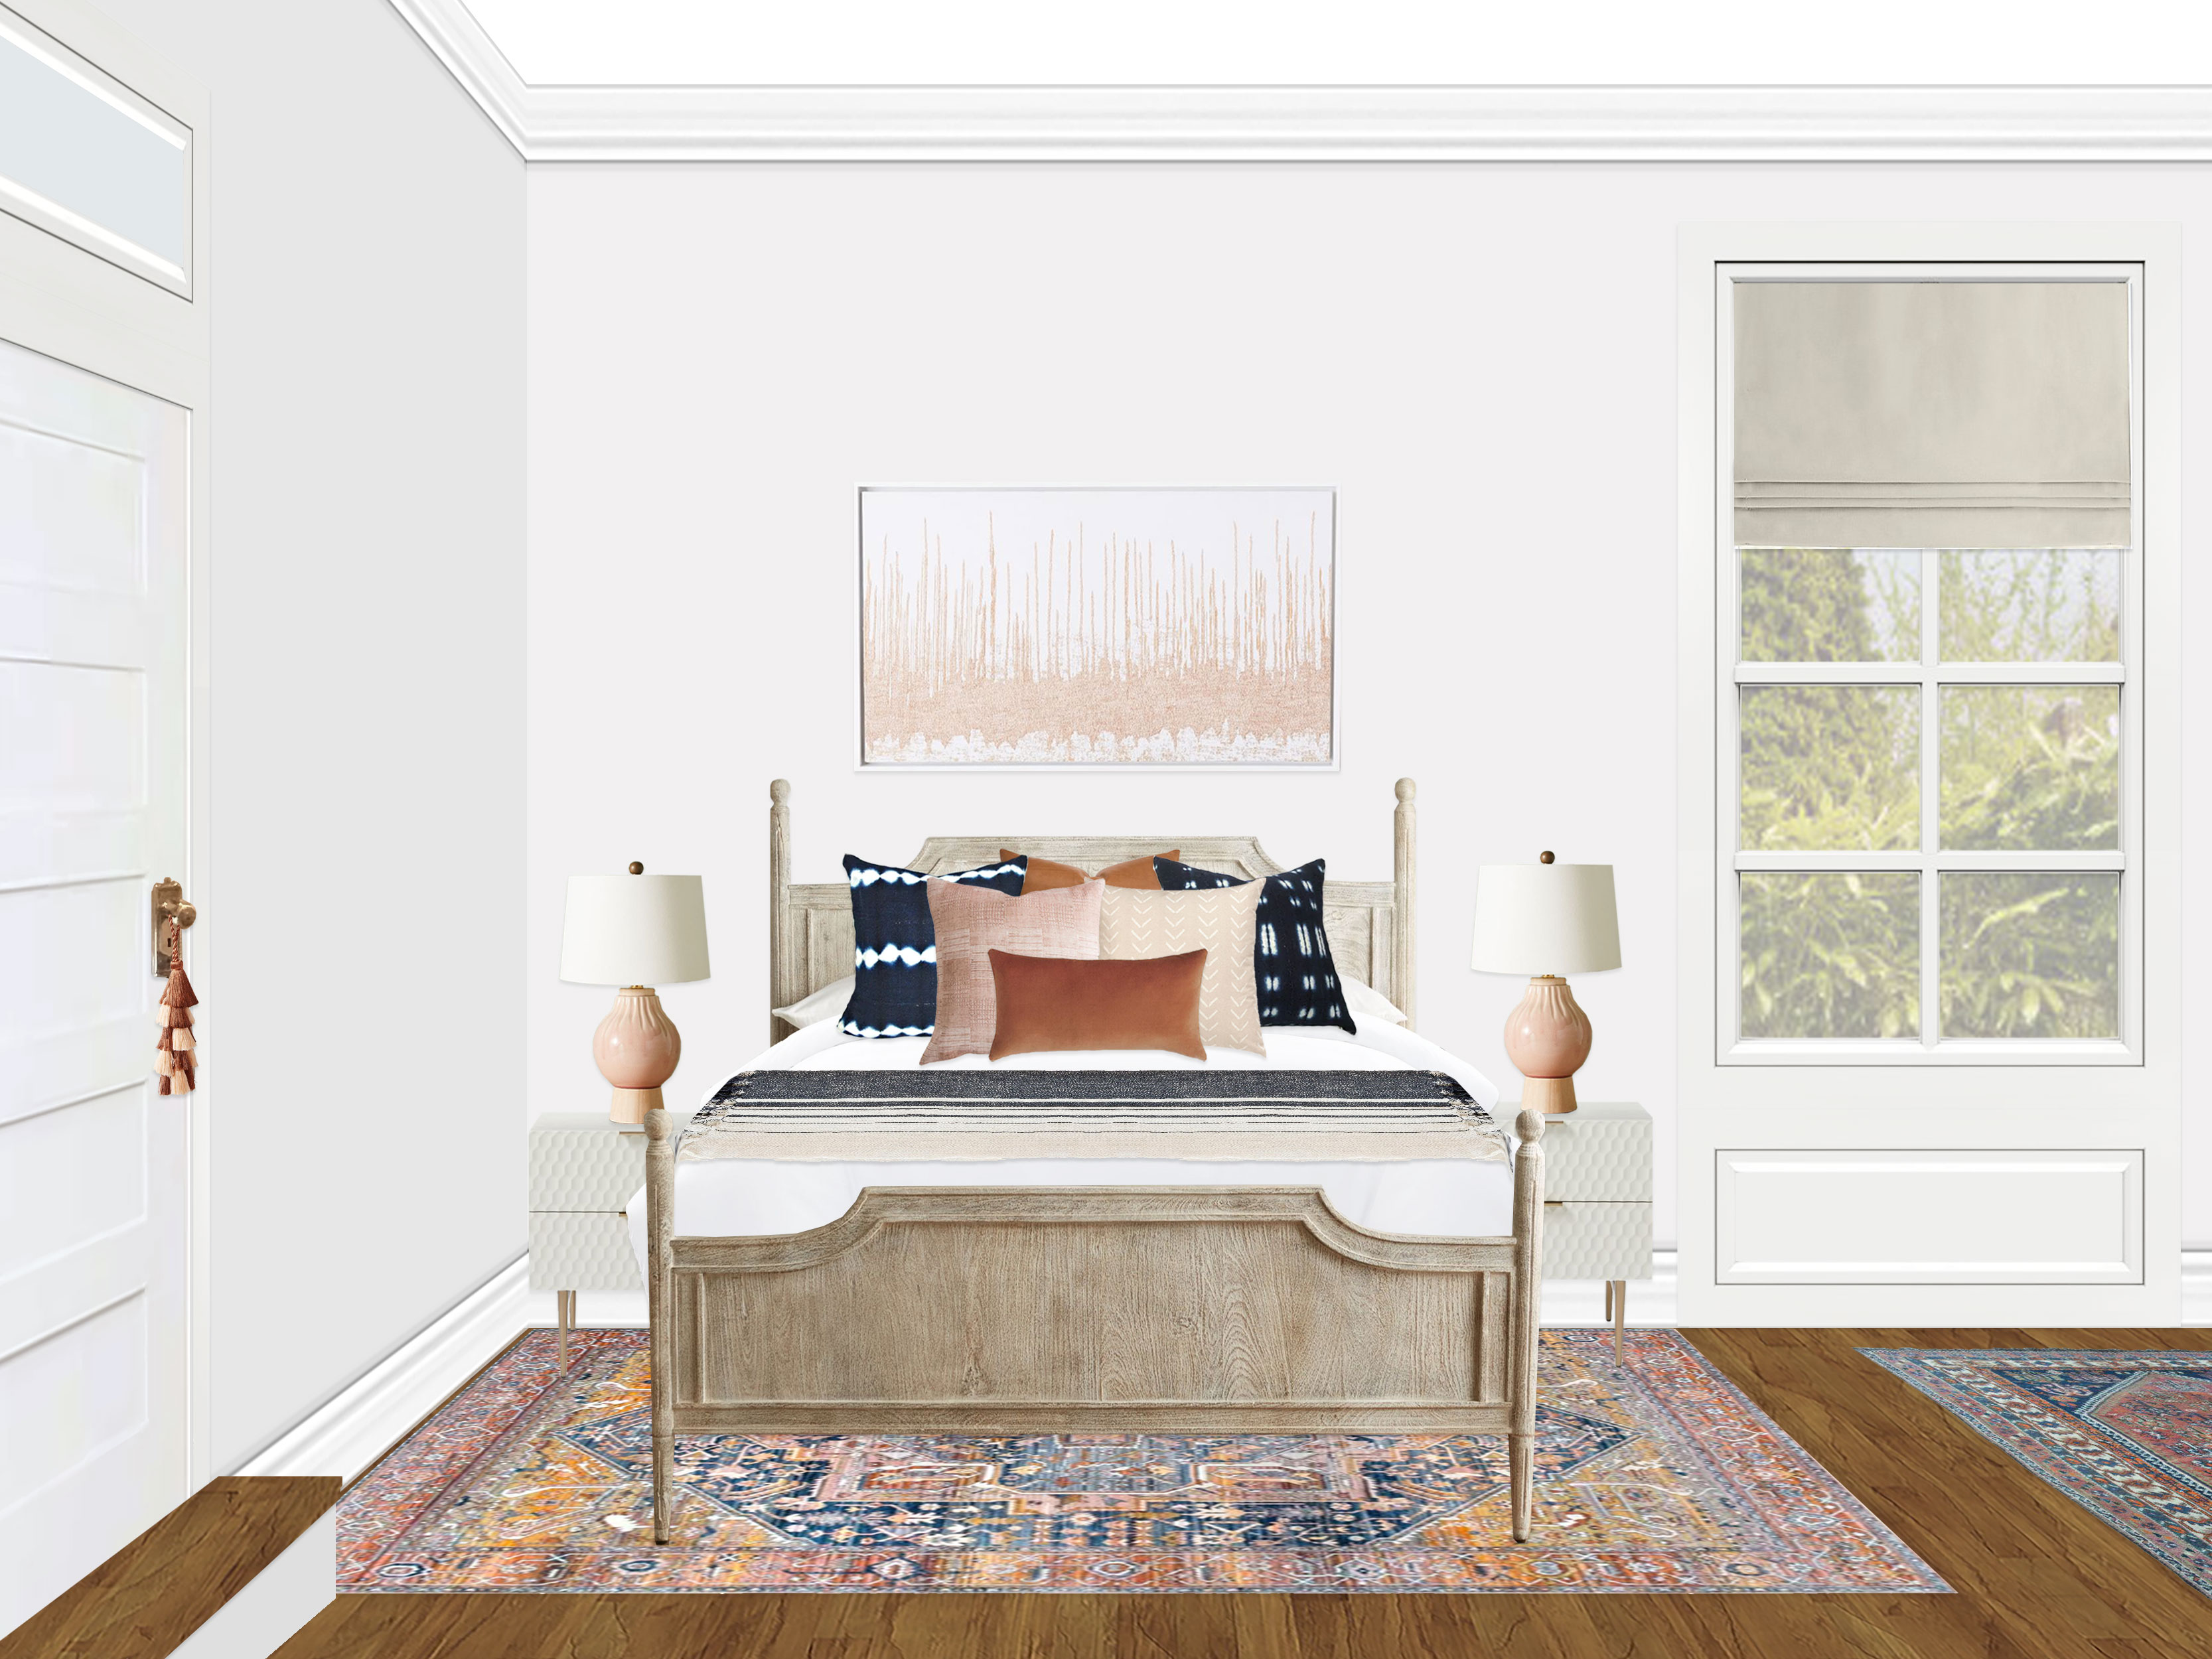
- Centered on the larger 8’x10′ rug, a gorgeous washed wood bed is the centerpiece of this luxurious sanctuary! Floating on either side of the bed are two lovely parchment lacquered geo nightstands. A pair of blush ceramic lamps sit on the nightstands, framing the bed.
- Giving the bed personality, texture, and coziness are an assortment of printed and textured pillows (please see the rendering for recommended placement), as well as a gorgeous indigo and ivory striped blanket. These all sit on top of a crisp white linen duvet.
- Completing the bed wall is the spectacular framed woven wall hanging in a gorgeous rosy beige, which gives the space a modern yet handmade and natural feeling.
- Hanging on the inside doorknob of the entrance door from the hall is a perfect little tassel decor in tones of blush and cognac.
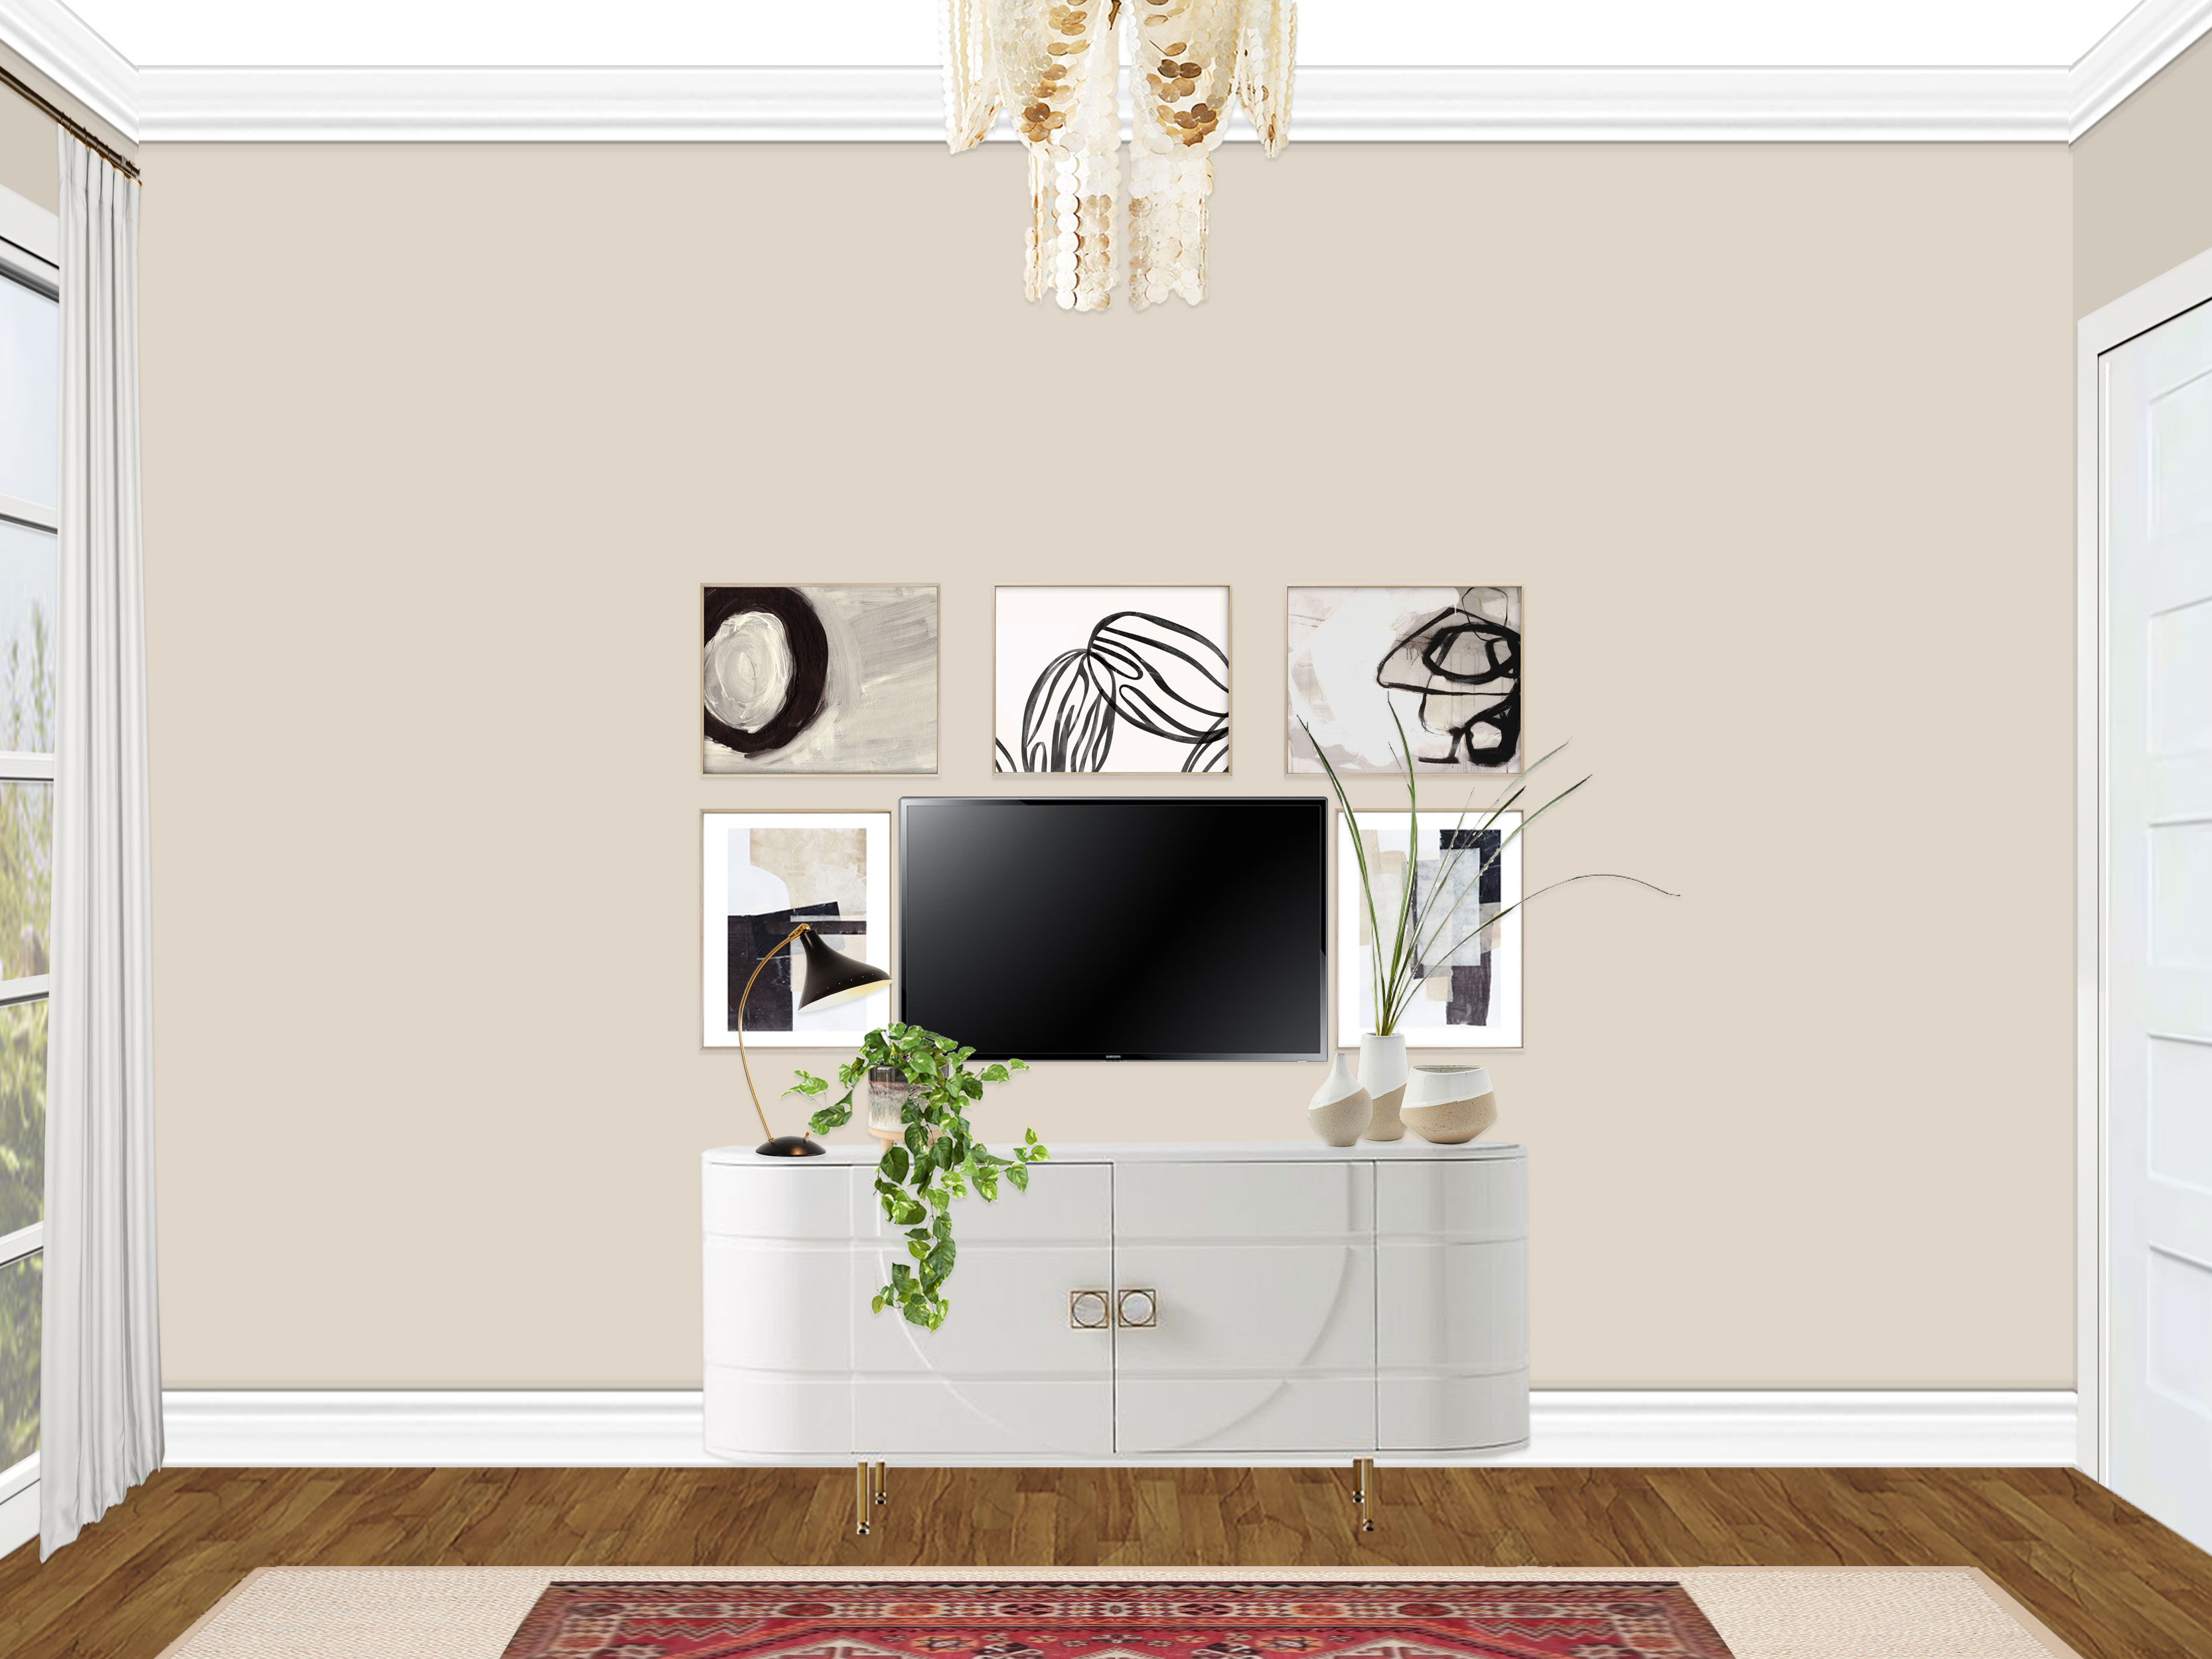
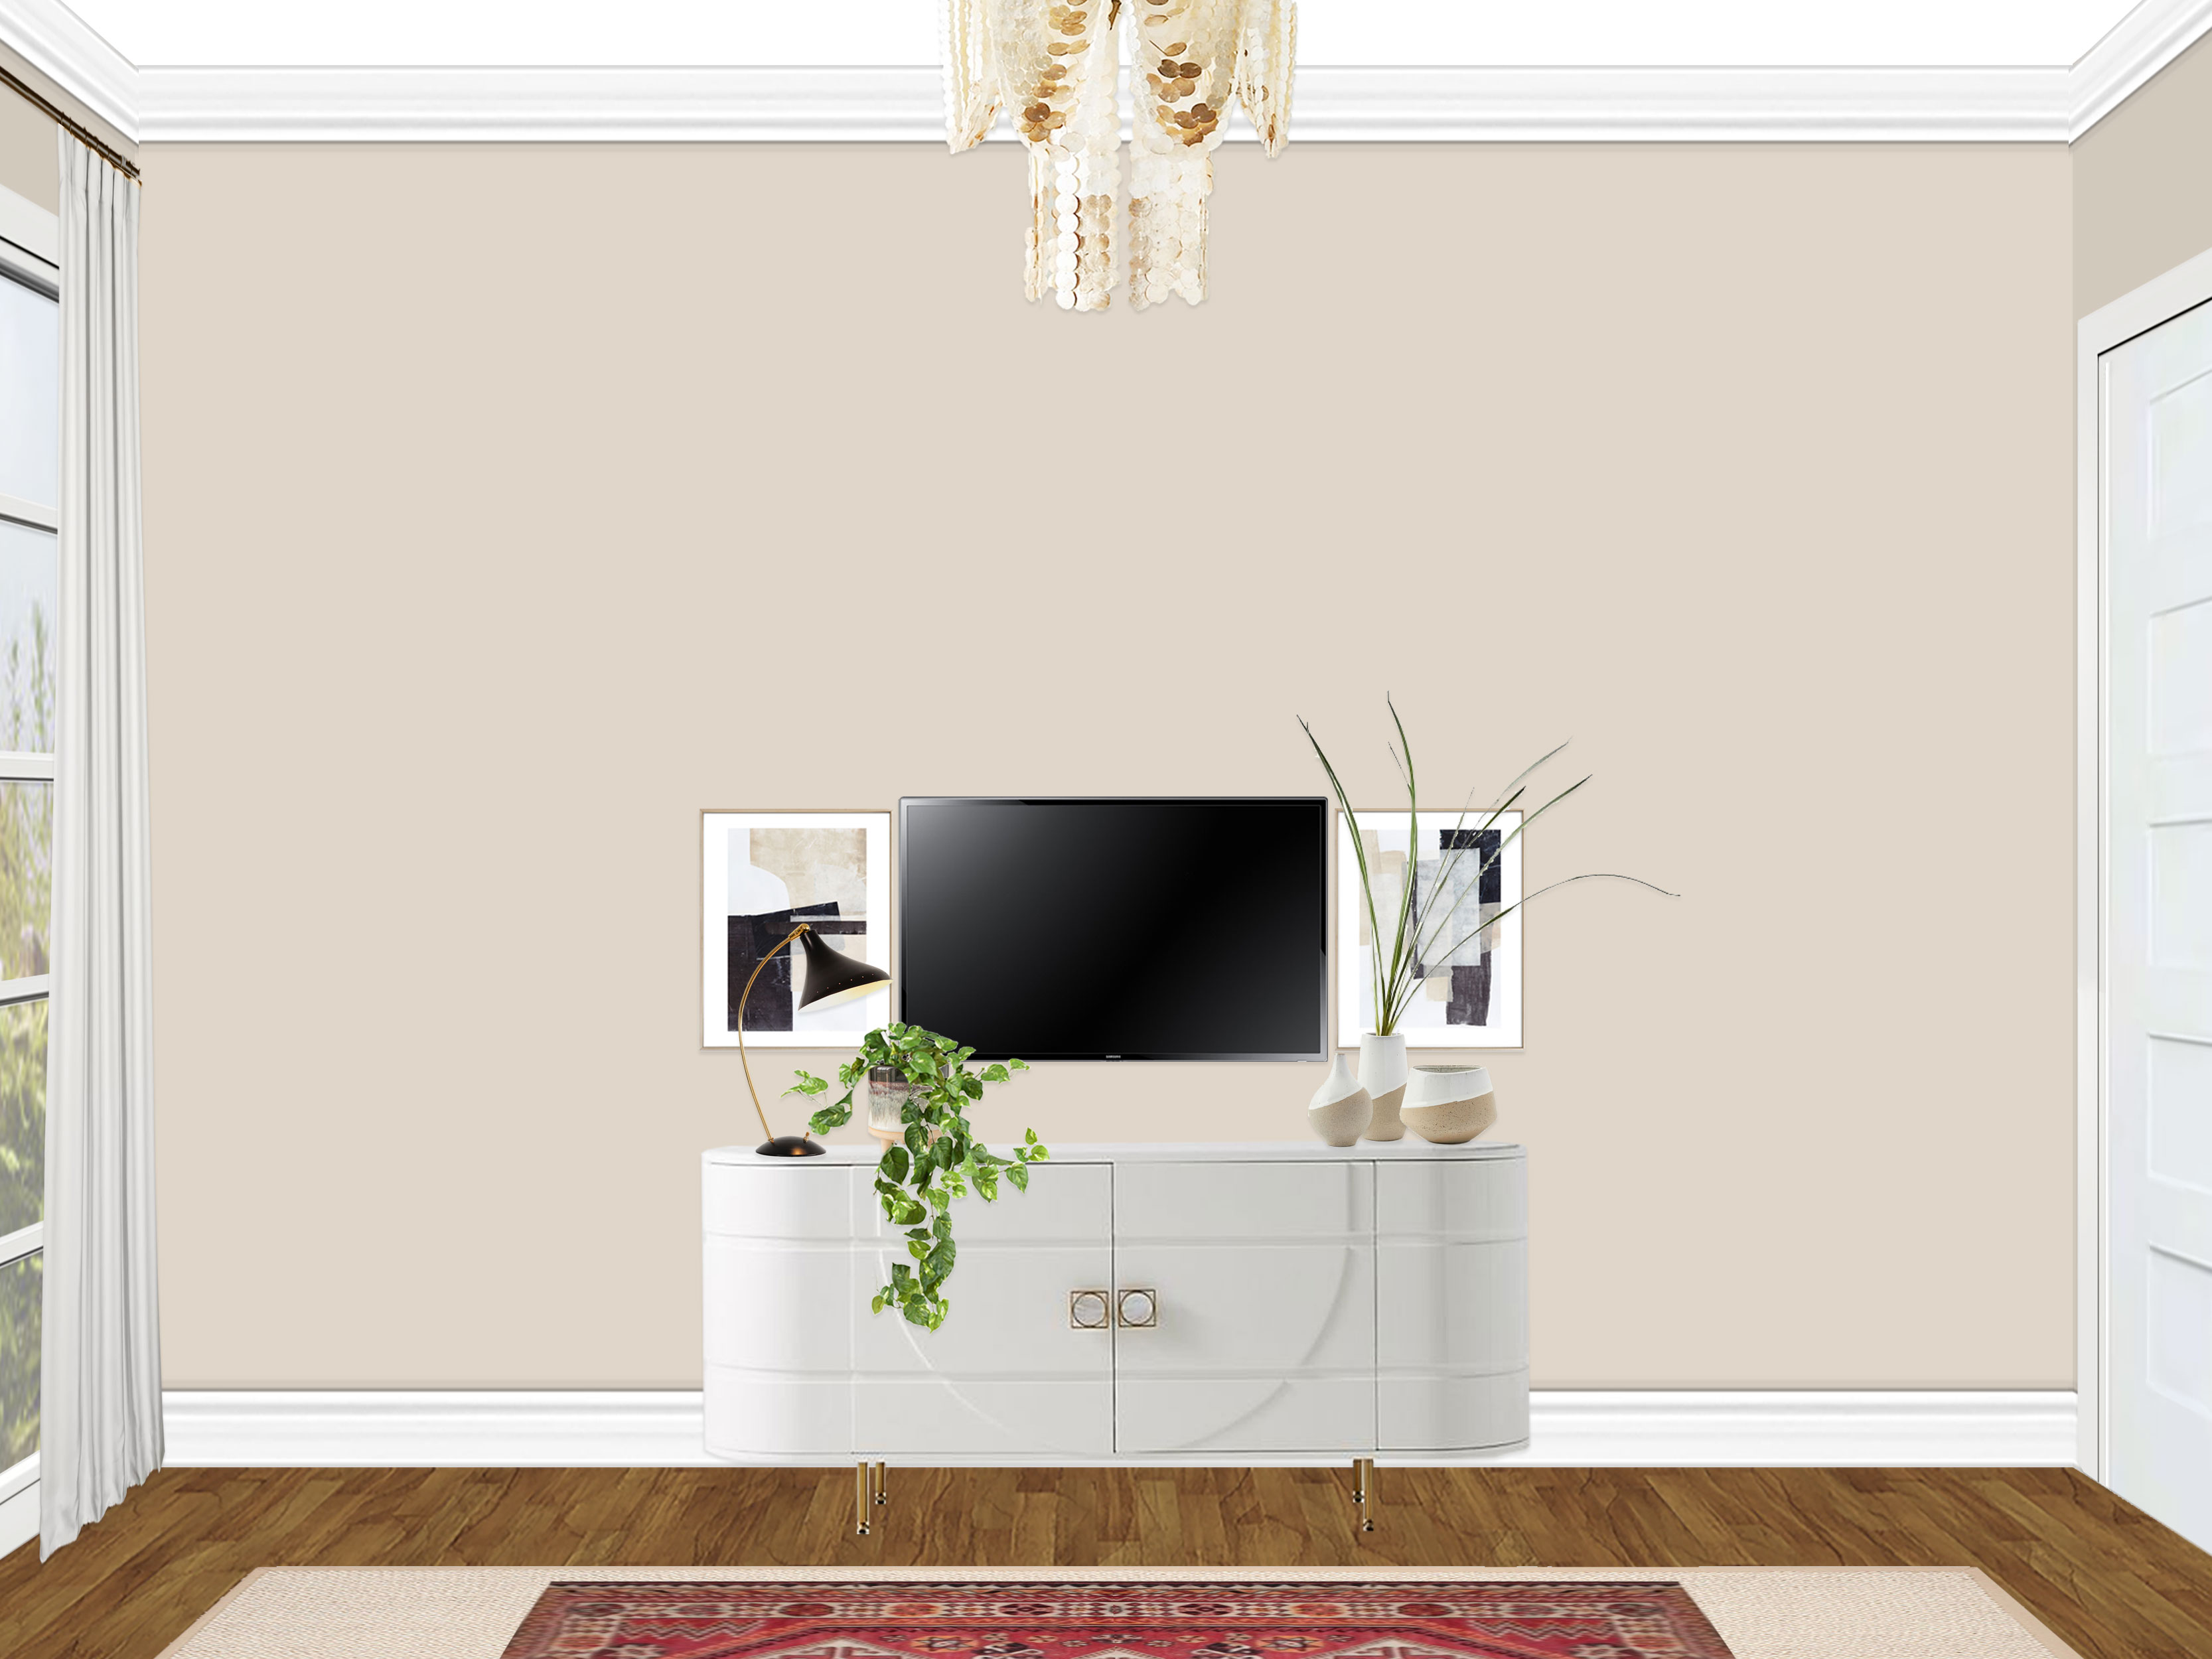
- Another wow moment in the space, a breathtaking carved wood armoire is centered on the wall with the door leading to the bathroom (and over the vintage rug) and is the first thing you see when you enter the room. Flanking the armoire are two halves of a marvelous indigo velvet tete-a-tete, creating a unique, elegant, and impactful his & hers seating arrangement around the armoire.
- Centered above each piece of the tete-a-tete are two complementary pieces of art from the same series. These help tie in all of the colors of the room, as well as create a nice balance to finish off the armoire moment. A planter with a pothos is perched on top of the armoire, breaking up the symmetry just enough!
- In one last convenient area for guests, a small natural wood and metal desk floats between the two windows on the wall opposite of the bed. A stunning large piece of blush artwork is hung over the desk and a dusty blush velvet desk chair with brass legs tucks right underneath. A gilded striped planter houses a ZZ plant on the desk to give the area a little life!
- The cherry on top is the stunning Capiz Chandelier! Since the ceiling is 120″ high and the fixture is 32.5″ high, I recommend hanging the chandelier right up at the ceiling to allow the maximum amount of clearance underneath (as guests will be walking underneath, so a 7′ minimum is advised). This will be 7′-3″ from the floor.”
I am really happy with the way it turned out! I think her guests will be wowed by both the elegant aesthetic and comfortable functionality of the space. It was so fun to work with Caroline on all of the projects we did together! What an exciting time to have purchased a home and are in the process of getting it all ready to welcome a new baby. Hopefully I made that process smooth and enjoyable for the mama-to-be! And as always, if anyone is interested in working with me on one of their rooms, you can purchase a package on my Decorist page using my friends & family promo code Designer233073 that allows you 30% off!
Have a great weekend everyone! :)